
Withdrawal
It is necessary to ensure good ventilation of the workplace and observe fire safety measures.
Attention: To remove the fuel quantity sensor, there must be no fuel in the tank. To do this, you must completely use up the fuel or pump out the fuel with a suitable pump into a large container or canister. Fuel vapors are poisonous and explosive, so ensure that the workplace is well ventilated.
Disconnect the negative cable from the battery, which is located in the trunk behind the right trim panel.
Remove the rear seat cushion.
Pull out the rubber bushing on the left or right under the seat. Cut the insulating mat with a sharp knife and fold it out.
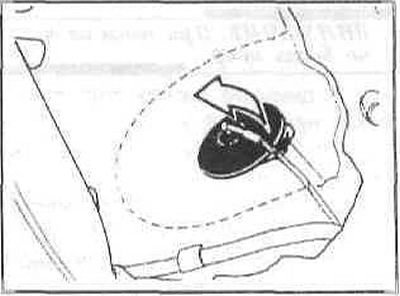
Loosen the fixing screws and remove the cover with gasket.

Right fuel tank sensor with fuel pump - removal
Loosen the screws and remove the cover.
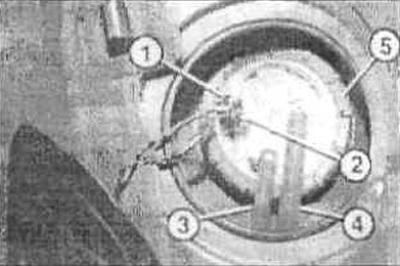
1 - fuel pump plug;
2 - fuel quantity sensor plug;
3 - fuel hose for supply from the pump;
4 - fuel hose for heating (if there).
Remove plugs (1) And (2), releasing the latches by compressing them.
Tag fuel hoses (3) And (4) and remove them from the fuel quantity sensor, after loosening the clamps.
Attention: The fuel system is under pressure, so the hose must be pulled off slowly and the spilled fuel must be collected with a rag.
Loosen the union nut by gently tapping it by turning it to the left. You can use the device, but a wooden block is also quite suitable.
Caution: There should be no sparks.
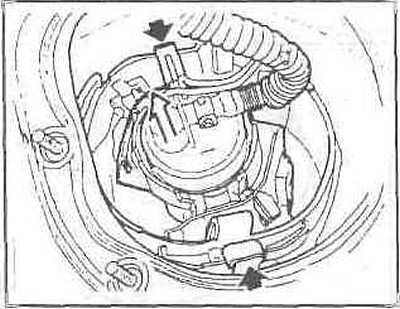
Lift the fuel tank sensor, tilt it to the side and remove it. Place a rag to collect dripping fuel.
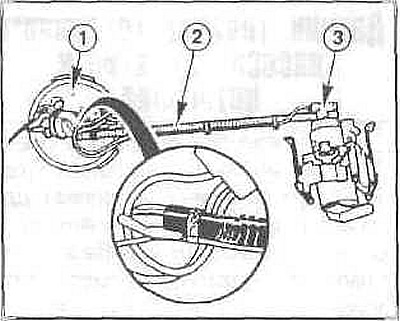
Squeeze the fuel pump retainer (black case). Pull the fuel pump out of the submerged assembly (white case).
Disconnect two plugs (1) from the fuel pump.
Loose wire bands (2). Loosen the spiral hose clamp, carefully pull the hose off the fuel pump.
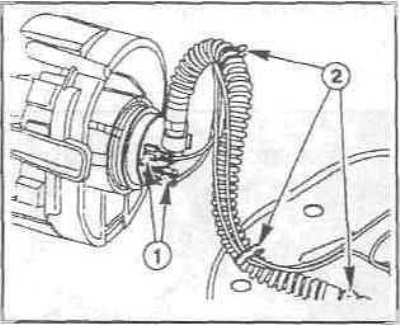
Attention: The wire strips are at the level of the white marks, which must be taken into account during installation.
Left fuel tank sensor - removal
Loosen the screws and remove the cover.
Remove the plug from the sensor, for which release the lock by squeezing it.
Loosen the clamp, pull the fuel hose off the fuel tank sensor.
Caution: The fuel system is pressurized, so retract the hose slowly and catch any escaping fuel.
Loosen the union nut by gently tapping it by turning it to the left. You can use a special device, but a wooden block is quite suitable.
Caution: There should be no sparks.
Pull the sensor out a little. From the underside, squeeze the two tabs for the pump tube and pull off the tube. Take out the sensor. At the same time, place a rag to collect the escaping fuel.
Installation
Caution: Be sure to replace the O-rings for the sensor.
Left sensor: insert the sensor and hold it about 5 cm above the tank. Fasten the pump pipe.
Right sensor: fix the fuel pump on the sensor and put on the plugs.
Before installing the spiral hose (black spare part with white alignment marks) align the wire (2) between sensor (1) and fuel pump (3), to avoid strong tension.
Align the sensor by turning it. In this case, the protrusion on the upper part of the sensor should fit into the recess on the tank. The sensor must be positioned vertically in the tank, the lower probe must be in the center on the bottom of the tank.
Fit the cap nut and tighten to 35 Nm. In this case, the swivel mount should snap into place with a sound with a protrusion in the corresponding recess on the tank.
Put on the fuel hoses in accordance with the marks made earlier and secure them with new clamps.
Put on the plugs and secure them.
Install the cover and fasten it with screws, paying attention to the correct fit of the gasket.
Install the rear seat cushion.
Connect the negative cable to the battery.
Check the operation of the fuel gauge on the instrument panel.