
- Home
- BMW 5 Series
- E28
- Power unit
- Supply system
- Removal and installation the fuel pump, intermediate pump and fuel level sensor
Removal and installation the fuel pump, intermediate pump and fuel level sensor (BMW 5 Series E28)
Fuel is extremely flammable, so take extra precautions when working on any part of the fuel system. Do not smoke, do not allow open flames or bare lamps near the work area, and do not work in a garage where natural gas equipment with a wick is used.
Fuel pump (carburetor engines)
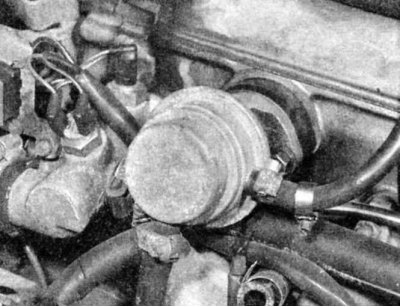
1. Disconnect the negative battery cable. Disconnect both hoses from the pump and loosen and remove the two mounting nuts.
2. Carefully remove the fuel pump from the cylinder head. If it is jammed, you can lightly hit the thick spacer with a wooden block.
3. Remove the two thin spacers.
4. The fuel pump is sealed and replacement of internal components is not possible. In case of internal failure, the pump is replaced.
5. Installation is the reverse of the removal procedure, however, replace the thin shims on both sides of the spacer and tighten evenly to the specified Table of sizes and adjustment data at the end of the Manual with the force of the nut. Do not change the thickness of the spacer under any circumstances, otherwise the operation of the pump will be impaired.
Fuel pump (engines with injection system)
On later models with the Motronic system, the fuel pump is located inside the fuel tank or near the fuel tank on models with the L-Jetronic system. Early models also have a transfer pump located in the fuel tank. The transfer pump feeds a more powerful main pump, which provides the high pressure required for the fuel system to function properly.
On early models, the fuel level sensor is located in the fuel tank along with the intermediate pump, and on later models, along with the main fuel pump.
1. Relieve the pressure in the fuel system (see section Relieving pressure in the fuel injection system) and to relieve pressure in the fuel tank, unscrew the filler cap.
2. Disconnect the negative battery cable.
If your vehicle's radio is equipped with an anti-theft system, make sure you know the correct activation code before disconnecting the battery. Refer to Section 1 for information before disconnecting the wire Anti-theft audio system and instrument cluster language.
If a message in another language appears on the instrument cluster display after connecting the battery, refer to Section 1 for the language setting procedure Anti-theft audio system and instrument cluster language.
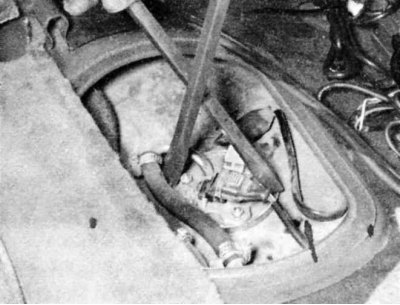
Externally mounted fuel pump
1. Raise the vehicle and place it on stands.
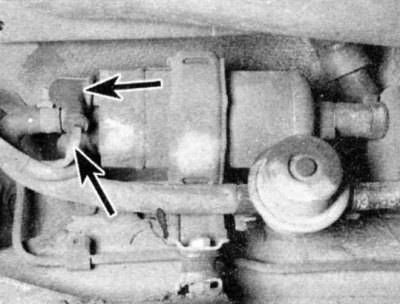
2. Remove the two rubber covers (indicated by arrows), protecting the fuel pump connectors and disconnect the cables from the pump.
3. Use hose clamps to pinch the fuel lines on both sides of the fuel pump. If clamps are not available, wrap a rag around the lines and use self-locking pliers to tighten them just enough to stop the fuel from flowing out.
4. Disconnect the hoses from the fuel pump.
5. Remove the fuel pump mounting screws and remove the pump from under the vehicle.
6. Installation is the reverse of the removal procedure.
In-tank fuel or intermediate pump
On some models, the fuel pump is accessed by removing the rear seat. On other models, access is gained by removing the cargo area carpet.

1. Loosen the fuel pump cover screws (indicated by arrows) and remove the cover from the floor of the car (on some models the fuel pump is located under the rear seat, on others - in the luggage compartment).
2. Remove the cover.
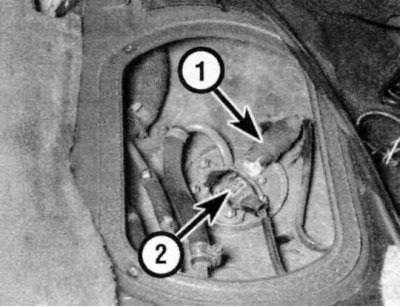
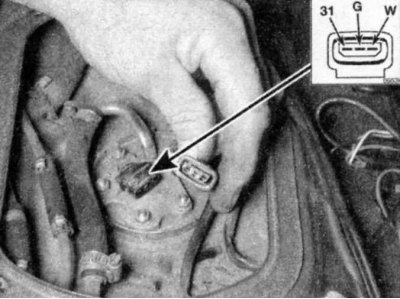
3. Locate the electrical connectors of the fuel pump (1) and fuel level sensor (2) and disconnect them.
4. To detach the connector, hook the bracket so that the protrusion aligns with the groove and remove the connector from the assembly
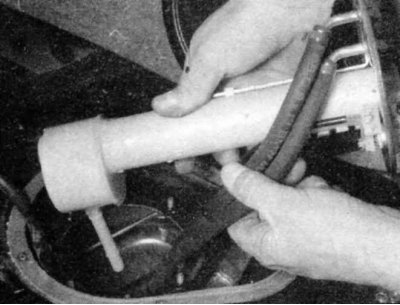
5. Also disconnect the inlet and outlet fuel lines.
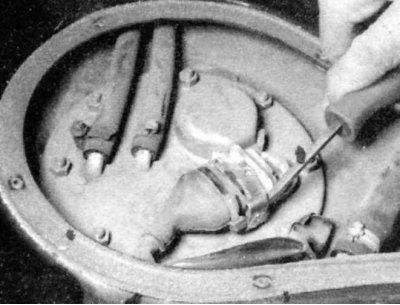
6. On models with a lock, use two screwdrivers to unscrew the unit from under the protrusions
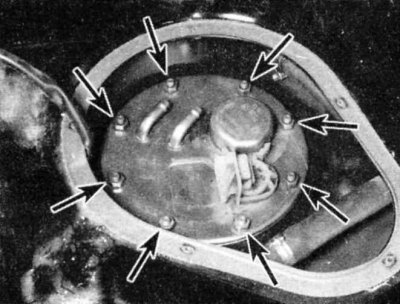
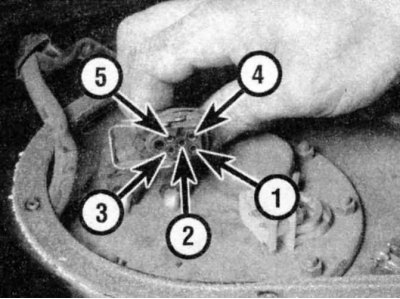
7. On models with nuts, unscrew the nuts to remove the unit from the fuel tank (indicated by arrows)
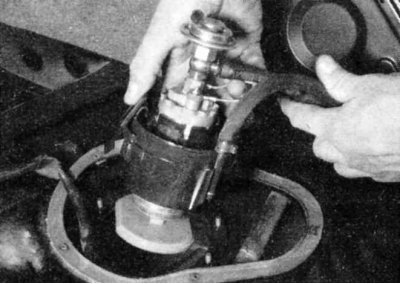
8. On later Motronic models, first remove the fuel level sensor...
...then pull the fuel pump straight up from the bottom of the tank (keep all fuel lines together)
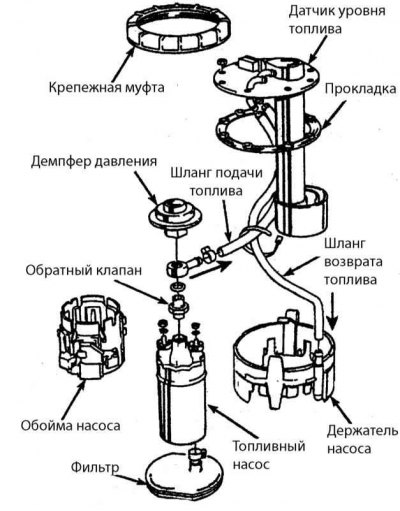
General view of the fuel pump unit on late Motronic systems.
9. On early models, remove the intermediate pump mounting screws and clamps and separate the pump from the assembly.
10. Installation is the reverse of removal. If the gasket between the fuel pump and the fuel tank is dry, cracked or damaged, replace it.
Checking the operation and replacing the fuel level sensor
1. Remove the main fuel pump or intermediate pump (as described above) together with the fuel level sensor.
2. Connect an ohmmeter to the contacts and check that the resistance is correct.
3. For L-Jetronic and early Motronic systems, refer to the table below.
4. For later models of Motronic systems, connect an ohmmeter to the fuel level sensor terminals corresponding to terminals 1 and 3 of the electrical connector. The resistance should decrease as the plunger rises.
L-Jetronic and early Motronic systems
| Contact | Float position | Resistance |
| G and 31 | Move slowly from the EMTY (Empty) position to the FULL (Full)position | |
| EMPTY FULL | Resistance is slowly falling | |
| W and 31 | EMPTY (Warning of low fuel quantity) | 3.2 ±0.7 Ohm 71.7 ±2.3 Ohm Infinity |
5. If the resistance values are incorrect, replace the sensor.
6. Installation is the reverse of removal.
This article is available at russian, bulgarian, belarusian, ukrainian, serbian, croatian, romanian, polish, slovak, hungarian
Article verified: Zhuravleva Isolda
Share information:
Previous articles
БМВ E28: Supply system
Next articles
Similar articles on other types of BMW cars:
Removal and installation the fuel level sensor / fuel pump BMW 3 Series E46 (1998-2006)
Removal the right fuel level sensor with the fuel pump BMW 3 Series E36 (1990-2000)
Fuel/Fuel Pump Sensor — Removal and Installation BMW 7 Series E32 (1986-1994)
Removal and installation the fuel pump BMW 7 Series E38 (1994-2001)
High-pressure fuel pump (M57TU/M57T2) BMW X3 E83 (2003-2010)
Fuel pump — design description BMW X5 E53 (1999-2006)
Link in different formats to this page
Visitor comments
No comments yet
- General information
- Governing bodies
- Manual
- Maintenance
- Power unit
- Engine repair
- Lubrication system
- Cooling system
- Ignition system
- Supply system
- Injection system (gasoline)
- Injection system (diesel)
- Exhaust system
- Transmission
- Clutch
- Car gearbox
- Front axle
- Rear axle
- Chassis
- Steering
- Brake system
- Wheels and tires
- Body
- Interior
- Exterior
- Heating system
- Electrical equipment
- Equipment and devices
- Power devices
- Windscreen wipers
- Electrical circuits
- General information
- Manual
- Maintenance
- Power unit
- Engine repair
- Ignition system
- Engine lubrication system
- Cooling system
- Fuel system (gasoline)
- Fuel system (diesel)
- Exhaust system
- Transmission
- Clutch
- Car gearbox
- Chassis
- Front and rear suspension
- Steering
- Brake system
- Body
- Exterior
- Interior
- Electrical equipment
- Heating system
- Equipment and devices
- Power devices
- Electrical circuits
- General information
- Manual
- Maintenance
- Power unit
- Engine in a car
- Engine overhaul
- Cooling system
- Supply system
- Ignition system
- Control system
- Transmission
- Clutch
- Manual gearbox
- Automatic gearbox
- Transmission line
- Chassis
- Steering
- Front suspension
- Rear suspension
- Brake system
- Body
- Body elements
- Car care and painting
- Electrical equipment
- Heater and air conditioner
- Equipment and devices
- Starter and generator
- Electrical circuits
- General information
- Operation and maintenance
- Specifications
- Power unit
- Engine repair
- Cooling and lubrication system
- Supply system
- Ecotronic power supply system
- Fuel injection system
- Ignition system
- Transmission
- Clutch
- Gearbox BMW 242/4
- Gearbox Getrag 262/8
- Gearbox Getrag 265/6
- Automatic gearbox
- Cardan gear
- Rear axle
- Chassis
- Steering
- Front suspension
- Rear suspension
- Brake system
- Electrical equipment
- Equipment and devices
- Electrical circuits