
Table of contents: Carburetor engines ↓ Fuel Injected Engines ↓
- Home
- BMW 5 Series
- E28
- Power unit
- Supply system
- Removal and installation the air cleaner
Removal and installation the air cleaner (BMW 5 Series E28)
Disconnect the negative battery cable.
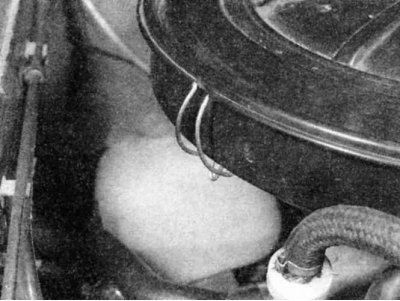
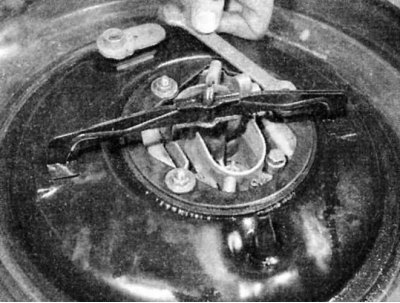
1. Unhook the spring clips, then unscrew the center nut and remove the cover.
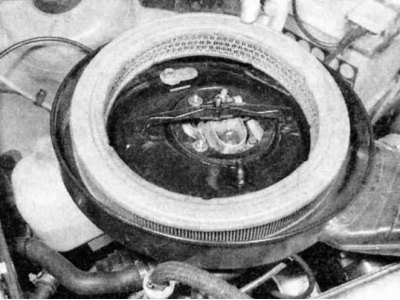
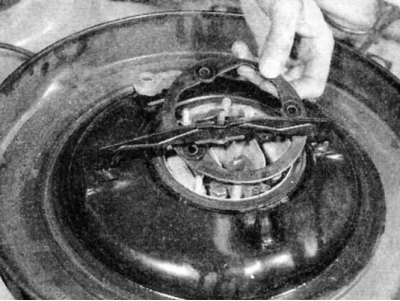
2. Remove the filter element and wipe the air cleaner body and cover.
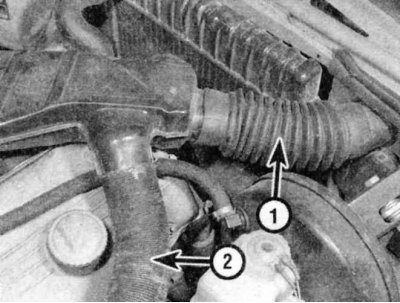
3. To remove the housing, first disconnect the air intake duct (1) and the heated air hose (2).
4. Disconnect the vacuum line at the carburetor.
5. Unscrew the four nuts securing the air cleaner to the carburetor and remove the metal ring.
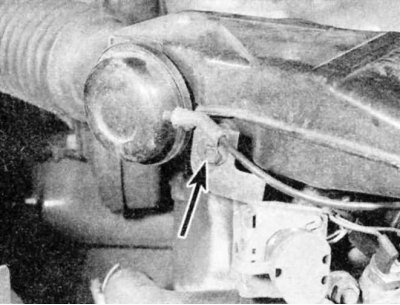
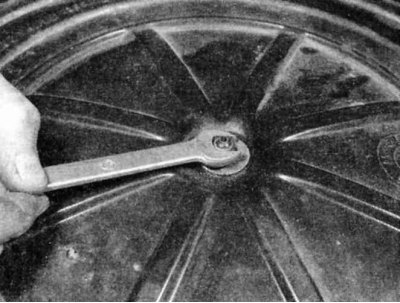
6. Loosen the air cleaner mounting bracket nut (shown by arrow).
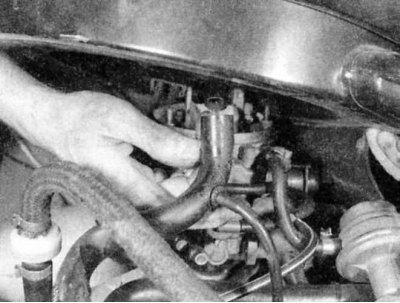
7. Remove the air cleaner from the carburetor and disconnect the crankcase ventilation hose.
8. If necessary, hook the sealing ring on the bottom of the air cleaner.
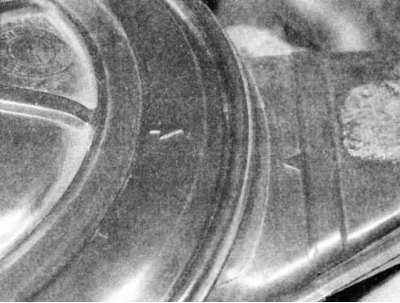
9. Installation is the reverse of removal, however, align the arrow on the cover with the arrow on the air intake duct.
1. Disconnect the air intake duct from the front of the air cleaner.
2. Disconnect the air duct between the air cleaner and the throttle body.
3. Remove the air filter (see chapter Routine car maintenance).
4. Disconnect the electrical connector from the air flow meter (see section Cleaning and adjusting the carburetor).
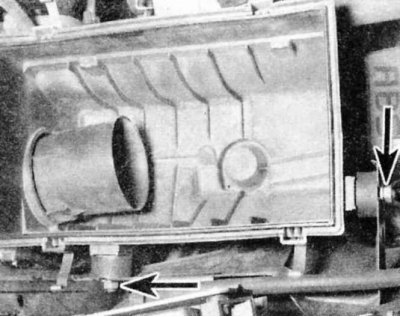
5. Remove the two nuts (shown by arrows) air cleaner mounts and remove the air cleaner from the engine compartment (motronic system shown).
6. Installation is the reverse of removal. Make sure the air ducts are securely fastened, otherwise air leakage may occur.
If your car's radio has an anti-theft system, make sure you know the correct activation code before disconnecting the battery. Before disconnecting the wire, refer to Section Anti-theft audio system and instrument cluster language.
If a message in another language appears on the instrument cluster display after connecting the battery, refer to Section 1 for the language setting procedure Anti-theft audio system and instrument cluster language.
Carburetor engines
1. Unhook the spring clips, then unscrew the center nut and remove the cover.
2. Remove the filter element and wipe the air cleaner body and cover.
3. To remove the housing, first disconnect the air intake duct (1) and the heated air hose (2).
4. Disconnect the vacuum line at the carburetor.
5. Unscrew the four nuts securing the air cleaner to the carburetor and remove the metal ring.
6. Loosen the air cleaner mounting bracket nut (shown by arrow).
7. Remove the air cleaner from the carburetor and disconnect the crankcase ventilation hose.
8. If necessary, hook the sealing ring on the bottom of the air cleaner.
9. Installation is the reverse of removal, however, align the arrow on the cover with the arrow on the air intake duct.
Fuel Injected Engines
1. Disconnect the air intake duct from the front of the air cleaner.
2. Disconnect the air duct between the air cleaner and the throttle body.
3. Remove the air filter (see chapter Routine car maintenance).
4. Disconnect the electrical connector from the air flow meter (see section Cleaning and adjusting the carburetor).
5. Remove the two nuts (shown by arrows) air cleaner mounts and remove the air cleaner from the engine compartment (motronic system shown).
6. Installation is the reverse of removal. Make sure the air ducts are securely fastened, otherwise air leakage may occur.
This article is available at russian, bulgarian, belarusian, ukrainian, serbian, croatian, romanian, polish, slovak, hungarian
Article verified: Zhuravleva Isolda
Share information:
Previous articles
БМВ E28: Supply system
Next articles
Similar articles on other types of BMW cars:
Air cleaner — removal and installation BMW 3 Series E46 (1998-2006, petrol)
Removal and installation the contact ignition distributor BMW 3 Series E21 (1975-1983)
Removal and installation the air cleaner housing BMW 7 Series E38 (1994-2001)
Cylinder Head Cover — Removal and Installation BMW 7 Series E32 (1986-1994)
Pistons — removal and installation BMW X3 E83 (2003-2010)
Removal and installation the engine BMW X5 E53 (1999-2006)
Link in different formats to this page
Visitor comments
No comments yet
- General information
- Governing bodies
- Manual
- Maintenance
- Power unit
- Engine repair
- Lubrication system
- Cooling system
- Ignition system
- Supply system
- Injection system (gasoline)
- Injection system (diesel)
- Exhaust system
- Transmission
- Clutch
- Car gearbox
- Front axle
- Rear axle
- Chassis
- Steering
- Brake system
- Wheels and tires
- Body
- Interior
- Exterior
- Heating system
- Electrical equipment
- Equipment and devices
- Power devices
- Windscreen wipers
- Electrical circuits
- General information
- Manual
- Maintenance
- Power unit
- Engine repair
- Ignition system
- Engine lubrication system
- Cooling system
- Fuel system (gasoline)
- Fuel system (diesel)
- Exhaust system
- Transmission
- Clutch
- Car gearbox
- Chassis
- Front and rear suspension
- Steering
- Brake system
- Body
- Exterior
- Interior
- Electrical equipment
- Heating system
- Equipment and devices
- Power devices
- Electrical circuits
- General information
- Manual
- Maintenance
- Power unit
- Engine in a car
- Engine overhaul
- Cooling system
- Supply system
- Ignition system
- Control system
- Transmission
- Clutch
- Manual gearbox
- Automatic gearbox
- Transmission line
- Chassis
- Steering
- Front suspension
- Rear suspension
- Brake system
- Body
- Body elements
- Car care and painting
- Electrical equipment
- Heater and air conditioner
- Equipment and devices
- Starter and generator
- Electrical circuits
- General information
- Operation and maintenance
- Specifications
- Power unit
- Engine repair
- Cooling and lubrication system
- Supply system
- Ecotronic power supply system
- Fuel injection system
- Ignition system
- Transmission
- Clutch
- Gearbox BMW 242/4
- Gearbox Getrag 262/8
- Gearbox Getrag 265/6
- Automatic gearbox
- Cardan gear
- Rear axle
- Chassis
- Steering
- Front suspension
- Rear suspension
- Brake system
- Electrical equipment
- Equipment and devices
- Electrical circuits