
- Home
- BMW 3 Series
- E30
- Power unit
- Supply system
- Removal and installation, checking of fuel level sensor
Removal and installation, checking of fuel level sensor (BMW 3 Series E30)
When the fuel level in the fuel tank drops, the float of the fuel reserve sensor drops. At the same time, the resistance of the sensor, taken from the sliding contact engine, increases. As a result, the voltage supplied to the fuel reserve indicator decreases and the indicator arrow shifts in the "empty" direction.
As the float continues to lower, the contact of the indicator closes and the warning light for remaining fuel lights up on the instrument panel.
Disconnect the ground wire from the battery.
Remove the rear seat (see section "Removing and installing the rear seat").
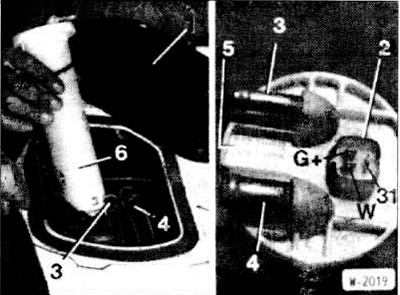
Unscrew cover 1-.
Disconnect the connector from the block "2" and the fuel hoses "3" and "4" from the fuel tank. First, loosen the clamps.
Turn left with 3 large screwdrivers (drawing W-2020) unscrew the fuel level sensor. The direction of rotation is also indicated on the top side of the fuel level sensor "5".
Lift the fuel gauge 6-, tilt it to the side and pull it out. At the same time, put a rag and collect fuel with it if it leaks.
Connect an ohmmeter to terminals 6 and 31 of the fuel level sensor.
Keep the fuel gauge in the working position. The float is at the bottom, and in this position the indicator on the instrument panel would show "reserve". The specified value on cars manufactured before February 1983: 71.7±2.3 Ohm, on cars manufactured from March 1983: 58.8±1.8 Ohm.
Turn the fuel gauge 180°. The float is on top, and in this position the indicator on the instrument panel would show "full". The specified value is 3.2±0.7 0 m.
Check the contact of the fuel level indicator: connect an ohmmeter to terminals W and 31 of the fuel level sensor. The specified value with the sensor in the working position: 0 0m, with the position turned 180°: infinity.
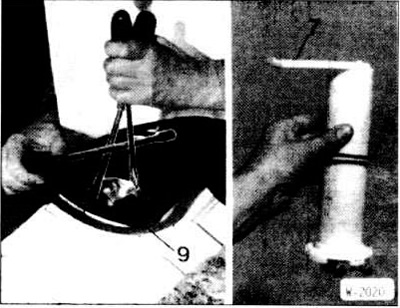
Check mesh "7" and clean if necessary.
Insert the fuel level sensor with a new gasket "8". When installing a new sensor, first remove the retaining ring.
Position the fuel gauge so that the fuel hoses can be connected after installation. Secure the fuel hoses with new clamps.
Connect the electrical connector.
Place and secure the cover, ensuring that the gasket "9" is correctly installed.
Connect the ground wire to the battery.
Check the operation of the fuel gauge on the instrument panel.
Install the rear seat (see section "Removing and installing the rear seat").
As the float continues to lower, the contact of the indicator closes and the warning light for remaining fuel lights up on the instrument panel.
Removal
Warning: Do not make an open fire! Fire hazard! When removing the fuel level sensor, the fuel tank must not be completely filled. When fully filled, pump out at least 10 liters of fuel.
Disconnect the ground wire from the battery.
Remove the rear seat (see section "Removing and installing the rear seat").
Unscrew cover 1-.
Disconnect the connector from the block "2" and the fuel hoses "3" and "4" from the fuel tank. First, loosen the clamps.
Turn left with 3 large screwdrivers (drawing W-2020) unscrew the fuel level sensor. The direction of rotation is also indicated on the top side of the fuel level sensor "5".
Lift the fuel gauge 6-, tilt it to the side and pull it out. At the same time, put a rag and collect fuel with it if it leaks.
Examination
Connect an ohmmeter to terminals 6 and 31 of the fuel level sensor.
Keep the fuel gauge in the working position. The float is at the bottom, and in this position the indicator on the instrument panel would show "reserve". The specified value on cars manufactured before February 1983: 71.7±2.3 Ohm, on cars manufactured from March 1983: 58.8±1.8 Ohm.
Turn the fuel gauge 180°. The float is on top, and in this position the indicator on the instrument panel would show "full". The specified value is 3.2±0.7 0 m.
Check the contact of the fuel level indicator: connect an ohmmeter to terminals W and 31 of the fuel level sensor. The specified value with the sensor in the working position: 0 0m, with the position turned 180°: infinity.
Installation
Check mesh "7" and clean if necessary.
Insert the fuel level sensor with a new gasket "8". When installing a new sensor, first remove the retaining ring.
Position the fuel gauge so that the fuel hoses can be connected after installation. Secure the fuel hoses with new clamps.
Connect the electrical connector.
Place and secure the cover, ensuring that the gasket "9" is correctly installed.
Connect the ground wire to the battery.
Check the operation of the fuel gauge on the instrument panel.
Install the rear seat (see section "Removing and installing the rear seat").
This article is available at russian, bulgarian, belarusian, ukrainian, serbian, croatian, romanian, polish, slovak, hungarian
Article verified: Polikarpov Saveliy
Share information:
Previous articles
БМВ E30: Supply system
Next articles
Similar articles on other types of BMW cars:
Removal and installation, checking of fuel level sensor BMW 5 Series E34 (1988-1996)
Removal and installation the fuel level sensor / fuel pump BMW 5 Series E39 (1995-2003)
Fuel/Fuel Pump Sensor — Removal and Installation BMW 7 Series E32 (1986-1994)
Removal and installation fuel level sensors BMW 7 Series E38 (1994-2001)
Removal and installation the fuel filler cap BMW X3 E83 (2003-2010)
Fuel level indicator sensor BMW X5 E53 (1999-2006)
Link in different formats to this page
Visitor comments
No comments yet
- General information
- Manual
- Maintenance
- Power unit
- Engine repair
- Cooling system
- Power system (gasoline)
- Injection system (gasoline)
- Fuel system (diesel)
- Exhaust system
- Ignition system
- Charge and launch systems
- Transmission
- Car gearbox
- Clutch and drive shafts
- Chassis
- Brake system
- Suspension front and rear
- Steering
- Body
- Body care and repair
- Exterior
- Interior
- Electrical equipment
- Troubleshooting
- Lighting and signaling
- Equipment and devices
- Heater and air conditioner
- Electrical circuits
- General information
- Manual
- Repair on the road
- Weekly checks
- Maintenance
- Troubleshooting
- Power unit
- 4 cylinder engines
- 6 cylinder engines
- Engine overhaul
- Cooling and heating
- Fuel and exhaust system
- Starting and charging system
- Ignition system
- Transmission
- Clutch
- Mechanical gearbox
- Automatic gearbox
- Cardan and drive shafts
- Chassis
- Brake system
- Wheel suspension
- Steering
- Body
- Exterior
- Interior
- Electrical equipment
- Equipment and devices
- Electrical circuits
- General information
- Maintenance
- Power unit
- Engine repair
- Cooling system
- Ignition system
- Supply system
- Fuel injection system
- Exhaust system
- Transmission
- Clutch
- Car gearbox
- Front and rear axle
- Chassis
- Steering
- Brake system
- Body
- Exterior
- Interior
- Electrical equipment
- Heating system
- Equipment and devices
- Power devices
- Electrical circuits
- Power unit
- M10/M20 engine
- M40 engine
- Ignition system
- Lubrication system
- Cooling system
- Supply system
- Fuel injection
- Exhaust system
- Transmission
- Clutch
- Manual gearbox
- Front axle
- Rear axle
- Chassis
- Steering
- Brake system
- Body
- Exterior
- Interior
- Electrical equipment
- Heating system
- Equipment and devices
- Electrical circuits
- General information
- Specifications
- Operation and maintenance
- 4-cylinder engine
- Engine repair
- Cooling and lubrication system
- Supply system
- Ignition system
- 6-cylinder engine
- Engine repair
- Cooling and lubrication system
- Supply system
- Fuel injection system
- Ignition system
- Transmission
- Clutch
- 4-speed manual gearbox
- 5-speed manual gearbox
- Automatic gearbox
- Cardan and rear axle
- Chassis
- Steering
- Front suspension
- Rear suspension
- Brake system
- Electrical equipment
- Equipment and devices
- Electrical circuits