



- Home
- BMW 3 Series
- E30
- Power unit
- Supply system
- Checking, removing and installing the air damper regulator
Checking, removing and installing the air damper regulator (BMW 3 Series E30)
The air damper, mounted on an eccentric support, roughly corresponds to the air damper on the previous carburetor. The air damper regulates the ratio of the air and fuel mixture when starting a cold engine, when warming up and when accelerating. The air damper is controlled by rods through the air damper regulator. In this case, we are talking about a small electric motor controlled by the carburetor control unit, the design of which allows it to develop a very high speed of movement of the damper. At the same time, when moving the lever on the other side of the air damper axis, the cross-section of the air jet of the idle correction system changes depending on the position of the air damper.
Remove the air filter (see section "Removal and installation the air filter").
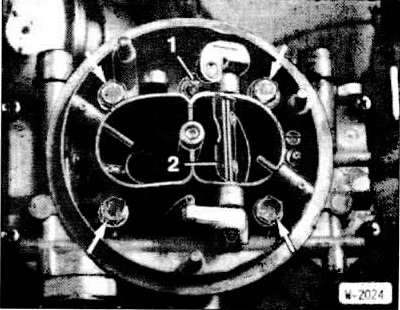
Press the needle "1" of the idle speed correction air jet with a small screwdriver and, by moving the air damper, check the ease of its movement.
Check the resistance of the air damper controller. To do this, disconnect the connector, connect an ohmmeter to both contacts of the air damper controller and measure the resistance of the winding. For the specified value, see the table of main carburetor technical data.
After this, measure the insulation resistance. To do this, connect an ohmmeter between the housing and the throttle valve controller connector. Thus, measure the resistance by connecting the ohmmeter sequentially to both connector contacts.
Install the air filter (see section "Removal and installation the air filter").
Remove the air filter (see section "Removal and installation the air filter").
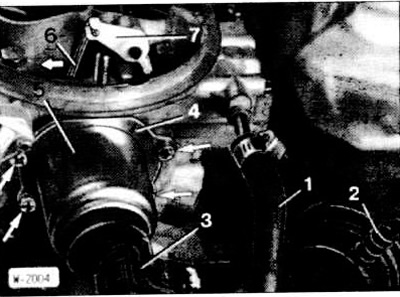
Disconnect connector "3" of the air damper regulator.
Use a felt-tip pen to mark "4" on the air damper regulator mounting ring so that you can later install the regulator in its previous position.
Unscrew the 4 screws of the fastening ring (arrows) and remove the air damper regulator "5".
Disconnect the air damper shaft from the lever and remove the connecting rod "6".
Check the ease of movement of the control lever by turning it through a full angle of 320°.
Insert the air damper regulator with the mounting ring and tighten the screws slightly so that the regulator cannot turn.
Connect the connecting rod from above with the short end with the adjusting lever. Place the connecting rod so that the adjusting lever is directed in the same way as the lever "7" on the air damper.
In this position, press the connecting rod into the lever on the air damper.
Press the air damper regulator so that the notch on the edge of the retaining pin enters the slot in the carburetor body. In this position, check the ability to fully open and close the air damper.
Tighten the mounting ring screws.
Connect the connector.
Install the air filter (see section "Removal and installation the air filter").
Examination
Remove the air filter (see section "Removal and installation the air filter").
Press the needle "1" of the idle speed correction air jet with a small screwdriver and, by moving the air damper, check the ease of its movement.
Check the resistance of the air damper controller. To do this, disconnect the connector, connect an ohmmeter to both contacts of the air damper controller and measure the resistance of the winding. For the specified value, see the table of main carburetor technical data.
After this, measure the insulation resistance. To do this, connect an ohmmeter between the housing and the throttle valve controller connector. Thus, measure the resistance by connecting the ohmmeter sequentially to both connector contacts.
Install the air filter (see section "Removal and installation the air filter").
Removal
Remove the air filter (see section "Removal and installation the air filter").
Disconnect connector "3" of the air damper regulator.
Use a felt-tip pen to mark "4" on the air damper regulator mounting ring so that you can later install the regulator in its previous position.
Unscrew the 4 screws of the fastening ring (arrows) and remove the air damper regulator "5".
Disconnect the air damper shaft from the lever and remove the connecting rod "6".
Check the ease of movement of the control lever by turning it through a full angle of 320°.
Installation
Insert the air damper regulator with the mounting ring and tighten the screws slightly so that the regulator cannot turn.
Connect the connecting rod from above with the short end with the adjusting lever. Place the connecting rod so that the adjusting lever is directed in the same way as the lever "7" on the air damper.
In this position, press the connecting rod into the lever on the air damper.
Press the air damper regulator so that the notch on the edge of the retaining pin enters the slot in the carburetor body. In this position, check the ability to fully open and close the air damper.
Tighten the mounting ring screws.
Connect the connector.
Install the air filter (see section "Removal and installation the air filter").
This article is available at russian, bulgarian, belarusian, ukrainian, serbian, croatian, romanian, polish, slovak, hungarian
Article verified: Polikarpov Saveliy
Share information:
Previous articles
БМВ E30: Supply system
Next articles
Similar articles on other types of BMW cars:
Checking/removing and installing the idle air control valve BMW 5 Series E39 (1995-2003)
Checking the operation, removing and installing the engine cooling… BMW 5 Series E28 (1981-1988)
Idle speed control valve — checking, removing and installing BMW 7 Series E32 (1986-1994)
Audio system — removing and installing a cd changer BMW X3 E83 (2003-2010)
Checking the generator and voltage regulator BMW X5 E53 (1999-2006)
Checking/removing and installing the idle air control valve BMW 5 Series E39 (1995-2003)
Checking the operation, removing and installing the engine cooling… BMW 5 Series E28 (1981-1988)
Idle speed control valve — checking, removing and installing BMW 7 Series E32 (1986-1994)
Audio system — removing and installing a cd changer BMW X3 E83 (2003-2010)
Checking the generator and voltage regulator BMW X5 E53 (1999-2006)
Link in different formats to this page
Visitor comments
No comments yet
- General information
- Manual
- Maintenance
- Power unit
- Engine repair
- Cooling system
- Power system (gasoline)
- Injection system (gasoline)
- Fuel system (diesel)
- Exhaust system
- Ignition system
- Charge and launch systems
- Transmission
- Car gearbox
- Clutch and drive shafts
- Chassis
- Brake system
- Suspension front and rear
- Steering
- Body
- Body care and repair
- Exterior
- Interior
- Electrical equipment
- Troubleshooting
- Lighting and signaling
- Equipment and devices
- Heater and air conditioner
- Electrical circuits
- General information
- Manual
- Repair on the road
- Weekly checks
- Maintenance
- Troubleshooting
- Power unit
- 4 cylinder engines
- 6 cylinder engines
- Engine overhaul
- Cooling and heating
- Fuel and exhaust system
- Starting and charging system
- Ignition system
- Transmission
- Clutch
- Mechanical gearbox
- Automatic gearbox
- Cardan and drive shafts
- Chassis
- Brake system
- Wheel suspension
- Steering
- Body
- Exterior
- Interior
- Electrical equipment
- Equipment and devices
- Electrical circuits
- General information
- Maintenance
- Power unit
- Engine repair
- Cooling system
- Ignition system
- Supply system
- Fuel injection system
- Exhaust system
- Transmission
- Clutch
- Car gearbox
- Front and rear axle
- Chassis
- Steering
- Brake system
- Body
- Exterior
- Interior
- Electrical equipment
- Heating system
- Equipment and devices
- Power devices
- Electrical circuits
- Power unit
- M10/M20 engine
- M40 engine
- Ignition system
- Lubrication system
- Cooling system
- Supply system
- Fuel injection
- Exhaust system
- Transmission
- Clutch
- Manual gearbox
- Front axle
- Rear axle
- Chassis
- Steering
- Brake system
- Body
- Exterior
- Interior
- Electrical equipment
- Heating system
- Equipment and devices
- Electrical circuits
- General information
- Specifications
- Operation and maintenance
- 4-cylinder engine
- Engine repair
- Cooling and lubrication system
- Supply system
- Ignition system
- 6-cylinder engine
- Engine repair
- Cooling and lubrication system
- Supply system
- Fuel injection system
- Ignition system
- Transmission
- Clutch
- 4-speed manual gearbox
- 5-speed manual gearbox
- Automatic gearbox
- Cardan and rear axle
- Chassis
- Steering
- Front suspension
- Rear suspension
- Brake system
- Electrical equipment
- Equipment and devices
- Electrical circuits