
Table of contents: Examination ↓ Removal and installation ↓
- Home
- BMW 5 Series
- E28
- Power unit
- Cooling system
- Checking the operation, removing and installing the engine cooling fan and its drive clutch
Checking the operation, removing and installing the engine cooling fan and its drive clutch (BMW 5 Series E28)
To avoid possible damage, DO NOT operate the vehicle with a non-working engine cooling fan. Do not attempt to repair damaged fan blades - replace the fan. In addition, an auxiliary electric fan installed in front of the radiator or air conditioning condenser can be turned on without starting the engine or turning on the ignition. Its operation is regulated by the coolant temperature using temperature sensors-switches located on the radiator.
Examination
Auxiliary electric fan
This fan is controlled on most models by two temperature switches located in the radiator: one for low temperature, low speed operation, and one for high temperature, high speed operation. Each switch is triggered at a specific coolant temperature (see Table of sizes and adjustment data at the end of the Guide).
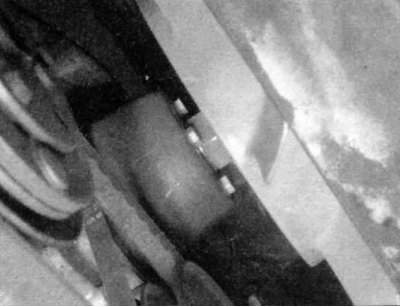
Thermostat-controlled high and low speed auxiliary fan switches are located in the radiator reservoirs, in different locations depending on engine type and vehicle model (see illustration). Either one double or two single switches can be installed.
1. Insert a small screwdriver into the connector to push the locking tab and disconnect the fan wiring.
2. To test the fan motor, disconnect the electrical connector from the motor and use the jump starter cable to connect the fan directly to the battery. If the fan does not work, the motor is faulty and must be replaced. If the fan works, the switch may be faulty. For a more accurate diagnosis, perform the test that matches your vehicle model.
Turn the auxiliary fan motor by hand to check if it is jammed. Before doing this, however, make sure that the motor has cooled down sufficiently and there is no danger of the fan turning on accidentally during the test.
3. To test the low and high speed circuits, disconnect the electrical connector from one of the switches and connect the connector terminals with a short piece of wire. The fan should run at low or high speed, depending on which switch was disconnected. On some models, the ignition must be turned on before the fan will run.
4. Repeat the test on another switch.
5. If the low and high speed circuits are OK but the fan still does not operate properly, replace the switch (or switches). To remove the switch, drain the coolant to a level below the switch (see chapter Routine car maintenance), then remove the screws, remove the old switch and install a new one. Add coolant to the system.
6. If the switches are working properly but the motor still does not work, then the problem is most likely a faulty fuse, relay, or wiring connecting the components (or the fan motor itself). Carefully check the fuse, relay, all wiring and connectors. For detailed information on performing these checks, refer to Chapter On-board electrical equipment system.
Mechanical fan with viscous coupling
1. Disconnect the negative battery cable and rock the fan from side to side by hand to check the bearing play.
If your vehicle's radio is equipped with an anti-theft system, make sure you enter the correct code before disconnecting the battery.
If the instrument cluster displays the wrong language after connecting the battery, refer to Section Anti-theft audio system and instrument cluster language, which describes the procedure for installing the required language.
2. Let the engine cool down and turn the fan blades by hand. They should turn with a slight resistance.
3. Inspect the fan clutch assembly for signs of a major fluid leak. If there is a leak, replace the clutch assembly.
4. Warm up the engine to operating temperature, turn off the ignition and disconnect the negative battery cable. Turn the fan by hand. This time the resistance should be stronger. If the blades turn easily, the fan clutch should be replaced.
Removal and installation
Auxiliary electric fan
1. Disconnect the negative battery cable.
2. To remove the auxiliary fan, follow the procedure appropriate for your vehicle model.
3. Loosen the screws and remove the trim panel in front of the radiator.
4. Unbolt the fan assembly from the condenser mounting points.
5. Disconnect the fan electrical connector.
6. Remove the fan and shroud from the vehicle, being careful not to damage the air conditioning condenser, if any, when removing the fan.
7. Install in reverse order.
Mechanical fan with viscous coupling
1. Disconnect the negative battery cable. Loosen the screws or remove the plastic fasteners of the fan shroud and remove the shroud (see section Removal and installation the radiator).
2. The cooling fan on the water pump is attached to the shaft with a left-hand threaded nut located directly behind the fan.
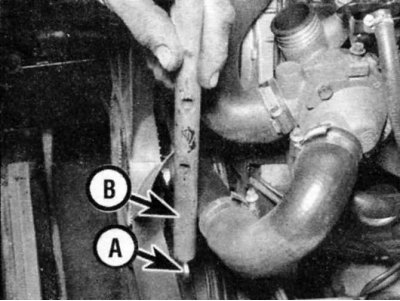
3. Using a 32mm wrench, remove the fan/clutch assembly. Place the wrench on the large nut in front of the pulley and tap the end of the wrench -A with a metal drift -B to loosen the nut.
This nut has a left-hand thread, so it can be loosened by turning it clockwise when viewed from the front of the vehicle.
4. Remove the fan/clutch assembly (and a casing if necessary) from the engine compartment.
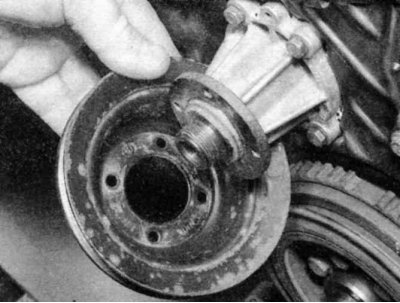
5. If necessary, loosen the four bolts securing the pulley to the water pump hub. The pulley can then be removed by removing the drive belts.
6. Carefully inspect the fan blades for defects and damage. Replace them if necessary.
7. The fan can now be unbolted from the coupling if necessary. If you are going to place the fan coupling on a shelf, place it so that the side facing the radiator is facing down.
8. Install in reverse order
This article is available at russian, bulgarian, belarusian, ukrainian, serbian, croatian, romanian, polish, slovak, hungarian
Article verified: Zhuravleva Isolda
Share information:
Previous articles
БМВ E28: Cooling system
Next articles
Similar articles on other types of BMW cars:
Cooling System Sensors and Switches — Checking, Removing and… BMW 3 Series E46 (1998-2006, petrol)
Checking, removing and installing the air damper regulator BMW 3 Series E30 (1982-1994)
Idle speed control valve — checking, removing and installing BMW 7 Series E32 (1986-1994)
Checking the brake system and clutch BMW 7 Series E38 (1994-2001)
Bleeding the cooling system and checking it for leaks (M54, N46, N47,… BMW X3 E83 (2003-2010)
Features of winter operation of a diesel engine BMW X5 E53 (1999-2006)
Link in different formats to this page
Visitor comments
No comments yet
- General information
- Governing bodies
- Manual
- Maintenance
- Power unit
- Engine repair
- Lubrication system
- Cooling system
- Ignition system
- Supply system
- Injection system (gasoline)
- Injection system (diesel)
- Exhaust system
- Transmission
- Clutch
- Car gearbox
- Front axle
- Rear axle
- Chassis
- Steering
- Brake system
- Wheels and tires
- Body
- Interior
- Exterior
- Heating system
- Electrical equipment
- Equipment and devices
- Power devices
- Windscreen wipers
- Electrical circuits
- General information
- Manual
- Maintenance
- Power unit
- Engine repair
- Ignition system
- Engine lubrication system
- Cooling system
- Fuel system (gasoline)
- Fuel system (diesel)
- Exhaust system
- Transmission
- Clutch
- Car gearbox
- Chassis
- Front and rear suspension
- Steering
- Brake system
- Body
- Exterior
- Interior
- Electrical equipment
- Heating system
- Equipment and devices
- Power devices
- Electrical circuits
- General information
- Manual
- Maintenance
- Power unit
- Engine in a car
- Engine overhaul
- Cooling system
- Supply system
- Ignition system
- Control system
- Transmission
- Clutch
- Manual gearbox
- Automatic gearbox
- Transmission line
- Chassis
- Steering
- Front suspension
- Rear suspension
- Brake system
- Body
- Body elements
- Car care and painting
- Electrical equipment
- Heater and air conditioner
- Equipment and devices
- Starter and generator
- Electrical circuits
- General information
- Operation and maintenance
- Specifications
- Power unit
- Engine repair
- Cooling and lubrication system
- Supply system
- Ecotronic power supply system
- Fuel injection system
- Ignition system
- Transmission
- Clutch
- Gearbox BMW 242/4
- Gearbox Getrag 262/8
- Gearbox Getrag 265/6
- Automatic gearbox
- Cardan gear
- Rear axle
- Chassis
- Steering
- Front suspension
- Rear suspension
- Brake system
- Electrical equipment
- Equipment and devices
- Electrical circuits