
- Home
- BMW 3 Series
- E30
- Power unit
- Supply system
- Removal and installation, testing of the throttle potentiometer
Removal and installation, testing of the throttle potentiometer (BMW 3 Series E30)
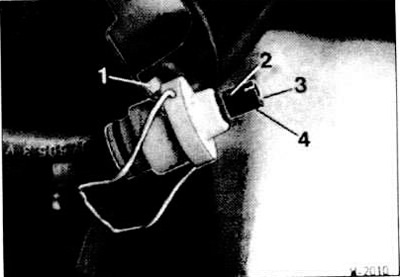
The throttle potentiometer is connected to its shaft and is a throttle position sensor for the carburetor control unit.
Remove the air filter (see section "Removal and installation the air filter").

Disconnect connector "2" of the throttle potentiometer, having first folded back the retaining bracket "3".
Unscrew screw "4" from the mounting bracket and remove potentiometer "1" of the throttle valve.
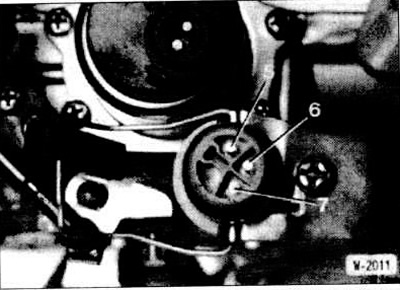
Remove and check coupling "4"; replace if necessary.
Check ease of movement and full angle of movement of about 90° of the leash "2". Check the force of the return spring.
Check the total resistance by connecting an ohmmeter to terminals 6 and 7.
Check the resistance of the potentiometer slider by connecting an ohmmeter to terminals 5 and 6.
If the resistance values deviate from the specified values, replace the throttle control potentiometer. For the specified values, see the table of the main technical data of the carburetor.
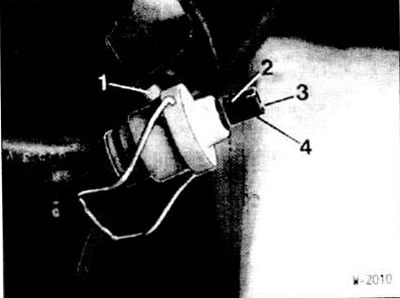
Insert the throttle valve potentiometer with the mounting bracket so that the throttle valve axis slider engages in the guide splines "3" of the coupling "4". At the same time, the projection "1" on the mounting bracket must enter the locking slot on the potentiometer and on the carburetor body.
Screw on the throttle potentiometer with the mounting bracket.
Install the air filter (see section "Removal and installation the air filter").
Start a cold engine and let it run at idle speed.
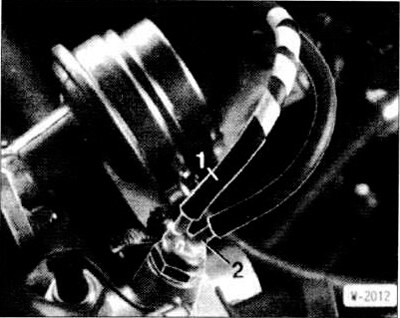
Disconnect the vacuum hose "1" from the straight fitting of the temperature valve and check for a vacuum at the end of the hose. To do this, close the end of the hose with your finger. If the finger is slightly "sucked in", there is a vacuum. Otherwise, check the tightness of the hose, as well as the patency of the hole in the carburetor.
Reconnect vacuum hose "1" and disconnect vacuum hose "2" from the angled fitting "2" of the temperature valve.
Check for vacuum at the angled fitting. As long as the coolant temperature is below approximately 45°C, the valve should be closed. That is, there should be no vacuum at the angled fitting.
When the coolant temperature rises above 61°C, the temperature valve should open. There should be a vacuum on the oblique fitting.
Otherwise, the temperature valve must be replaced.
Removal
Remove the air filter (see section "Removal and installation the air filter").
Disconnect connector "2" of the throttle potentiometer, having first folded back the retaining bracket "3".
Unscrew screw "4" from the mounting bracket and remove potentiometer "1" of the throttle valve.
Examination
Remove and check coupling "4"; replace if necessary.
Check ease of movement and full angle of movement of about 90° of the leash "2". Check the force of the return spring.
Check the total resistance by connecting an ohmmeter to terminals 6 and 7.
Check the resistance of the potentiometer slider by connecting an ohmmeter to terminals 5 and 6.
If the resistance values deviate from the specified values, replace the throttle control potentiometer. For the specified values, see the table of the main technical data of the carburetor.
Installation
Insert the throttle valve potentiometer with the mounting bracket so that the throttle valve axis slider engages in the guide splines "3" of the coupling "4". At the same time, the projection "1" on the mounting bracket must enter the locking slot on the potentiometer and on the carburetor body.
Screw on the throttle potentiometer with the mounting bracket.
Install the air filter (see section "Removal and installation the air filter").
Checking the temperature valve
Start a cold engine and let it run at idle speed.
Disconnect the vacuum hose "1" from the straight fitting of the temperature valve and check for a vacuum at the end of the hose. To do this, close the end of the hose with your finger. If the finger is slightly "sucked in", there is a vacuum. Otherwise, check the tightness of the hose, as well as the patency of the hole in the carburetor.
Reconnect vacuum hose "1" and disconnect vacuum hose "2" from the angled fitting "2" of the temperature valve.
Check for vacuum at the angled fitting. As long as the coolant temperature is below approximately 45°C, the valve should be closed. That is, there should be no vacuum at the angled fitting.
Note: The orifice in the valve allows a small amount of air to pass through even when the valve is closed.
When the coolant temperature rises above 61°C, the temperature valve should open. There should be a vacuum on the oblique fitting.
Otherwise, the temperature valve must be replaced.
Note: The temperature valve can also be tested when removed. In this case, heat the valve in a water bath.
This article is available at russian, bulgarian, belarusian, ukrainian, serbian, croatian, romanian, polish, slovak, hungarian
Article verified: Polikarpov Saveliy
Share information:
Previous articles
БМВ E30: Supply system
Next articles
Similar articles on other types of BMW cars:
Removal and installation the throttle valve pipe BMW 5 Series E39 (1995-2003)
Removal and installation the oil pan BMW 5 Series E12 (1972-1981)
Throttle body — removal and installation BMW 7 Series E32 (1986-1994)
Removal and installation the pipe between the air flow meter and the… BMW 7 Series E38 (1994-2001)
Pistons — removal and installation BMW X3 E83 (2003-2010)
Removal and installation the engine BMW X5 E53 (1999-2006)
Link in different formats to this page
Visitor comments
No comments yet
- General information
- Manual
- Maintenance
- Power unit
- Engine repair
- Cooling system
- Power system (gasoline)
- Injection system (gasoline)
- Fuel system (diesel)
- Exhaust system
- Ignition system
- Charge and launch systems
- Transmission
- Car gearbox
- Clutch and drive shafts
- Chassis
- Brake system
- Suspension front and rear
- Steering
- Body
- Body care and repair
- Exterior
- Interior
- Electrical equipment
- Troubleshooting
- Lighting and signaling
- Equipment and devices
- Heater and air conditioner
- Electrical circuits
- General information
- Manual
- Repair on the road
- Weekly checks
- Maintenance
- Troubleshooting
- Power unit
- 4 cylinder engines
- 6 cylinder engines
- Engine overhaul
- Cooling and heating
- Fuel and exhaust system
- Starting and charging system
- Ignition system
- Transmission
- Clutch
- Mechanical gearbox
- Automatic gearbox
- Cardan and drive shafts
- Chassis
- Brake system
- Wheel suspension
- Steering
- Body
- Exterior
- Interior
- Electrical equipment
- Equipment and devices
- Electrical circuits
- General information
- Maintenance
- Power unit
- Engine repair
- Cooling system
- Ignition system
- Supply system
- Fuel injection system
- Exhaust system
- Transmission
- Clutch
- Car gearbox
- Front and rear axle
- Chassis
- Steering
- Brake system
- Body
- Exterior
- Interior
- Electrical equipment
- Heating system
- Equipment and devices
- Power devices
- Electrical circuits
- Power unit
- M10/M20 engine
- M40 engine
- Ignition system
- Lubrication system
- Cooling system
- Supply system
- Fuel injection
- Exhaust system
- Transmission
- Clutch
- Manual gearbox
- Front axle
- Rear axle
- Chassis
- Steering
- Brake system
- Body
- Exterior
- Interior
- Electrical equipment
- Heating system
- Equipment and devices
- Electrical circuits
- General information
- Specifications
- Operation and maintenance
- 4-cylinder engine
- Engine repair
- Cooling and lubrication system
- Supply system
- Ignition system
- 6-cylinder engine
- Engine repair
- Cooling and lubrication system
- Supply system
- Fuel injection system
- Ignition system
- Transmission
- Clutch
- 4-speed manual gearbox
- 5-speed manual gearbox
- Automatic gearbox
- Cardan and rear axle
- Chassis
- Steering
- Front suspension
- Rear suspension
- Brake system
- Electrical equipment
- Equipment and devices
- Electrical circuits