
Table of contents: Sensor on the right side of the fuel…↓ Sensor on the left side of the fuel…↓
- Home
- BMW 7 Series
- E38
- Power unit
- Fuel system (petrol)
- Removal and installation fuel level sensors
Removal and installation fuel level sensors (BMW 7 Series E38)
1. Empty the fuel tank.
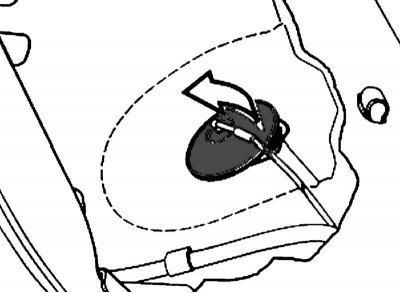
2. Remove the rear seat (see chapter Body) and remove the rubber plug. Separate the insulating mat along the perforation line (dotted line) and throw it back.
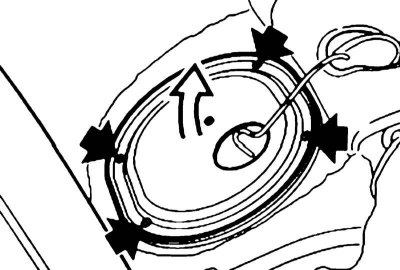
1. Loosen 4 screws and remove the cover.
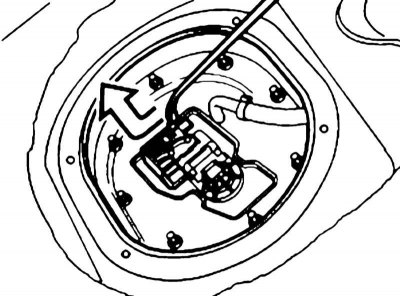
2. Disconnect the connector. Clamp the fuel line, loosen the clamp and remove the fuel line (on gasoline engines - the supply line, on diesel engines - the drain line).
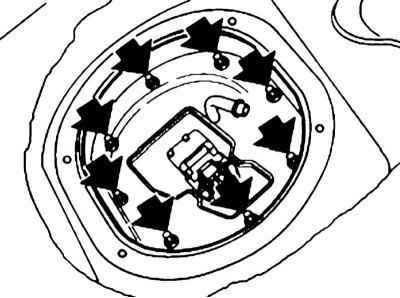
3. Remove the nuts, lift the cover as far as possible and fold it upward.
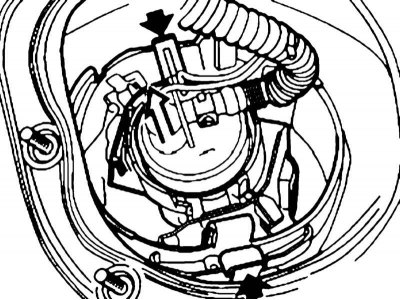
4. Press the fuel pump latches simultaneously (black case). If the housing is white, remove the fuel pump from the housing.
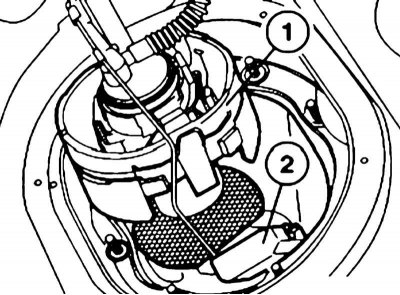
5. Remove the fuel pump assembly (1) and fuel level sensor (2).
6. Remove the sensor from the fuel pump.
7. Disconnect both connectors (1) on the fuel pump. Loosen the clamp (2) and carefully disconnect the spiral hose, avoiding damage to the pump nipple.
8. Installation is carried out in the reverse order. Before installation, straighten the connecting hose and cable (1) between the lid (2) and fuel pump (3) to avoid tension.
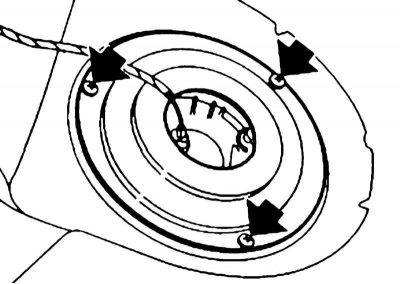
1. Remove 3 screws and remove the cover.
2. Disconnect the connector located under the cover.
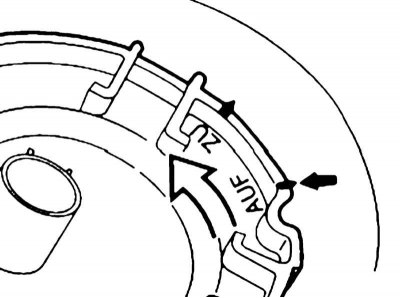
3. To remove the fuel level sensor, insert the special key with its ends into the grooves on the sensor body. Turn the bayonet lock counterclockwise until the mark "Auf" with an arrow on the fuel tank.
4. Carefully remove the sensor, avoiding bending of its bracket.
5. Installation is carried out in the reverse order. Replace the rubber gasket of the sensor. Insert the sensor so that the "Auf" mark matches the arrow on the fuel tank, and then turn the sensor until the "Zu" mark matches the arrow on the fuel tank.
2. Remove the rear seat (see chapter Body) and remove the rubber plug. Separate the insulating mat along the perforation line (dotted line) and throw it back.
Sensor on the right side of the fuel tank
1. Loosen 4 screws and remove the cover.
When installing, pay attention to the gasket.
2. Disconnect the connector. Clamp the fuel line, loosen the clamp and remove the fuel line (on gasoline engines - the supply line, on diesel engines - the drain line).
3. Remove the nuts, lift the cover as far as possible and fold it upward.
Place the connecting hose under the cover without securing it.
4. Press the fuel pump latches simultaneously (black case). If the housing is white, remove the fuel pump from the housing.
When installing, make sure both clamps are securely fastened. Check the installation of the sealing ring on the connecting nipple and, if necessary, press it carefully into place.
5. Remove the fuel pump assembly (1) and fuel level sensor (2).
Do not allow the sensor bracket to bend. Replace the gasket when installing.
6. Remove the sensor from the fuel pump.
The sensor is supplied assembled with connecting hoses and connectors.
7. Disconnect both connectors (1) on the fuel pump. Loosen the clamp (2) and carefully disconnect the spiral hose, avoiding damage to the pump nipple.
8. Installation is carried out in the reverse order. Before installation, straighten the connecting hose and cable (1) between the lid (2) and fuel pump (3) to avoid tension.
Sensor on the left side of the fuel tank
The fuel level sensor is secured to the fuel tank using a bayonet connection.
1. Remove 3 screws and remove the cover.
When installing, pay attention to the gasket.
2. Disconnect the connector located under the cover.
3. To remove the fuel level sensor, insert the special key with its ends into the grooves on the sensor body. Turn the bayonet lock counterclockwise until the mark "Auf" with an arrow on the fuel tank.
4. Carefully remove the sensor, avoiding bending of its bracket.
5. Installation is carried out in the reverse order. Replace the rubber gasket of the sensor. Insert the sensor so that the "Auf" mark matches the arrow on the fuel tank, and then turn the sensor until the "Zu" mark matches the arrow on the fuel tank.
This article is available at russian, bulgarian, belarusian, ukrainian, serbian, croatian, romanian, polish, slovak, hungarian
Article verified: Polikarpov Saveliy
Share information:
Previous articles
БМВ E38: Fuel system (petrol)
Next articles
Similar articles on other types of BMW cars:
Fuel pump and fuel level sensors — removal and installation BMW 3 Series E46 (1998-2006, petrol)
Removal and installation, checking of fuel level sensor BMW 3 Series E30 (1982-1994)
Removal and installation, checking of fuel level sensor BMW 5 Series E34 (1988-1996)
Removal and installation the fuel level sensor / fuel pump BMW 5 Series E39 (1995-2003)
Removal and installation the fuel filler cap BMW X3 E83 (2003-2010)
Removal and installation the engine BMW X5 E53 (1999-2006)
Fuel pump and fuel level sensors — removal and installation BMW 3 Series E46 (1998-2006, petrol)
Removal and installation, checking of fuel level sensor BMW 3 Series E30 (1982-1994)
Removal and installation, checking of fuel level sensor BMW 5 Series E34 (1988-1996)
Removal and installation the fuel level sensor / fuel pump BMW 5 Series E39 (1995-2003)
Removal and installation the fuel filler cap BMW X3 E83 (2003-2010)
Removal and installation the engine BMW X5 E53 (1999-2006)
Link in different formats to this page
Visitor comments
No comments yet
- General information
- Introduction to guide
- Manual
- Maintenance
- Power unit
- Engine M60/1, M60/2 (petrol)
- M62 engine (petrol)
- M57 engine (diesel)
- M67 engine (diesel)
- Cooling system
- Fuel system (petrol)
- Fuel system (diesel)
- Exhaust system
- Ignition and control systems
- Charge and launch systems
- Transmission
- Clutch
- Mechanical gearbox
- Automatic gearbox
- Cardan and drive shafts
- Chassis
- Brake system
- Front suspension
- Rear suspension
- Steering
- Body
- Exterior
- Interior
- Electrical equipment
- Equipment and devices
- Lighting
- Heating and air conditioning
- Electrical circuits
- General information
- Care and maintenance
- Power unit
- Minor engine repair
- Engine overhaul
- Lubrication system
- Cooling system
- Ignition system
- Supply system
- Injection system (petrol)
- Injection system (diesel)
- Exhaust system
- Transmission
- Clutch
- Manual gearbox
- Automatic gearbox
- Cardan gear
- Rear axle and shafts
- Chassis
- Front suspension
- Rear suspension
- Steering
- Wheels and tires
- Brake system
- Body
- Body elements
- Electrical equipment
- Equipment and devices
- Electrical circuits