
Table of contents: Removal ↓ Installation ↓
- Home
- BMW 3 Series
- E36
- Body
- Exterior
- Removal and installation the front wing
Removal and installation the front wing (BMW 3 Series E36)
Attention: Observe safety regulations when performing bodywork.
Removal
Use a wide plastic spatula to press down the decorative molding.
Remove the front bumper with an assistant.
Remove or pry off the decorative wheel cap with a screwdriver.
Mark the position of the wheel rims on the front wheel hubs with paint. This will allow the balanced wheel to be installed in the same position later. Loosen the wheel bolts.
Raise the front of the car and remove the wheel.

Unscrew and remove the "arrow" locker.
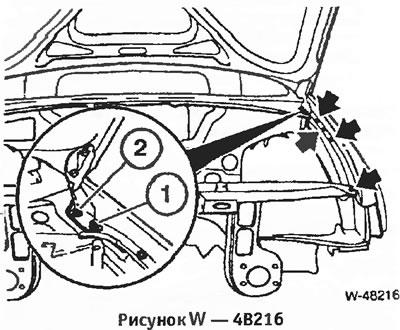
Unscrew bolt "1", loosen bolt "2".
Loosen the upper front wing mounting bolts.
Unscrew 3 bolts "A" (Figure W 48214).
Unscrew 2 bolts "B" (Figure W 48214).
Unscrew 2 bolts "C" (Figure W48214). To access the rear bolts, open the door.
The front wing is firmly attached to the underbody protection. Therefore, to separate the wing, a hair dryer with a temperature of at least 400'C is required.
Place a hair dryer with a flat nozzle at the top and rear of the front fender and soften the underbody protection with it. Then soften the underbody protection from below in the front fender contact area. This area is the most important because otherwise the fender may become deformed when removed.
Remove the front fender.
Installation
Clean the contact surfaces of the front fender.
Apply regular front fender sealing tape to the wing contact surfaces.
If necessary, paint the wing.
Install the front wing, align and screw it in place (Figure W 48214). Ensure correct and uniform clearance in relation to the door and the hood of the engine compartment.
Apply underbody protection to the inside of the front fender.
Place seal "3" inside the wing groove
Screw the locker (Figure W 48215).
Secure the decorative molding to the front fender with clamps.
Install the wheel observing the marking of the disk position on the hub. Lower the car and cross-tighten the wheel bolts to a torque of 110 Nm.
Install the front bumper.
This article is available at russian, bulgarian, belarusian, ukrainian, serbian, croatian, romanian, polish, slovak, hungarian
Article verified: Chebotarev Vladislav
Share information:
Previous articles
БМВ E36: Exterior
Next articles
Similar articles on other types of BMW cars:
Removal and installation the front wing BMW 5 Series E34 (1988-1996)
Removal and installation the front wing BMW 5 Series E39 (1995-2003)
Front wing — removal and installation BMW 7 Series E32 (1986-1994)
Removal and installation the front wing BMW 7 Series E38 (1994-2001)
Removal and installation the airbag system module in the left or… BMW X3 E83 (2003-2010)
Removal and installation front door glass BMW X5 E53 (1999-2006)
Link in different formats to this page
Visitor comments
No comments yet
- General information
- Manual
- Maintenance
- Power unit
- Engine repair
- Cooling system
- Power system (gasoline)
- Injection system (gasoline)
- Fuel system (diesel)
- Exhaust system
- Ignition system
- Charge and launch systems
- Transmission
- Car gearbox
- Clutch and drive shafts
- Chassis
- Brake system
- Suspension front and rear
- Steering
- Body
- Body care and repair
- Exterior
- Interior
- Electrical equipment
- Troubleshooting
- Lighting and signaling
- Equipment and devices
- Heater and air conditioner
- Electrical circuits
- General information
- Manual
- Repair on the road
- Weekly checks
- Maintenance
- Troubleshooting
- Power unit
- 4 cylinder engines
- 6 cylinder engines
- Engine overhaul
- Cooling and heating
- Fuel and exhaust system
- Starting and charging system
- Ignition system
- Transmission
- Clutch
- Mechanical gearbox
- Automatic gearbox
- Cardan and drive shafts
- Chassis
- Brake system
- Wheel suspension
- Steering
- Body
- Exterior
- Interior
- Electrical equipment
- Equipment and devices
- Electrical circuits
- General information
- Maintenance
- Power unit
- Engine repair
- Cooling system
- Ignition system
- Supply system
- Fuel injection system
- Exhaust system
- Transmission
- Clutch
- Car gearbox
- Front and rear axle
- Chassis
- Steering
- Brake system
- Body
- Exterior
- Interior
- Electrical equipment
- Heating system
- Equipment and devices
- Power devices
- Electrical circuits
- Power unit
- M10/M20 engine
- M40 engine
- Ignition system
- Lubrication system
- Cooling system
- Supply system
- Fuel injection
- Exhaust system
- Transmission
- Clutch
- Manual gearbox
- Front axle
- Rear axle
- Chassis
- Steering
- Brake system
- Body
- Exterior
- Interior
- Electrical equipment
- Heating system
- Equipment and devices
- Electrical circuits
- General information
- Specifications
- Operation and maintenance
- 4-cylinder engine
- Engine repair
- Cooling and lubrication system
- Supply system
- Ignition system
- 6-cylinder engine
- Engine repair
- Cooling and lubrication system
- Supply system
- Fuel injection system
- Ignition system
- Transmission
- Clutch
- 4-speed manual gearbox
- 5-speed manual gearbox
- Automatic gearbox
- Cardan and rear axle
- Chassis
- Steering
- Front suspension
- Rear suspension
- Brake system
- Electrical equipment
- Equipment and devices
- Electrical circuits