
Table of contents: Removal ↓ Installation ↓
- Home
- BMW 5 Series
- E39
- Body
- Exterior
- Removal and installation the front wing
Removal and installation the front wing (BMW 5 Series E39)
Attention: Please note the instructions for bodywork.
Removal
Press out the protective wing trim with a wide plastic spatula.
Remove the side turn signal light.
Remove the headlight trim. To do this, unfasten the trim from the inside, press it down from both holders in the middle and pull it out of the outer hook.
Remove the protective edging with an upward movement.
Remove the upper seal from the wing.
Mark the relative positions of the front wheel and hub with paint. This will allow the balanced wheel to be installed in its original position. Loosen the wheel bolts on the vehicle while it is standing on its wheels. Raise the vehicle from the front and remove the front wheel.
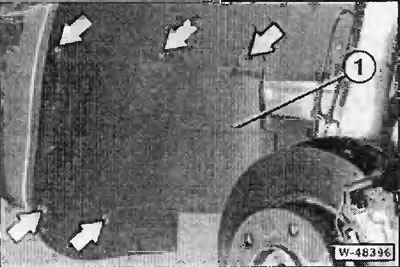
Unscrew the front mudguard fastening "1" and remove it by moving it to the side.
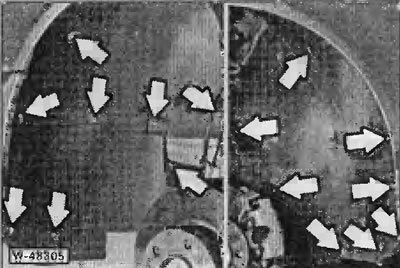
Unscrew the wheel arch lining fastening. Remove the spacer clamps, having first knocked out the spacer pins inward with a suitable pin. If the spacer pins have caps, press them out with a screwdriver, then remove the clamps. Remove the wheel arch lining.

Loosen the wing mount to the A-pillar.
Loosen the holder's fastening to the bumper.
Open the door and through the resulting gap, unscrew the bolt securing it to the A-pillar.
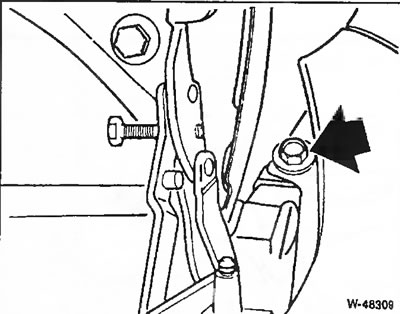
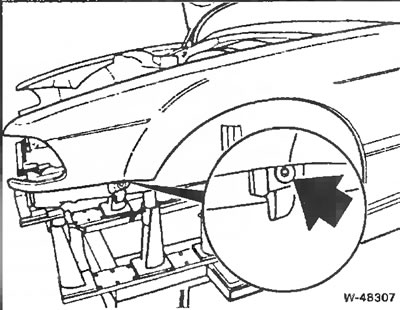
Unscrew the upper rear mounting bolt "arrow".
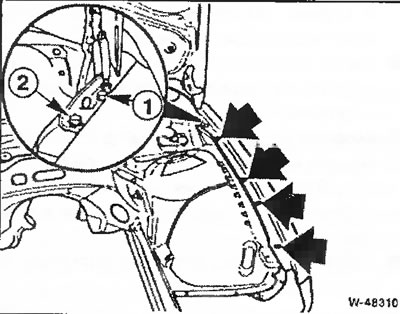
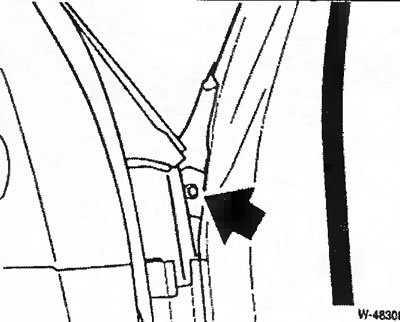
Remove the upper bolts securing the wing "arrow".
Mark the position of the hood hinge with a felt-tip pen. Circle the area where it meets the wing with a felt-tip pen.
Secure the hood so that after releasing the hinge fastening to the wing, the adjacent parts of the body and the windshield are not damaged.
Loosen bolt "1", unscrew bolt "2", see figure W-4B310.
Caution: Make sure that the washers under the bolts do not get lost.
Thanks to the protective coating of the bottom, the wing sits very firmly. Therefore, to remove the wing, you need a hair dryer that can provide a temperature of at least +400°C.
Apply a hair dryer with a flat nozzle to the upper and rear areas of the wing to soften the protective coating. Then soften the protective coating from below in the front area of the wing. This is especially important in this place, since otherwise the wing will be dented when removed.
Remove the wing.
Installation
Clean the wing mating areas and straighten them if necessary.
Apply standard wing sealant to the mating areas.
If necessary, varnish the wing.
Place the wing, first align it and loosely tighten it with bolts.
Align and tighten the engine compartment hood, see chapters below.
When aligning the wing, ensure that the seal fits tightly to the headlight housing. Pay attention to the unevenness and compliance with the prescribed values of the gaps in at the junction of the wing with the door and the engine hood.
Tighten all wing mounting bolts securely.
Apply a protective coating to the inner surface of the wing.
Tighten the holder mount to the bumper.
Screw on the wheel arch trim and front mudguard, insert the expansion clips and drive in the expansion pins firmly.
Screw on the front wheel, having first made sure that the marks on the wheel disk and the hub match. Do not lubricate the wheel bolts. Tighten the wheel bolts crosswise to a torque of 100 Nm.
Install the upper wing seal.
Press the protective edging on top.
Hook the headlight cover from the outside, press it down and secure it from the inside.
Install the side turn signal light.
Press the protective pad against the wing.
(This publication was borrowed from an online resource: BMWMan.ru)
This article is available at russian, bulgarian, belarusian, ukrainian, serbian, croatian, romanian, polish, slovak, hungarian
Article verified: Ilyinsky Matvey
Share information:
Previous articles
БМВ E39: Exterior
Next articles
Similar articles on other types of BMW cars:
Removal and installation the front wing BMW 3 Series E36 (1990-2000)
Removal and installation the front wing BMW 3 Series E46 (1998-2006)
Front wing — removal and installation BMW 7 Series E32 (1986-1994)
Removal and installation the front wing BMW 7 Series E38 (1994-2001)
Removal and installation the airbag system module in the left or… BMW X3 E83 (2003-2010)
Removal and installation front door glass BMW X5 E53 (1999-2006)
Link in different formats to this page
Visitor comments
No comments yet
- General information
- Governing bodies
- Manual
- Maintenance
- Power unit
- Engine repair
- Lubrication system
- Cooling system
- Ignition system
- Supply system
- Injection system (gasoline)
- Injection system (diesel)
- Exhaust system
- Transmission
- Clutch
- Car gearbox
- Front axle
- Rear axle
- Chassis
- Steering
- Brake system
- Wheels and tires
- Body
- Interior
- Exterior
- Heating system
- Electrical equipment
- Equipment and devices
- Power devices
- Windscreen wipers
- Electrical circuits
- General information
- Manual
- Maintenance
- Power unit
- Engine repair
- Ignition system
- Engine lubrication system
- Cooling system
- Fuel system (gasoline)
- Fuel system (diesel)
- Exhaust system
- Transmission
- Clutch
- Car gearbox
- Chassis
- Front and rear suspension
- Steering
- Brake system
- Body
- Exterior
- Interior
- Electrical equipment
- Heating system
- Equipment and devices
- Power devices
- Electrical circuits
- General information
- Manual
- Maintenance
- Power unit
- Engine in a car
- Engine overhaul
- Cooling system
- Supply system
- Ignition system
- Control system
- Transmission
- Clutch
- Manual gearbox
- Automatic gearbox
- Transmission line
- Chassis
- Steering
- Front suspension
- Rear suspension
- Brake system
- Body
- Body elements
- Car care and painting
- Electrical equipment
- Heater and air conditioner
- Equipment and devices
- Starter and generator
- Electrical circuits
- General information
- Operation and maintenance
- Specifications
- Power unit
- Engine repair
- Cooling and lubrication system
- Supply system
- Ecotronic power supply system
- Fuel injection system
- Ignition system
- Transmission
- Clutch
- Gearbox BMW 242/4
- Gearbox Getrag 262/8
- Gearbox Getrag 265/6
- Automatic gearbox
- Cardan gear
- Rear axle
- Chassis
- Steering
- Front suspension
- Rear suspension
- Brake system
- Electrical equipment
- Equipment and devices
- Electrical circuits