
Table of contents: Removal ↓ Installation ↓
- Home
- BMW 3 Series
- E46
- Body
- Exterior
- Removal and installation the front wing
Removal and installation the front wing (BMW 3 Series E46)
Follow the instructions for carrying out bodywork, refer to Section General information and safety precautions.
Removal
1. Detach the strip on the wing using a wide plastic spatula.
2. Remove the side turn signal repeater, refer to Section Replacement of incandescent lamps for outdoor lighting.
3. Remove the headlight, refer to Section Removal and installation headlights.
4. Remove the edge protection upwards.
5. Mark the position of the corresponding front wheel relative to the hub with paint. This will allow the balanced wheel to be installed in its original position during assembly. Loosen the wheel mounting bolts with the car on the ground. Raise the front of the car, place it on stands and remove the front wheel.
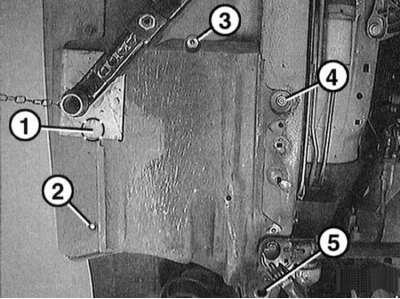
6. Remove the wing liner at the longitudinal beam. To do this, remove the clamps "1" and "2" with a small screwdriver.
First remove the pin from the center of the clamp, then remove the clamp. Clamp "2" in the illustration is covered by a bar.
7. Unscrew the nut "3" and bolt "4". Disconnect the lower engine compartment cover at point "5", refer to Section Removal and installation the lower engine compartment cover.
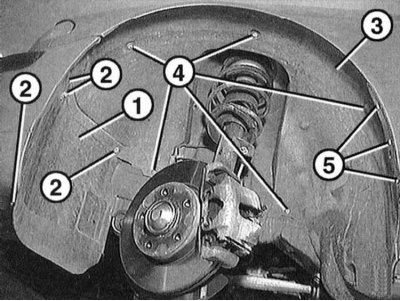
8. Unscrew the mounting bolts "1" and remove the front wheel arch visor "2".
Remove the extra bolt at the front bottom. The bolt is not visible in the illustration.
9. Unscrew the mounting bolts "4" of the wing liner "3". Remove the clamps "5", first removing the pins and then the clamps.
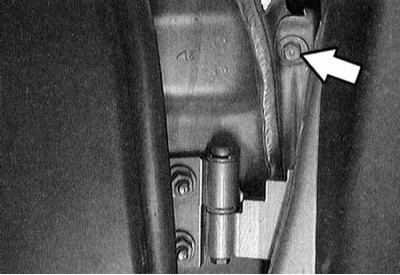
10. Open the door and unscrew the mounting bolt through the gap (arrow on the illustration) at stand "A".
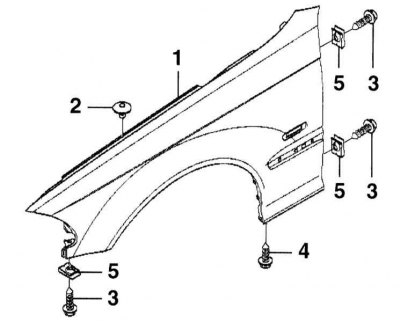
11. Remove three 22 mm long self-tapping screws "3" and one 19 mm long self-tapping screw "4".
12. Remove the upper Torx "2" mounting screws of the wing "1". 5 - sheet metal nuts.
13. Thanks to the presence of a protective coating on the bottom, the wing is securely fixed. To detach the wing, you need a hair dryer that creates a temperature of at least 400°C.
14. Place a hair dryer with a flat nozzle on the upper and rear area of the wing and soften the protective coating. Then remove the protective coating from below in the front part of the wing. It is important to do this in the specified place, otherwise the wing may bulge when removed.
15. Remove the wing.
Installation
16. Clean the adjacent surfaces of the wing and straighten if necessary.
17. If necessary, paint the wing.
18. In the areas of contact, lay a regular sealing tape.
19. Install the wing in place, adjust it approximately and secure it lightly with bolts.
20. Adjust the wing, making sure to maintain an even gap with the door and hood, refer to Specifications.
21. Tighten all wing mounting bolts.
22. Apply a protective coating to the inner surface of the wing.
23. Bolt the fender liner and front wheel arch visor in place. Insert the clips and press the pins flush.
24. Install the front wheel so that the markings applied during removal match. Pre-lubricate the centering belt of the wheel disk on the hub with a thin layer of bearing grease. Do not lubricate the wheel mounting bolts. Replace rusty bolts. Tighten the bolts. Lower the car onto the wheels and tighten the bolts crosswise to a torque of 100 N·m.
25. Place the edge protection element on top.
26. Install the headlight, refer to Section Removal and installation headlights.
27. Install the side turn signal repeater, refer to Section Replacement of incandescent lamps for outdoor lighting.
28. Place the bar on the wing.
This article is available at russian, bulgarian, belarusian, ukrainian, serbian, croatian, romanian, polish, slovak, hungarian
Article verified: Sevastyanov Nikolay
Share information:
Previous articles
БМВ E46: Exterior
Next articles
Similar articles on other types of BMW cars:
Removal and installation the front wing BMW 5 Series E34 (1988-1996)
Removal and installation the front wing BMW 5 Series E39 (1995-2003)
Front wing — removal and installation BMW 7 Series E32 (1986-1994)
Removal and installation the front wing BMW 7 Series E38 (1994-2001)
Removal and installation the airbag system module in the left or… BMW X3 E83 (2003-2010)
Removal and installation front door glass BMW X5 E53 (1999-2006)
Link in different formats to this page
Visitor comments
No comments yet
- General information
- Manual
- Maintenance
- Power unit
- Engine repair
- Cooling system
- Power system (gasoline)
- Injection system (gasoline)
- Fuel system (diesel)
- Exhaust system
- Ignition system
- Charge and launch systems
- Transmission
- Car gearbox
- Clutch and drive shafts
- Chassis
- Brake system
- Suspension front and rear
- Steering
- Body
- Body care and repair
- Exterior
- Interior
- Electrical equipment
- Troubleshooting
- Lighting and signaling
- Equipment and devices
- Heater and air conditioner
- Electrical circuits
- General information
- Manual
- Repair on the road
- Weekly checks
- Maintenance
- Troubleshooting
- Power unit
- 4 cylinder engines
- 6 cylinder engines
- Engine overhaul
- Cooling and heating
- Fuel and exhaust system
- Starting and charging system
- Ignition system
- Transmission
- Clutch
- Mechanical gearbox
- Automatic gearbox
- Cardan and drive shafts
- Chassis
- Brake system
- Wheel suspension
- Steering
- Body
- Exterior
- Interior
- Electrical equipment
- Equipment and devices
- Electrical circuits
- General information
- Maintenance
- Power unit
- Engine repair
- Cooling system
- Ignition system
- Supply system
- Fuel injection system
- Exhaust system
- Transmission
- Clutch
- Car gearbox
- Front and rear axle
- Chassis
- Steering
- Brake system
- Body
- Exterior
- Interior
- Electrical equipment
- Heating system
- Equipment and devices
- Power devices
- Electrical circuits
- Power unit
- M10/M20 engine
- M40 engine
- Ignition system
- Lubrication system
- Cooling system
- Supply system
- Fuel injection
- Exhaust system
- Transmission
- Clutch
- Manual gearbox
- Front axle
- Rear axle
- Chassis
- Steering
- Brake system
- Body
- Exterior
- Interior
- Electrical equipment
- Heating system
- Equipment and devices
- Electrical circuits
- General information
- Specifications
- Operation and maintenance
- 4-cylinder engine
- Engine repair
- Cooling and lubrication system
- Supply system
- Ignition system
- 6-cylinder engine
- Engine repair
- Cooling and lubrication system
- Supply system
- Fuel injection system
- Ignition system
- Transmission
- Clutch
- 4-speed manual gearbox
- 5-speed manual gearbox
- Automatic gearbox
- Cardan and rear axle
- Chassis
- Steering
- Front suspension
- Rear suspension
- Brake system
- Electrical equipment
- Equipment and devices
- Electrical circuits