
- Home
- BMW 3 Series
- E46
- Electrical equipment
- Lighting and signaling
- Replacement of incandescent lamps for outdoor lighting
Replacement of incandescent lamps for outdoor lighting (BMW 3 Series E46)
Incandescent lamps wear out over time. Therefore, they must be replaced with new ones every two years, even if they still retain their functionality. This does not apply to halogen lamps, which are used, for example, for low and high beams, as well as in fog lights. As a rule, their service life is significantly higher and they are replaced only if damaged. The weakening of the luminous intensity in incandescent lamps is determined by the black deposit on the glass bulb.
Before replacing an incandescent lamp, turn off the corresponding consumer.
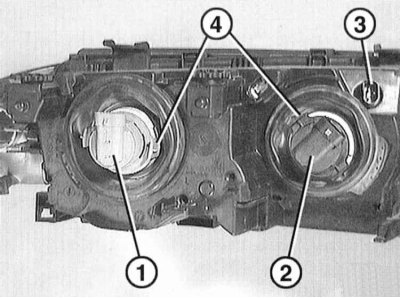
1. Disconnect the connector on the socket of the damaged lamp. Turn the fastening ring "4" on the socket of the low beam "1" or high beam "2" lamp counterclockwise until it stops and remove it.
2. Press the damaged lamp into the socket, turn it clockwise until it is released and remove it.
3. Insert the new bulb into the socket and turn it clockwise until it stops.
4. Place the socket into the headlight and turn it clockwise until it stops.
5. Connect the connector to the socket.
6. The parking light lamps are located in the high beam headlight housing.

7. Turn the parking light bulb holder "3" counterclockwise and remove it from the housing.
8. Remove the lamp from the socket.
9. Insert the new parking light bulb into the socket.
10. Insert the bulb holder into the headlight housing with the large tab facing up and turn it clockwise until it stops.
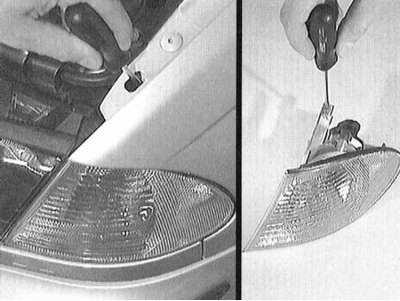
11. To replace the bulb, you need to remove the turn signal. To do this, insert a screwdriver through the hole in the wing, see the left side of the illustration.
12. Press down the turn signal mounting hook with a screwdriver to release it. For clarification, this process is shown with the turn signal removed, refer to the right side of the illustration.
13. Remove the forward turn signal.

14. Turn bulb holder "1" counterclockwise and remove from turn signal housing.
15. Press the damaged lamp into the socket, turn it counterclockwise until it is released and remove it.
16. Insert the new bulb into the socket. Press the bulb in and turn it clockwise until it locks into place.
17. Insert the bulb holder into the headlight housing and turn it clockwise until it stops, so that the holder is locked in place.
18. Insert the turn signal with both tabs "2" into the guides on the body and press so that the hooks are clearly fixed.
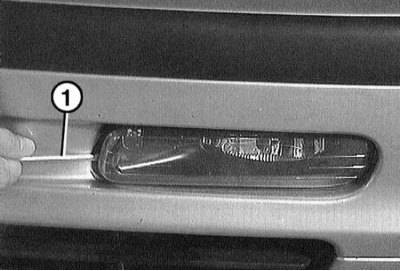
19. Using a small screwdriver "1", remove the fog light from the side of the body.
20. Disconnect the connector at the headlight.
21. Press the damaged bulb into the socket, turn it counterclockwise until it is released, and remove it.
22. Insert the new bulb into the socket. Press the bulb in and turn it clockwise until it locks into place.
23. Connect the connector to the fog light.
24. Insert the headlight and secure it.
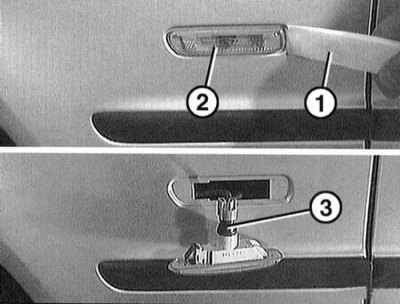
25. Using a plastic wedge "1" or your fingers, move the side indicator "2" forward in the direction of travel and remove it from the body opening.
26. Turn the cartridge "3" counterclockwise and remove it from the turn signal.
27. Remove the lamp from the socket.
28. Press the new lamp into the socket.
29. Insert the socket into the turn signal and turn clockwise until the socket locks into place.
30. Insert the turn signal included in the kit into the body hole and press it down.
1 - turn signal
2 - reversing light
3 - fog light
4 - side light
5 — side light/brake light
31. Removing the side lamp holder: Release the clips from the luggage compartment in the direction of the arrow. Remove the lamp holder and disconnect the connector.
32. Removing the lamp holder in the trunk lid: Remove the 2 fasteners of the trunk lid trim at point "1" with a screwdriver. Release the bracket "2" on the lamp holder. Remove the lamp holder and disconnect the connector.
33. Press the damaged lamp into the socket, turn it counterclockwise until it is released and remove it.
34. Insert the new bulb into the socket. Press the bulb in and turn it clockwise until it locks into place.
35. Connect the connector to the lamp holder. Insert the holder and press it until you hear a click.
36. Secure the boot lid trim with two clips, refer to Section Removal and installation the trunk lid.
37. Remove the cover from the clips under the brake light from the front side, then remove it.
38. Disconnect the light strip and unplug the connection.
39. Connect the connector to the new light strip, secure the light strip.
40. First insert the cover with brackets in the area of the rear light, then press it.
41. Insert a small screwdriver "1" into the slot on the right and press to the left, then remove the license plate light "2".
42. Remove the damaged spotlight from the contact terminals.
43. Insert the new spotlight.
44. Insert the diffuser and press it in. The latches should click into place clearly.
Before replacing an incandescent lamp, turn off the corresponding consumer.
Do not touch the lamp with bare fingers. The fingerprint evaporates and settles on the reflector, reducing the luminous flux of the lamp. Be sure to install a lamp of the same design. Be sure to replace it with a lamp of the same design. Any stains accidentally left on the lamp bulb can be removed with a clean cloth soaked in alcohol.
- Turn off the switch of the corresponding lamp.
- Turn off the ignition.
- Open the hood or trunk lid.
Low/high beam
Halogen bulbs used for low and high beams, as well as for fog lights, are under pressure and may crack when replaced. Therefore, when replacing such bulbs, it is necessary to use protective glasses and gloves. When replacing gas discharge lamps (xenon low beam lamps) there is a danger to life due to unskilled handling of the high-voltage element of the lamp. Therefore, their replacement is not described here.
1. Disconnect the connector on the socket of the damaged lamp. Turn the fastening ring "4" on the socket of the low beam "1" or high beam "2" lamp counterclockwise until it stops and remove it.
The illustration shows a removed headlight. 3 – parking light bulb socket.
2. Press the damaged lamp into the socket, turn it clockwise until it is released and remove it.
3. Insert the new bulb into the socket and turn it clockwise until it stops.
4. Place the socket into the headlight and turn it clockwise until it stops.
5. Connect the connector to the socket.
Parking light
6. The parking light lamps are located in the high beam headlight housing.
7. Turn the parking light bulb holder "3" counterclockwise and remove it from the housing.
8. Remove the lamp from the socket.
9. Insert the new parking light bulb into the socket.
10. Insert the bulb holder into the headlight housing with the large tab facing up and turn it clockwise until it stops.
Front turn signal
11. To replace the bulb, you need to remove the turn signal. To do this, insert a screwdriver through the hole in the wing, see the left side of the illustration.
12. Press down the turn signal mounting hook with a screwdriver to release it. For clarification, this process is shown with the turn signal removed, refer to the right side of the illustration.
In this case, the screwdriver must be pressed down hard so that the hook clicks into place.
13. Remove the forward turn signal.
14. Turn bulb holder "1" counterclockwise and remove from turn signal housing.
15. Press the damaged lamp into the socket, turn it counterclockwise until it is released and remove it.
16. Insert the new bulb into the socket. Press the bulb in and turn it clockwise until it locks into place.
17. Insert the bulb holder into the headlight housing and turn it clockwise until it stops, so that the holder is locked in place.
18. Insert the turn signal with both tabs "2" into the guides on the body and press so that the hooks are clearly fixed.
Fog light
The halogen bulbs in the fog lights, low beam and high beam are under pressure and may crack when replaced. Therefore, use gloves and protective glasses when replacing the bulb.
19. Using a small screwdriver "1", remove the fog light from the side of the body.
To avoid damaging the paintwork, place a rag under the screwdriver.
20. Disconnect the connector at the headlight.
21. Press the damaged bulb into the socket, turn it counterclockwise until it is released, and remove it.
22. Insert the new bulb into the socket. Press the bulb in and turn it clockwise until it locks into place.
23. Connect the connector to the fog light.
24. Insert the headlight and secure it.
Side direction indicator
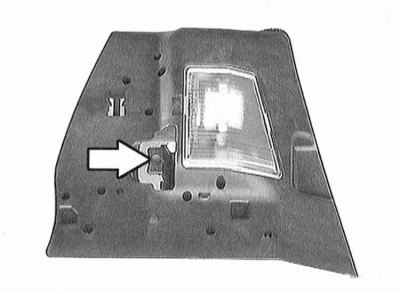
25. Using a plastic wedge "1" or your fingers, move the side indicator "2" forward in the direction of travel and remove it from the body opening.
26. Turn the cartridge "3" counterclockwise and remove it from the turn signal.
27. Remove the lamp from the socket.
28. Press the new lamp into the socket.
29. Insert the socket into the turn signal and turn clockwise until the socket locks into place.
30. Insert the turn signal included in the kit into the body hole and press it down.
Rear light
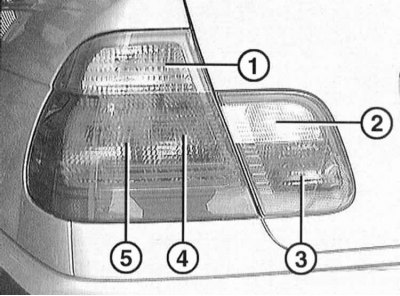
The arrangement of the lamps in the rear grouped light
1 - turn signal
2 - reversing light
3 - fog light
4 - side light
5 — side light/brake light
31. Removing the side lamp holder: Release the clips from the luggage compartment in the direction of the arrow. Remove the lamp holder and disconnect the connector.
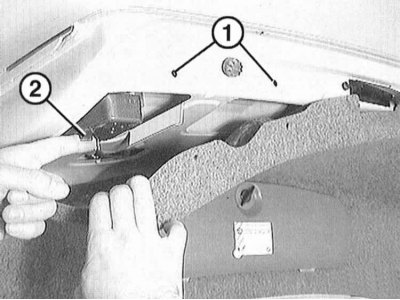
32. Removing the lamp holder in the trunk lid: Remove the 2 fasteners of the trunk lid trim at point "1" with a screwdriver. Release the bracket "2" on the lamp holder. Remove the lamp holder and disconnect the connector.
33. Press the damaged lamp into the socket, turn it counterclockwise until it is released and remove it.
34. Insert the new bulb into the socket. Press the bulb in and turn it clockwise until it locks into place.
35. Connect the connector to the lamp holder. Insert the holder and press it until you hear a click.
36. Secure the boot lid trim with two clips, refer to Section Removal and installation the trunk lid.
Central brake light
If the LED fails, the entire light strip must be replaced.
37. Remove the cover from the clips under the brake light from the front side, then remove it.
38. Disconnect the light strip and unplug the connection.
39. Connect the connector to the new light strip, secure the light strip.
40. First insert the cover with brackets in the area of the rear light, then press it.
License plate light
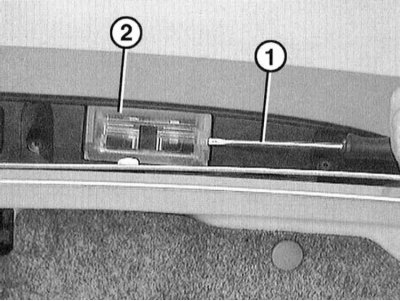
41. Insert a small screwdriver "1" into the slot on the right and press to the left, then remove the license plate light "2".
To avoid damaging the paintwork, place a rag under the screwdriver.
42. Remove the damaged spotlight from the contact terminals.
43. Insert the new spotlight.
44. Insert the diffuser and press it in. The latches should click into place clearly.
This article is available at russian, bulgarian, belarusian, ukrainian, serbian, croatian, romanian, polish, slovak, hungarian
Article verified: Sevastyanov Nikolay
Share information:
Previous articles
БМВ E46: Lighting and signaling
Next articles
Similar articles on other types of BMW cars:
Replacing incandescent lamps BMW 5 Series E34 (1988-1996)
Replacing incandescent lamps BMW 5 Series E39 (1995-2003)
Replacement of lamps of outdoor lighting devices BMW 7 Series E38 (1994-2001)
Filter replacement BMW 7 Series E32 (1986-1994)
Instructions for handling incandescent lamps (external lighting) BMW X3 E83 (2003-2010)
Lamps in lighting fixtures — replacement BMW X5 E53 (1999-2006)
Link in different formats to this page
Visitor comments
No comments yet
- General information
- Manual
- Maintenance
- Power unit
- Engine repair
- Cooling system
- Power system (gasoline)
- Injection system (gasoline)
- Fuel system (diesel)
- Exhaust system
- Ignition system
- Charge and launch systems
- Transmission
- Car gearbox
- Clutch and drive shafts
- Chassis
- Brake system
- Suspension front and rear
- Steering
- Body
- Body care and repair
- Exterior
- Interior
- Electrical equipment
- Troubleshooting
- Lighting and signaling
- Equipment and devices
- Heater and air conditioner
- Electrical circuits
- General information
- Manual
- Repair on the road
- Weekly checks
- Maintenance
- Troubleshooting
- Power unit
- 4 cylinder engines
- 6 cylinder engines
- Engine overhaul
- Cooling and heating
- Fuel and exhaust system
- Starting and charging system
- Ignition system
- Transmission
- Clutch
- Mechanical gearbox
- Automatic gearbox
- Cardan and drive shafts
- Chassis
- Brake system
- Wheel suspension
- Steering
- Body
- Exterior
- Interior
- Electrical equipment
- Equipment and devices
- Electrical circuits
- General information
- Maintenance
- Power unit
- Engine repair
- Cooling system
- Ignition system
- Supply system
- Fuel injection system
- Exhaust system
- Transmission
- Clutch
- Car gearbox
- Front and rear axle
- Chassis
- Steering
- Brake system
- Body
- Exterior
- Interior
- Electrical equipment
- Heating system
- Equipment and devices
- Power devices
- Electrical circuits
- Power unit
- M10/M20 engine
- M40 engine
- Ignition system
- Lubrication system
- Cooling system
- Supply system
- Fuel injection
- Exhaust system
- Transmission
- Clutch
- Manual gearbox
- Front axle
- Rear axle
- Chassis
- Steering
- Brake system
- Body
- Exterior
- Interior
- Electrical equipment
- Heating system
- Equipment and devices
- Electrical circuits
- General information
- Specifications
- Operation and maintenance
- 4-cylinder engine
- Engine repair
- Cooling and lubrication system
- Supply system
- Ignition system
- 6-cylinder engine
- Engine repair
- Cooling and lubrication system
- Supply system
- Fuel injection system
- Ignition system
- Transmission
- Clutch
- 4-speed manual gearbox
- 5-speed manual gearbox
- Automatic gearbox
- Cardan and rear axle
- Chassis
- Steering
- Front suspension
- Rear suspension
- Brake system
- Electrical equipment
- Equipment and devices
- Electrical circuits