
- Home
- BMW 3 Series
- E46
- Body
- Exterior
- Removal and installation the front bumper
Removal and installation the front bumper (BMW 3 Series E46)
Front bumper

1 - bumper beam
2 - bumper trim
3 - Towing hole cover
4 — lower grille. Has different design depending on the model
5 - fog light cover
6 - grille insert
7 - Automatic transmission grille insert
8 - bar
9 — lining. For attaching the license plate
10 — mounting sleeve
11 — bolt, 40 Nm
12 - Bolt. Only for aerodynamic package
13 — mounting sleeve
14 - sealing gasket
15 - left support
16 — shock absorber
17 - spacer plate
The front bumper is designed in such a way that it can withstand a frontal collision at a speed of up to 4 km/h without damage. The impact energy is absorbed by an aluminum beam located inside and two hydraulic shock absorbers. The shock absorbers are attached to two easily replaceable deformable elements, the so-called impact boxes. At a speed of up to 15 km/h, the impact energy is absorbed by the deformation of the shock absorbers and impact boxes in such a way that damage to the engine mount beam is excluded.
Removal
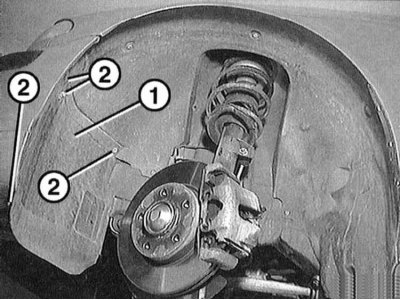
1. Unscrew the mounting bolts "2" of the wheel arch visor "1".
Remove the additional bolt at the front bottom. Bolt not shown in the illustration.
2. Disconnect and remove the front wheel arch visor.
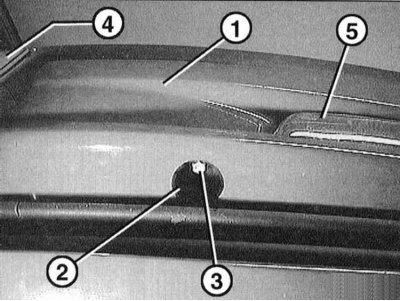
3. Unscrew the mounting bolts "3" of the bumper "1" to the shock absorbers from below through two holes "2". 4 - license plate, 5 - fog lamp. To unscrew, you need a Torx head, for example, HEZET-880-Mlg-Torx-E2 with an extension HAZET-8822-10 and, if necessary, a square adapter 958-2 with 5/8 to 1/2 inches.
4. Pull the bumper slightly and disconnect the plug connections of the horn on the left and right.
5. Disconnect the fog light plug connections, if any.
6. Pull the bumper forward with the help of an assistant.
Installation
7. Assemble the bumper if necessary.
8. If necessary, put the covers on the shock absorbers. The cover often remains in the shock absorber mount when removed.
9. With the help of an assistant, position the bumper horizontally. Connect the plug connections of the horns and/or fog lights.
10. Insert the bumper into the side guides and press back.
11. Align the bumper parallel to the body and secure with a torque of 40 Nm.
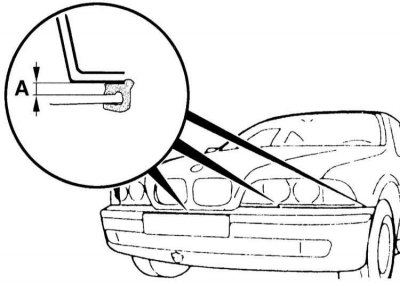
12. The distance between the bumper and the body should be A = 5±1 mm. Otherwise, remove the bumper and adjust the bumper height at the shock absorbers.
13. The height of the bumper is adjusted by rotating the plastic inserts with an internal hexagon "5" in the shock absorbers "1". 2 - nuts, 3 - nuts, 4 - connectors.
14. Insert the front wheel arch visors and secure them with bolts.
This article is available at russian, bulgarian, belarusian, ukrainian, serbian, croatian, romanian, polish, slovak, hungarian
Article verified: Sevastyanov Nikolay
Share information:
Previous articles
БМВ E46: Exterior
Next articles
Similar articles on other types of BMW cars:
Removal and installation the front bumper BMW 5 Series E34 (1988-1996)
Removal and installation the front bumper BMW 5 Series E39 (1995-2003)
Front bumper — removal and installation BMW 7 Series E32 (1986-1994)
Removal and installation of the front bumper and its components BMW 7 Series E38 (1994-2001)
Removal and installation the airbag system module in the left or… BMW X3 E83 (2003-2010)
Removal and installation front door glass BMW X5 E53 (1999-2006)
Link in different formats to this page
Visitor comments
No comments yet
- General information
- Manual
- Maintenance
- Power unit
- Engine repair
- Cooling system
- Power system (gasoline)
- Injection system (gasoline)
- Fuel system (diesel)
- Exhaust system
- Ignition system
- Charge and launch systems
- Transmission
- Car gearbox
- Clutch and drive shafts
- Chassis
- Brake system
- Suspension front and rear
- Steering
- Body
- Body care and repair
- Exterior
- Interior
- Electrical equipment
- Troubleshooting
- Lighting and signaling
- Equipment and devices
- Heater and air conditioner
- Electrical circuits
- General information
- Manual
- Repair on the road
- Weekly checks
- Maintenance
- Troubleshooting
- Power unit
- 4 cylinder engines
- 6 cylinder engines
- Engine overhaul
- Cooling and heating
- Fuel and exhaust system
- Starting and charging system
- Ignition system
- Transmission
- Clutch
- Mechanical gearbox
- Automatic gearbox
- Cardan and drive shafts
- Chassis
- Brake system
- Wheel suspension
- Steering
- Body
- Exterior
- Interior
- Electrical equipment
- Equipment and devices
- Electrical circuits
- General information
- Maintenance
- Power unit
- Engine repair
- Cooling system
- Ignition system
- Supply system
- Fuel injection system
- Exhaust system
- Transmission
- Clutch
- Car gearbox
- Front and rear axle
- Chassis
- Steering
- Brake system
- Body
- Exterior
- Interior
- Electrical equipment
- Heating system
- Equipment and devices
- Power devices
- Electrical circuits
- Power unit
- M10/M20 engine
- M40 engine
- Ignition system
- Lubrication system
- Cooling system
- Supply system
- Fuel injection
- Exhaust system
- Transmission
- Clutch
- Manual gearbox
- Front axle
- Rear axle
- Chassis
- Steering
- Brake system
- Body
- Exterior
- Interior
- Electrical equipment
- Heating system
- Equipment and devices
- Electrical circuits
- General information
- Specifications
- Operation and maintenance
- 4-cylinder engine
- Engine repair
- Cooling and lubrication system
- Supply system
- Ignition system
- 6-cylinder engine
- Engine repair
- Cooling and lubrication system
- Supply system
- Fuel injection system
- Ignition system
- Transmission
- Clutch
- 4-speed manual gearbox
- 5-speed manual gearbox
- Automatic gearbox
- Cardan and rear axle
- Chassis
- Steering
- Front suspension
- Rear suspension
- Brake system
- Electrical equipment
- Equipment and devices
- Electrical circuits