
Table of contents: Removal ↓ Installation ↓
- Home
- BMW 7 Series
- E32
- Body
- Body elements
- Front bumper — removal and installation
Front bumper — removal and installation (BMW 7 Series E32)
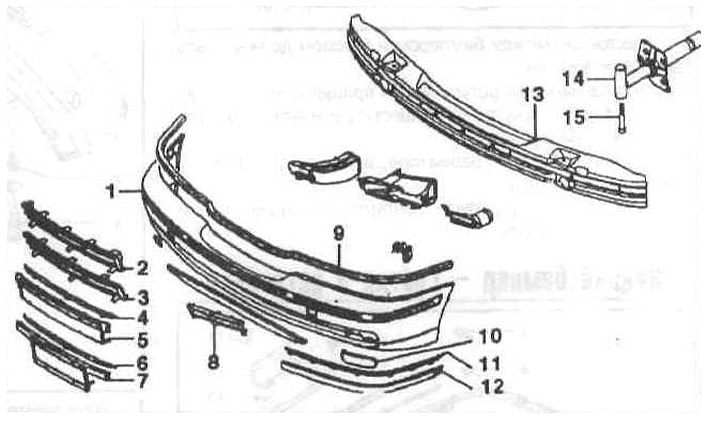
2 - the grill is open;
3 - the grill is closed;
4 — shield;
5 - lining;
6 — shield;
7 - lining;
8 - lattice;
9 - gasket;
10 — lid;
11 — shield;
12 - overhead strip;
14— shock absorbing buffer;
15 - cylindrical bolt.
The bumper is positioned so that no damage occurs in a collision at a speed of up to 4 km/h. The impact energy is absorbed by the aluminum mount located inside and two hydraulic shock-absorbing buffers. The shock-absorbing buffers are mounted on two easily deformable, replaceable elements, the so-called shock-absorbing blocks. At a collision speed of up to 15 km/h, the impact energy is absorbed by the deformation of the hydraulic buffer and shock-absorbing blocks, i.e. damage to the engine mounts (supports) is prevented.
Removal
Remove the three outer bolts of the front wheel arch protection panels on the left and right. Pull the panels out of the bumper from the side.
Note: There is no need to remove the front wheels.
Remove the sliding clips of the radiator grille in the bumper by prying the clip up and then pulling it out.
Pry the grill up at the top and remove it.
Remove the TORX T-50 bolts from the shock absorbing buffers on the left and right.
Pull the bumper forward with the help of an assistant.
If equipped, disconnect the fog light plugs and/or headlamp cleaning system hoses. Clamp the hoses to prevent fluid from leaking.
Installation
If necessary, assemble the bumper.
Insert the bumper horizontally with the help of an assistant. If available, connect the fog light plugs and/or headlight cleaning system hoses.
Insert the bumper into the side guides and press it back.
Align the bumper parallel to the body, secure with bolts and tighten them to a torque of 40 Nm.
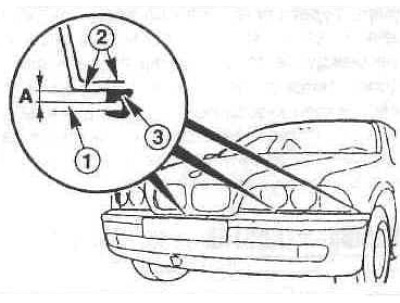
The distance between the bumper and the body should be equal to A = 5+1 mm.
The height of the bumper is adjusted by rotating the plastic insert with an internal hexagon in the shock-absorbing buffer.
Insert the radiator grille, insert the sliding clips and hammer them in.
Install and bolt the front wheel arch protection panels.
This article is available at russian, bulgarian, belarusian, ukrainian, serbian, croatian, romanian, polish, slovak, hungarian
Article verified: Sevastyanov Nikolay
Share information:
Previous articles
БМВ E32: Body elements
Next articles
Similar articles on other types of BMW cars:
Removal and installation the front bumper BMW 3 Series E30 (1982-1994)
Removal and installation the front bumper BMW 3 Series E36 (1990-2000)
Removal and installation the front bumper BMW 5 Series E34 (1988-1996)
Removal and installation the front bumper BMW 5 Series E39 (1995-2003)
Removal and installation the airbag system module in the left or… BMW X3 E83 (2003-2010)
Removal and installation front door glass BMW X5 E53 (1999-2006)
Link in different formats to this page
Visitor comments
No comments yet
- General information
- Introduction to guide
- Manual
- Maintenance
- Power unit
- Engine M60/1, M60/2 (petrol)
- M62 engine (petrol)
- M57 engine (diesel)
- M67 engine (diesel)
- Cooling system
- Fuel system (petrol)
- Fuel system (diesel)
- Exhaust system
- Ignition and control systems
- Charge and launch systems
- Transmission
- Clutch
- Mechanical gearbox
- Automatic gearbox
- Cardan and drive shafts
- Chassis
- Brake system
- Front suspension
- Rear suspension
- Steering
- Body
- Exterior
- Interior
- Electrical equipment
- Equipment and devices
- Lighting
- Heating and air conditioning
- Electrical circuits
- General information
- Care and maintenance
- Power unit
- Minor engine repair
- Engine overhaul
- Lubrication system
- Cooling system
- Ignition system
- Supply system
- Injection system (petrol)
- Injection system (diesel)
- Exhaust system
- Transmission
- Clutch
- Manual gearbox
- Automatic gearbox
- Cardan gear
- Rear axle and shafts
- Chassis
- Front suspension
- Rear suspension
- Steering
- Wheels and tires
- Brake system
- Body
- Body elements
- Electrical equipment
- Equipment and devices
- Electrical circuits