
- Home
- BMW 7 Series
- E32
- Body
- Body elements
- Door — removal, installation and adjustment
Door — removal, installation and adjustment (BMW 7 Series E32)
The front and rear doors are removed and installed in the same way.
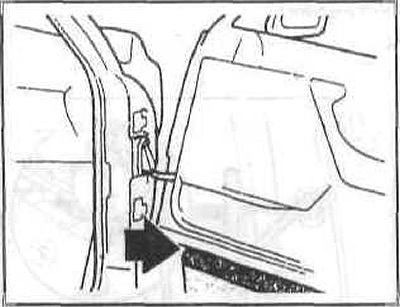
Unscrew the bolt from each hinge (hinge) using a 10 mm cap head and a gimbal collar.
Press the fastener sideways from the finger.
Knock the pin out with a punch upwards, holding the door latch with a hammer if necessary.
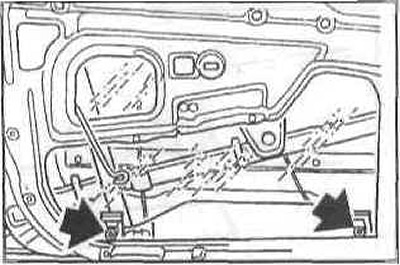
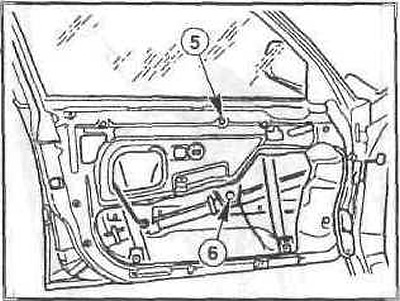
Remove the door from its hinges and place it on a suitable stand (arrow). The stand should be adjusted so that the wires from the door wiring harness are not stretched.
Loosen the plug mounting frame bolts (arrows) and then remove the plug.
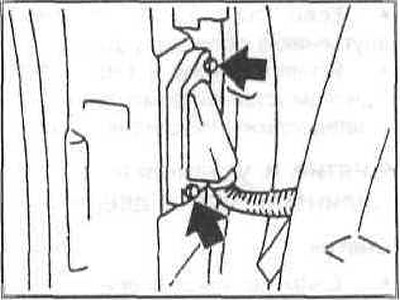
Pull out the staple (top arrow), to disconnect the plug.
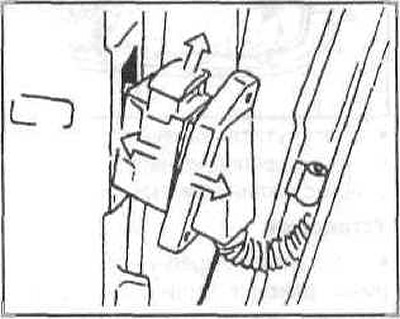
Connect the plug for electrical consumers and insert the mounting bracket. Insert the plug into the door post, secure the mounting frame with bolts.
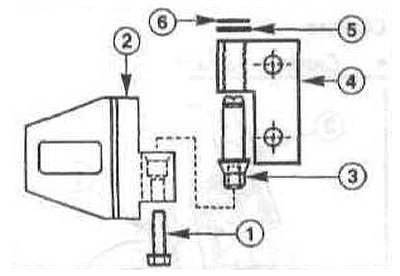
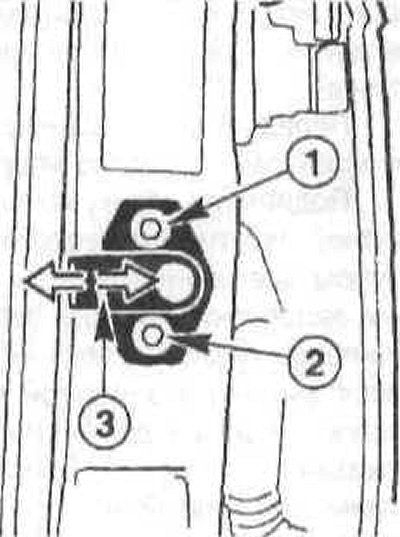
1 - Hexagon head bolt;
2 - upper loop on the body;
3 - loop finger;
4 - upper hinge on the door with a support sleeve;
5 - adjusting washer;
6 — mounting washer.
Insert the door into the hinges at the top and bottom - you will need an assistant for this. The door is guided with a finger (3). By placing adjusting washers in the hinges, you can readjust the door if necessary. When installing the old door, door adjustment is usually not necessary.
Screw one bolt into each hinge.
Hammer the door latch pin and secure it with a clamp.
Close the door and check if the gap between the door and the body is uniform, if necessary, unscrew the door hinge bolts and adjust the door height using the upper hinge.
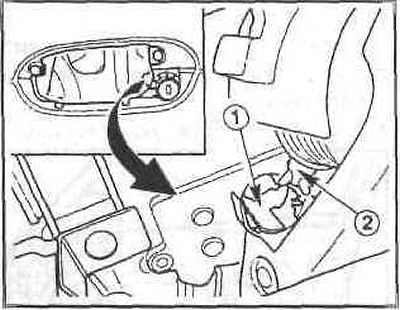
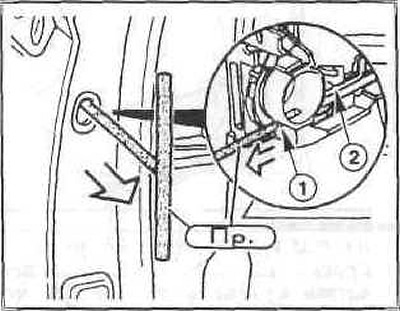
Loosen the bolt (1) of the lock pin on the B-pillar using a TORX screwdriver and loosen the bolt (2) enough to allow the latch to move.
Lift the door handle and hold it in this position. Close the door to adjust the height and tilt of the latch.
Carefully open the door and tighten the bolts to 30 Nm.
The worn latch of the lock needs to be replaced.
Close the front door glass, open the other windows.
Disconnect the negative wire from the battery. The battery is located in the trunk behind the right side trim.
Insulate the negative terminal of the battery to avoid accidental electrical contact.
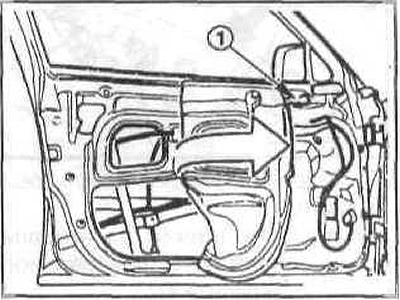
Remove the door trim.
Disconnect the orange connector of the side airbag. Unscrew the bolts securing the side airbag and place the airbag with the cover facing up, for example in the trunk.
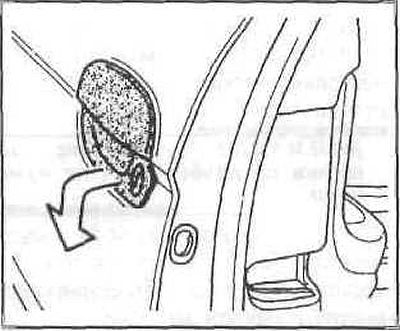
Remove the outside door handle.
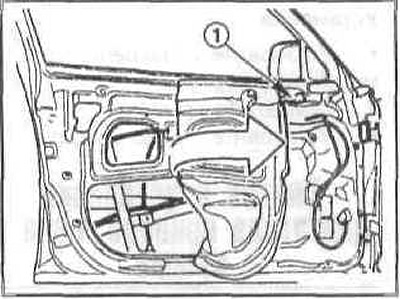
Gently pull off the spongy (foam plastic) trim at the rear of the door opening, fold it forward and secure it in this position with adhesive tape (1).
Disconnect and remove the central door lock actuator plug.
Unhook the cable nipple in the trim (1) and the cable core from the door lock (3).
Disconnect the central locking microswitch plug.
Unhook the cable in the inner door handle housing from the door frame.
Loosen the door lock screws and remove the lock downwards.
Check if the drive (fork) protrusion is at the bottom in the middle.
Insert the lock into the door. At the same time, insert the drive (1) for the fork (leash) of the door lock upwards into the fork (2) of the lock cylinder.
Secure the lock to the door with three screws.
Place the plug onto the central lock actuator motor and secure it.
Connect the plug for the micro switch.
Attach the cable nipple in the sheath and the cable core to the door lock.
Attach the cable in the sheath for the interior door handle to the door frame.
Carefully adhere the foam (sponge) liner to the door cutout.
Install the outside door handle.
Install the side airbag to the door frame and secure it with bolts. Connect the orange side airbag connector.
Install the interior door trim.
Install the negative cable to the battery.
Check the operation of the central door lock.
Removing and installing the outer door handle
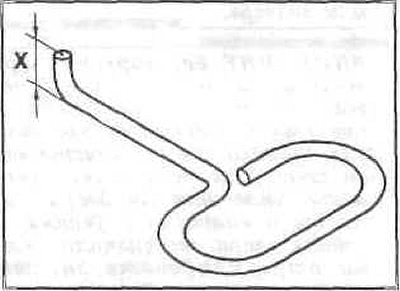
Make a suitable wire hook yourself. To do this, bend a 2 mm diameter wire at a right angle at a distance of X=5 mm.
Insert the wire hook through the mounting hole on the end of the door into the eye of the strike plate.
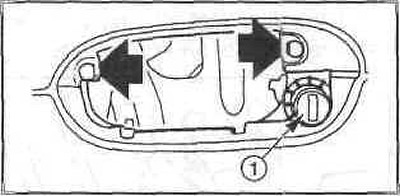
Move the strike plate forward with the hook until it stops. Lift the strike plate mounting bar with a screwdriver over the mounting lug. In this position, move the strike plate forward with the hook until the recesses in the strike plate of the outer door handle are released. The figure shows the position of the strike plate with the outer door handle removed.
Lift the outside door handle at the bottom and pull it diagonally downwards.
Insert and press the outside door handle.
Pull the locking plate (2) back with the wire hook until the fastening bar snaps into place.
Lift the outer handle and check its operation.
If removed, install the inner door trim.
Insert the shield into the end of the door. At the same time, install the outer part, and then press the middle part.
Remove the door lock.
Loosen the screws with a screwdriver and remove the outer door handle mount with the lock cylinder.
Install the outer door handle mount with the lock cylinder and secure it with screws.
Install the door lock.
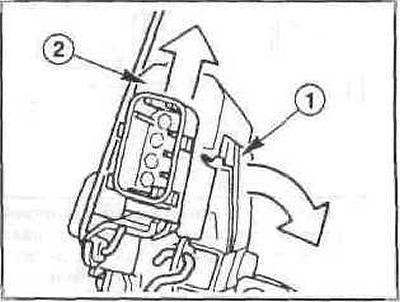
Lift the latch (1) with a screwdriver and pull the actuator motor (2) up from the door lock.
Unscrew the screws (arrows).
Remove the mounting plate (1) and microswitch (2).
Install the mounting plate and microswitch, secure with screws.
Place and snap the actuator motor onto the door lock.
Install the door lock.
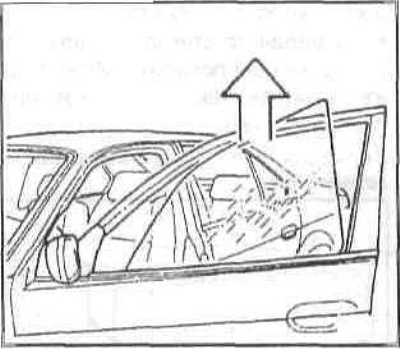
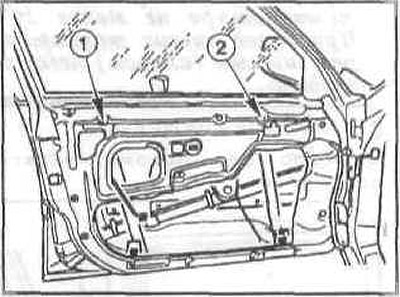
Pull up the outer glass channel strip starting from the back.
Remove the door trim.
Carefully pull the foam trim away from the rear of the door recess, fold it forward until the lower adjustment screws are free and secure it in this position with adhesive tape (1).
Loosen the clamp plate screws (arrows).
Tilt the glass forward a little and pull it back and up.
Insert the door glass into the clamping strip.
Insert the key switch. If necessary, connect the negative wire to the battery.
Raise the glass using the switch so that there is a gap of about 10 mm.
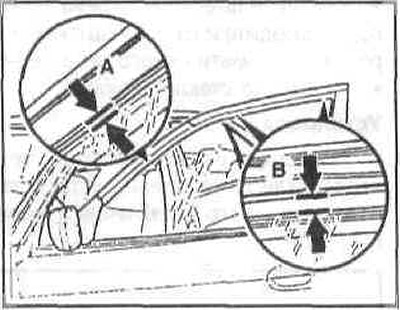
Adjust the glass position to obtain the following gaps: A=5.4 mm, B=10 mm. To do this, with the jaws open, move the glass in the longitudinal direction or lift the rear jaws so that the glass is parallel to the door frame. In this position, tighten the clamping bolts with a torque of 10 Nm.
Pull the plug off the window lifter key switch. If necessary, disconnect the negative wire from the battery.
Install the door trim. If equipped, install the side airbag.
Insert the glass channel strip so that it fits snugly against the edge of the door at the back.
Remove the door glass.
Disconnect the connector from the window lift motor.
Pull the guide (1).
Mark the position of the bolts (arrows) by tracing the bolt heads with a felt-tip pen.
Loosen the three lower bolts (arrows).
Remove the three top bolts (arrows).
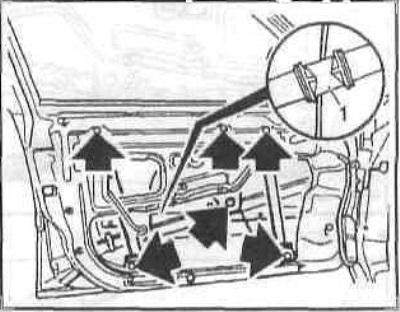
Remove the window regulator (1) as an assembly.
Insert the window regulator into the drive hinges and lightly tighten all the bolts.
Tighten bolts (1) and (2) to 10 Nm.
Insert the door glass into the clamping jaws (arrows) of the window regulator and adjust the position of the glass.
Lower the glass all the way.
Tighten bolts (3) and (4) to 10 Nm. Close the glass until it stops.
Tighten bolts (5) and (6) to 10 Nm.
Put on the guide.
Install the interior door trim.
Examine the original source using the link on the website: «BMWMan.ru»
Removal
Unscrew the bolt from each hinge (hinge) using a 10 mm cap head and a gimbal collar.
Press the fastener sideways from the finger.
Knock the pin out with a punch upwards, holding the door latch with a hammer if necessary.
Remove the door from its hinges and place it on a suitable stand (arrow). The stand should be adjusted so that the wires from the door wiring harness are not stretched.
Caution: Avoid damaging the paint on the door and front of the body, for which, if necessary, stick on protective tape.
Loosen the plug mounting frame bolts (arrows) and then remove the plug.
Pull out the staple (top arrow), to disconnect the plug.
Installation
Connect the plug for electrical consumers and insert the mounting bracket. Insert the plug into the door post, secure the mounting frame with bolts.
1 - Hexagon head bolt;
2 - upper loop on the body;
3 - loop finger;
4 - upper hinge on the door with a support sleeve;
5 - adjusting washer;
6 — mounting washer.
Insert the door into the hinges at the top and bottom - you will need an assistant for this. The door is guided with a finger (3). By placing adjusting washers in the hinges, you can readjust the door if necessary. When installing the old door, door adjustment is usually not necessary.
Screw one bolt into each hinge.
Hammer the door latch pin and secure it with a clamp.
Close the door and check if the gap between the door and the body is uniform, if necessary, unscrew the door hinge bolts and adjust the door height using the upper hinge.
Note: When installing a new door, spacers are placed under the hinges to allow the door to move outward or inward.
Caution: Adjust the door only together with all its parts, such as the window lift, glass, etc., since the fit of the door depends on its weight. To adjust, remove the door seals. If both the front and rear doors have been removed, first adjust the rear door, then the front.
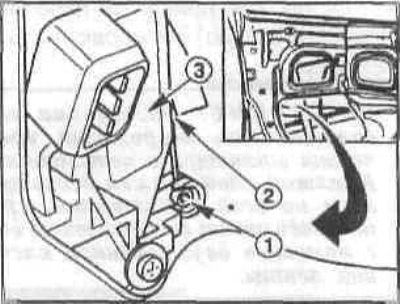
Loosen the bolt (1) of the lock pin on the B-pillar using a TORX screwdriver and loosen the bolt (2) enough to allow the latch to move.
Note: Do not change the depth adjustment of the latch (3).
Lift the door handle and hold it in this position. Close the door to adjust the height and tilt of the latch.
Note: To better guide the latch of the door lock, an adjustment device is inserted into the door lock in the workshop. If the device is not used, this may lead to the displacement of the door latch.
Carefully open the door and tighten the bolts to 30 Nm.
Please note: The door may be positioned no more than 1 mm inward at the front and no more than 1 mm inward at the rear.
The worn latch of the lock needs to be replaced.
Removal and installation the door lock
Removal
Close the front door glass, open the other windows.
Disconnect the negative wire from the battery. The battery is located in the trunk behind the right side trim.
Insulate the negative terminal of the battery to avoid accidental electrical contact.
Remove the door trim.
Disconnect the orange connector of the side airbag. Unscrew the bolts securing the side airbag and place the airbag with the cover facing up, for example in the trunk.
Remove the outside door handle.
Gently pull off the spongy (foam plastic) trim at the rear of the door opening, fold it forward and secure it in this position with adhesive tape (1).
Disconnect and remove the central door lock actuator plug.
Unhook the cable nipple in the trim (1) and the cable core from the door lock (3).
Disconnect the central locking microswitch plug.
Unhook the cable in the inner door handle housing from the door frame.
Loosen the door lock screws and remove the lock downwards.
Installation
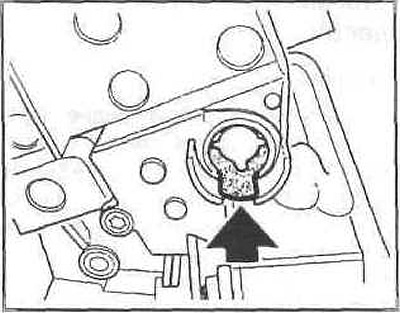
Check if the drive (fork) protrusion is at the bottom in the middle.
Insert the lock into the door. At the same time, insert the drive (1) for the fork (leash) of the door lock upwards into the fork (2) of the lock cylinder.
Secure the lock to the door with three screws.
Place the plug onto the central lock actuator motor and secure it.
Connect the plug for the micro switch.
Attach the cable nipple in the sheath and the cable core to the door lock.
Attach the cable in the sheath for the interior door handle to the door frame.
Carefully adhere the foam (sponge) liner to the door cutout.
Note: The lining must not be damaged, otherwise it will be sucked into the car. The adhesive layer must be intact around the entire circumference, if necessary, restore it with double-sided adhesive tape.
Install the outside door handle.
Install the side airbag to the door frame and secure it with bolts. Connect the orange side airbag connector.
Install the interior door trim.
Install the negative cable to the battery.
Check the operation of the central door lock.
Removing and installing the outer door handle
Removal
Make a suitable wire hook yourself. To do this, bend a 2 mm diameter wire at a right angle at a distance of X=5 mm.
Insert the wire hook through the mounting hole on the end of the door into the eye of the strike plate.
Move the strike plate forward with the hook until it stops. Lift the strike plate mounting bar with a screwdriver over the mounting lug. In this position, move the strike plate forward with the hook until the recesses in the strike plate of the outer door handle are released. The figure shows the position of the strike plate with the outer door handle removed.
Lift the outside door handle at the bottom and pull it diagonally downwards.
Installation
Insert and press the outside door handle.
Pull the locking plate (2) back with the wire hook until the fastening bar snaps into place.
Lift the outer handle and check its operation.
If removed, install the inner door trim.
Insert the shield into the end of the door. At the same time, install the outer part, and then press the middle part.
Removal and installation the door lock cylinder
Removal
Remove the door lock.
Loosen the screws with a screwdriver and remove the outer door handle mount with the lock cylinder.
Installation
Install the outer door handle mount with the lock cylinder and secure it with screws.
Install the door lock.
Removal and installation the actuator motor/microswitch of the central lock
Removal
Lift the latch (1) with a screwdriver and pull the actuator motor (2) up from the door lock.
Unscrew the screws (arrows).
Remove the mounting plate (1) and microswitch (2).
Installation
Install the mounting plate and microswitch, secure with screws.
Place and snap the actuator motor onto the door lock.
Install the door lock.
Removal, installation and adjustment of door glass
Removal
Pull up the outer glass channel strip starting from the back.
Remove the door trim.
Caution: For vehicles with a side airbag, disconnect the negative cable from the battery and remove the side airbag.
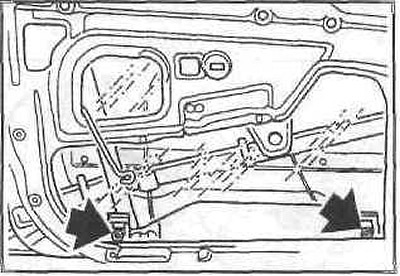
Carefully pull the foam trim away from the rear of the door recess, fold it forward until the lower adjustment screws are free and secure it in this position with adhesive tape (1).
Loosen the clamp plate screws (arrows).
Tilt the glass forward a little and pull it back and up.
Installation
Insert the door glass into the clamping strip.
Insert the key switch. If necessary, connect the negative wire to the battery.
Raise the glass using the switch so that there is a gap of about 10 mm.
Adjust the glass position to obtain the following gaps: A=5.4 mm, B=10 mm. To do this, with the jaws open, move the glass in the longitudinal direction or lift the rear jaws so that the glass is parallel to the door frame. In this position, tighten the clamping bolts with a torque of 10 Nm.
Pull the plug off the window lifter key switch. If necessary, disconnect the negative wire from the battery.
Install the door trim. If equipped, install the side airbag.
Insert the glass channel strip so that it fits snugly against the edge of the door at the back.
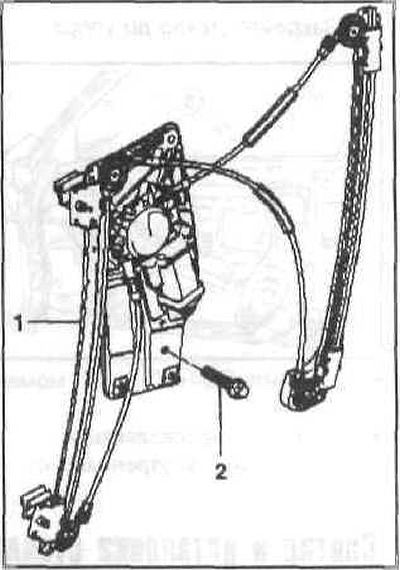
Removal and installation an electric window lifter
Removal
Remove the door glass.
Disconnect the connector from the window lift motor.
Pull the guide (1).
Mark the position of the bolts (arrows) by tracing the bolt heads with a felt-tip pen.
Loosen the three lower bolts (arrows).
Remove the three top bolts (arrows).
Remove the window regulator (1) as an assembly.
Installation
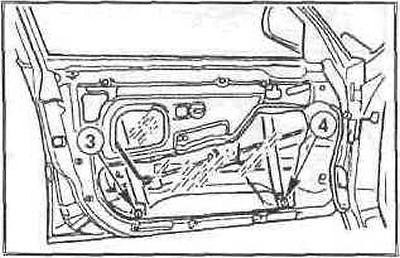
Insert the window regulator into the drive hinges and lightly tighten all the bolts.
Tighten bolts (1) and (2) to 10 Nm.
Insert the door glass into the clamping jaws (arrows) of the window regulator and adjust the position of the glass.
Lower the glass all the way.
Tighten bolts (3) and (4) to 10 Nm. Close the glass until it stops.
Tighten bolts (5) and (6) to 10 Nm.
Put on the guide.
Install the interior door trim.
Examine the original source using the link on the website: «BMWMan.ru»
This article is available at russian, bulgarian, belarusian, ukrainian, serbian, croatian, romanian, polish, slovak, hungarian
Article verified: Sevastyanov Nikolay
Share information:
Previous articles
БМВ E32: Body elements
Next articles
Similar articles on other types of BMW cars:
Removal and installation, door adjustment BMW 3 Series E36 (1990-2000)
Removal, installation and adjustment of the door BMW 3 Series E46 (1998-2006)
Removal and installation, door adjustment BMW 5 Series E34 (1988-1996)
Removal and installation / adjustment of the door BMW 5 Series E39 (1995-2003)
Removal and installation the rear door BMW X3 E83 (2003-2010)
Removal and installation the upper luggage door lock BMW X5 E53 (1999-2006)
Link in different formats to this page
Visitor comments
No comments yet
- General information
- Introduction to guide
- Manual
- Maintenance
- Power unit
- Engine M60/1, M60/2 (petrol)
- M62 engine (petrol)
- M57 engine (diesel)
- M67 engine (diesel)
- Cooling system
- Fuel system (petrol)
- Fuel system (diesel)
- Exhaust system
- Ignition and control systems
- Charge and launch systems
- Transmission
- Clutch
- Mechanical gearbox
- Automatic gearbox
- Cardan and drive shafts
- Chassis
- Brake system
- Front suspension
- Rear suspension
- Steering
- Body
- Exterior
- Interior
- Electrical equipment
- Equipment and devices
- Lighting
- Heating and air conditioning
- Electrical circuits
- General information
- Care and maintenance
- Power unit
- Minor engine repair
- Engine overhaul
- Lubrication system
- Cooling system
- Ignition system
- Supply system
- Injection system (petrol)
- Injection system (diesel)
- Exhaust system
- Transmission
- Clutch
- Manual gearbox
- Automatic gearbox
- Cardan gear
- Rear axle and shafts
- Chassis
- Front suspension
- Rear suspension
- Steering
- Wheels and tires
- Brake system
- Body
- Body elements
- Electrical equipment
- Equipment and devices
- Electrical circuits