
- Home
- BMW 7 Series
- E32
- Body
- Body elements
- Trunk lid — removal and installation
Trunk lid — removal and installation (BMW 7 Series E32)

1 - trunk lid;
2 - seal;
3 - loop;
4 - gas-filled strut;
5 - lock latch;
6 - TORX bolt with washer;
7 - castle;
8 — bushing;
9 — TORX bolt with washer;
10 - connecting rod;
11 - lock with key;
12 - lock with code;
13 — rod mount;
14 - lock nut;
15 - Stop buffer with ejector;
16 - Stop buffer;
17 - rubber stopper;
18 — mounting washer;
19 - insert nut;
20 — adjusting washer;
21 - self-tapping bolt;
22 - protective cap;
23 — actuator;
24 - connecting piece;
25 - TORX screw for plastic;
26 - gasket;
27 - emphasis;
28 — buffer;
29 — key;
30, 31 — TORX bolt with washer.
Removal
Remove the trim.
Remove the wiring harness from the boot lid. To do this, disconnect the plugs from the number plate lights and central locking. Tie a rope to the plugs and remove the wiring harness.
Note: The rope remains in the trunk lid and serves to ensure installation.
Mark the position of the trunk lid on the hinges by tracing the plate with a felt-tip pen.
Support the trunk lid securely or have an assistant hold it.
Loosen the bolts (1) on the left and right, unscrew the bolts (2).
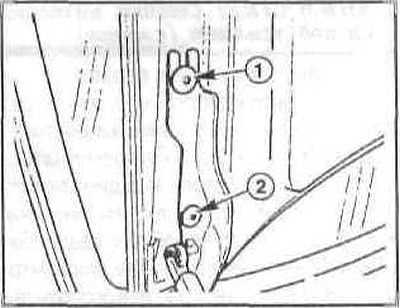
Remove the trunk lid with the help of an assistant.
Installation
Install the trunk lid with the help of an assistant. Tighten the bolts (1) without tightening them.
Align the trunk lid according to the marks made during removal. If the trunk lid is being replaced, adjust it position.
Insert the electric wires for the number plate light and for the central locking into the boot lid using a rope and secure them.
Secure the trim, replace damaged clips. Adjusting the trunk lid
Note: Since the trunk lid is adjustable and attached to the unpainted body, subsequent movements may be found painted.
Loosen the trunk lid lock mounting bolts.
If the stop buffers are equipped with ejectors, press the ejector into the stop buffer and in this position turn it slightly to the left with a Phillips screwdriver. This will lock the ejectors in the stop buffers.
Unscrew the stop buffer.
Caution: Secure the trunk lid with the gas strut removed to prevent it from falling.
Remove the gas strut
Loosen the bolts on the left and right.
Loosen the lower part of the boot lid lock enough to allow it to move up and down. To do this, pry up the flap in the rear boot trim.
Carefully close the trunk lid and move it sideways so that the gap to the right and left fenders is the same and parallel (permissible variation ±1 mm).
Carefully open the trunk lid.
Tighten the lower part of the lock.
Close the trunk lid and check the adjustment, repeat if necessary.
Open the trunk lid.
Check for faults in the sliding parts at the bottom of the trunk lid lock and replace them if necessary.
Close the trunk lid.
Check the height of the trunk lid relative to the rear fenders. It should be flush with the fenders (permissible deviation ±1 mm).
Check the adjustment and repeat if necessary.
Open the trunk lid.
Unscrew the stop buffer so that the closed trunk lid on the left and right fits against the stop buffers.
Note: The trunk lid must not be higher than the fenders, otherwise.
For stop buffers with ejectors, use a Phillips-head screwdriver to turn the ejector slightly to the right. This will release the stop buffer and allow it to come out.
Removal and installation gas-filled bonnet/trunk lid strut
Removal
Open the lid (hood).
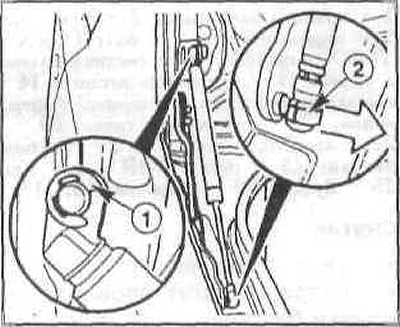
Trunk lid: Press the upper fastening washer (1) to the side.
Pry up the spring clip with a screwdriver.
Press the stand down away from the ball head.
Caution: The rack is under force (compressed).
Installation
Press the gas-filled strut onto the ball head, having first inserted the mounting bracket from the end into the groove. Press the strut onto the ball head and press the mounting bracket upwards with a screwdriver.
Place the stand on the pin and secure with the mounting spring.
Replacing the protective strip/model designation inscription
Replacing the protective strip (molding)
The protective strips are secured with plastic expansion clamps to the body parts.
Pull the strip off with your hand or pry it off with a wide plastic spatula.
As a rule, when removing the strip, the plastic bushings are pulled out together with the brackets. Therefore, remove the bushings from the pins and insert them into the holes of the body parts.
Straighten any curved planks before installation.
Then install the protective strips with brackets over the corresponding holes and press them in. If necessary, hammer the pins with your fist.
Replacing the model designation label
Separate the adhesive bond between the lettering and the body using a thin nylon rope (fishing line) and remove the inscription. To make the job easier, lubricate the fishing line (cord) with liquid detergent and wind the ends of the fishing line onto wooden blocks. Lightly heat the inscription with a hair dryer.
Remove any remaining glue with alcohol or a special solution.
Heat the new inscription with a hair dryer to approximately 50°C, remove the protective paper, align the inscription and press it to the body for approximately 10 seconds.
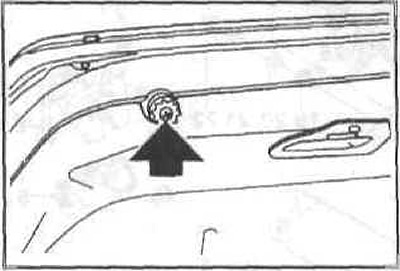
BMW Emblem Replacement
Pry up the BMW emblem using a cloth to protect the paintwork.
For better adhesion, apply a non-hardening sealant to the back of the emblem.
This article is available at russian, bulgarian, belarusian, ukrainian, serbian, croatian, romanian, polish, slovak, hungarian
Article verified: Sevastyanov Nikolay
Share information:
Previous articles
БМВ E32: Body elements
Next articles
Similar articles on other types of BMW cars:
Removal and installation the trunk lid lock and lock cylinder BMW 3 Series E36 (1990-2000)
Removal and installation the trunk lid trim BMW 3 Series E46 (1998-2006)
Removal and installation the trunk lid (Limousine) BMW 5 Series E39 (1995-2003)
Removal, installation and adjustment of the trunk lid / tailgate BMW 5 Series E28 (1981-1988)
Pistons — removal and installation BMW X3 E83 (2003-2010)
Removal and installation the engine BMW X5 E53 (1999-2006)
Link in different formats to this page
Visitor comments
No comments yet
- General information
- Introduction to guide
- Manual
- Maintenance
- Power unit
- Engine M60/1, M60/2 (petrol)
- M62 engine (petrol)
- M57 engine (diesel)
- M67 engine (diesel)
- Cooling system
- Fuel system (petrol)
- Fuel system (diesel)
- Exhaust system
- Ignition and control systems
- Charge and launch systems
- Transmission
- Clutch
- Mechanical gearbox
- Automatic gearbox
- Cardan and drive shafts
- Chassis
- Brake system
- Front suspension
- Rear suspension
- Steering
- Body
- Exterior
- Interior
- Electrical equipment
- Equipment and devices
- Lighting
- Heating and air conditioning
- Electrical circuits
- General information
- Care and maintenance
- Power unit
- Minor engine repair
- Engine overhaul
- Lubrication system
- Cooling system
- Ignition system
- Supply system
- Injection system (petrol)
- Injection system (diesel)
- Exhaust system
- Transmission
- Clutch
- Manual gearbox
- Automatic gearbox
- Cardan gear
- Rear axle and shafts
- Chassis
- Front suspension
- Rear suspension
- Steering
- Wheels and tires
- Brake system
- Body
- Body elements
- Electrical equipment
- Equipment and devices
- Electrical circuits