
- Home
- BMW 7 Series
- E32
- Body
- Body elements
- Engine hood — removal and installation
Engine hood — removal and installation (BMW 7 Series E32)
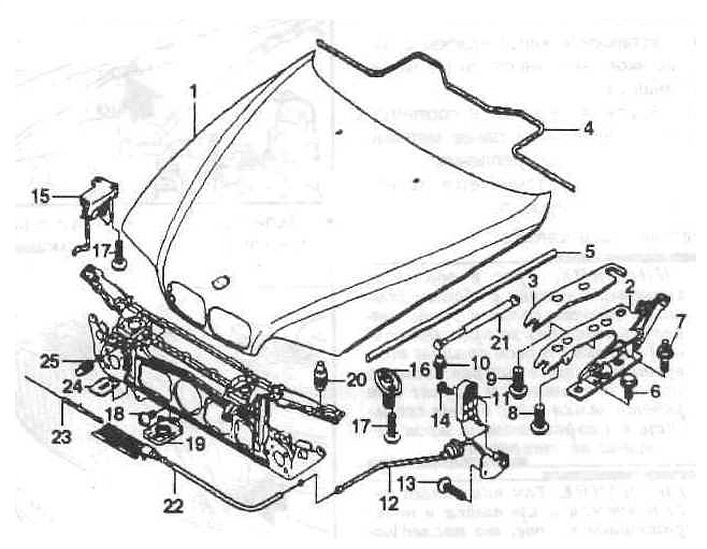
1 - hood;
2 - hinge (hinge);
3 - adjustment plate;
4 - rear seal;
5 - side seal;
6 - Hexagon head bolt with washer;
7 - "mass" finger;
8, 9 — bolt with TORX head and washer;
10 — ball joint;
11 — hood opening lever;
12 — rear hood cable;
13 — TORX bolt;
14 - countersunk head screw;
15 - flat hook;
16 - upper part of the hood lock;
17, 18 — TORX head bolt with washer;
19 - lower part of the hood lock;
20 - Stop buffer with ejector;
21 - gas-filled strut (stop);
22 - Front hood cable;
23 - middle hood cable;
24 - Flat hook latch;
25 - stop buffer.
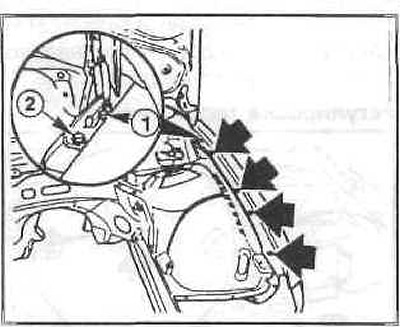
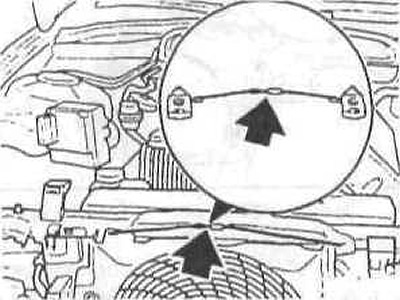
Remove the upper wing mounting bolts (arrows).
Mark the position of the hood hinge with a felt-tip pen. Trace the position on the wing with a felt-tip pen.
Secure the hood so that after unscrewing the fasteners on the wing, the surrounding body parts or glass are not damaged.
Loosen the bolt (1), unscrew
Removal
Disconnect the windshield washer jet connectors. Disconnect the windshield washer jet hoses.
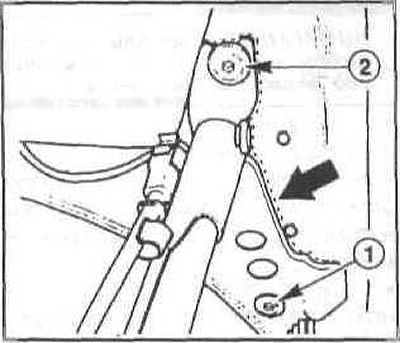
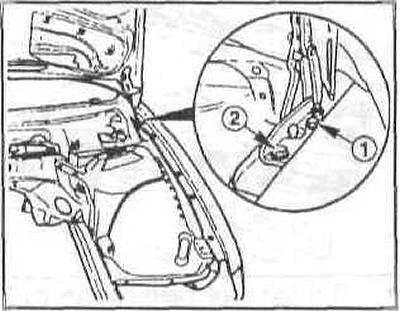
Mark the position of the adjustment plates on the hinges by tracing them with a felt-tip pen (arrow).
Support the hood securely or have an assistant hold it securely.
Unscrew the bolts (1) on the right and left, loosen the bolt (2).
Disconnect the ground wire from the right loop.
Remove the hood with the help of an assistant.
Installation
Install the hood with the help of an assistant, screwing in the bolts (1) without tightening them.
Align the hood according to the marks made earlier and tighten the mounting bolts.
If the hood is replaced, it needs to be adjusted.
Adjusting the hood
Caution: The sheathed cable, which is connected to both hood locks, must be adjusted without any gaps. The sheath (bushing) of the cable must be completely seated in the guide of the lock. Otherwise, when the lock is operating, the cable will slide in the guide.
Note: Since the hood is adjustable and attached to the unpainted body, subsequent movements can be detected by unpainted areas.
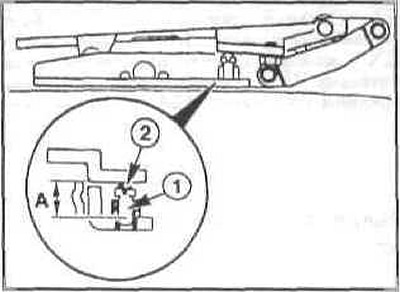
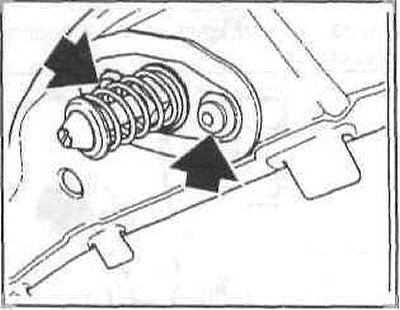
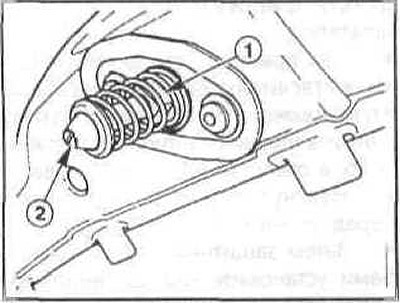
Adjust the stop bolt (1) for the left and right hinges to size A = 25+1 mm.
Check the stop buffer (2) for damage, replace the loop if necessary.
Adjusting the hood cable
Install the hood cable on the adjusting device without gaps.
Note: The cable in the sheath must be under force. For clarity, the cable and locks are shown in the removed position in the figure.
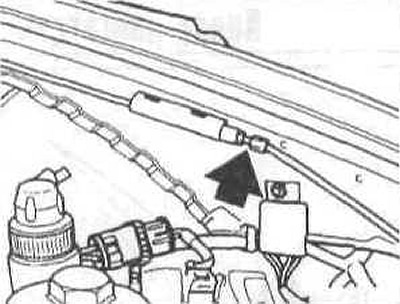
If necessary, adjust the working stroke of the hood cable using the adjusting bolt (arrow).
Unscrew the stop buffer completely. Aligning the hood from the side
Loosen the hinge bolts (1) and (2) on the left and right enough to allow the hood to move.
Close the hood and align it with the fenders at the front and sides.
Note: If the adjustment range is not sufficient, loosen the hood hinge mounting bolts on the body and move the hinges on the body.
Carefully open the hood and tighten the hinge mounting bolts.
Height adjustment of the rear part of the hood
Adjust the height of the hood in the hinge area. To do this, close the hood and measure the deviation in height relative to the fenders.
Unscrew the bolts (1) and (2), depending on the results of the measurements taken earlier, remove or place shims under the hinges.
Tighten the left and right hinge bolts.
Check the height position and, if necessary, repeat the adjustment.
Open the hood and support it securely or have an assistant hold the hood.
Unscrew the bolts (1) and (2), depending on the results of the measurements taken earlier, remove or place shims under the hinges.
Tighten the left and right hinge bolts.
Check the height position and, if necessary, repeat the adjustment.
Height adjustment of the front part of the bonnet
Loosen the two lock pin bolts just enough to allow the pin to move freely.
Close and open the hood several times to allow the lock to center itself.
Caution: Do not allow the hood latch to snap into place.
Tighten the lock pin bolts.
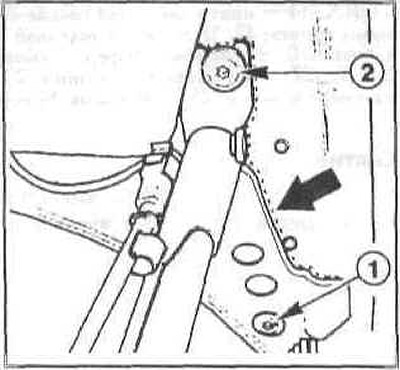
Loosen the lock nut (1) and turn the pin (2) with a screwdriver.
In this way, adjust the height of the hood relative to the wings. Make sure the gap is parallel to the front trim.
Tighten the lock nut.
Check that the lock and hook are properly engaged and readjust if necessary.
Adjusting the stop buffer
Open the hood.
Unscrew the stop buffer so that the hood fits with a little effort. To do this, make two posts about 10 mm high from an elastic mass or plasticine. Place them on the stop buffers and close the hood. Open the hood and measure the height of the stop buffer and the flattened post. Unscrew the buffer so that it protrudes by 0.5 mm more than the measured height. Adjust all the stop buffers in this way. Check whether the hood fits without a gap to all the stop buffers and, if necessary, repeat the adjustment.
Note: The hood should not be higher than the fenders, otherwise there will be noise from the oncoming wind.
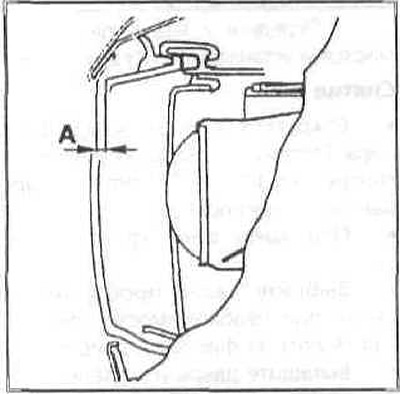
Measure the hood protrusion above the glass headlight covers. It should be A = 4±1 mm, otherwise adjust the headlight.
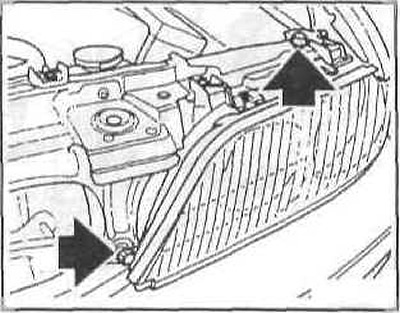
Loosen the bolts (arrows) and move the headlight forward or backward.
Caution: Do not apply force to the headlight; if necessary, reposition the lower mounting bolts.
If the headlight has moved, then you need to check its adjustment.
This article is available at russian, bulgarian, belarusian, ukrainian, serbian, croatian, romanian, polish, slovak, hungarian
Article verified: Sevastyanov Nikolay
Share information:
Previous articles
БМВ E32: Body elements
Next articles
Similar articles on other types of BMW cars:
Removal and installation the engine compartment hood BMW 3 Series E30 (1982-1994)
Removal and installation the engine compartment hood BMW 3 Series E36 (1990-2000)
Removal and installation the engine compartment hood cable BMW 5 Series E34 (1988-1996)
Removal and installation the engine compartment hood BMW 5 Series E39 (1995-2003)
Removal and installation the engine assembly BMW X3 E83 (2003-2010)
Removal and installation the engine BMW X5 E53 (1999-2006)
Link in different formats to this page
Visitor comments
No comments yet
- General information
- Introduction to guide
- Manual
- Maintenance
- Power unit
- Engine M60/1, M60/2 (petrol)
- M62 engine (petrol)
- M57 engine (diesel)
- M67 engine (diesel)
- Cooling system
- Fuel system (petrol)
- Fuel system (diesel)
- Exhaust system
- Ignition and control systems
- Charge and launch systems
- Transmission
- Clutch
- Mechanical gearbox
- Automatic gearbox
- Cardan and drive shafts
- Chassis
- Brake system
- Front suspension
- Rear suspension
- Steering
- Body
- Exterior
- Interior
- Electrical equipment
- Equipment and devices
- Lighting
- Heating and air conditioning
- Electrical circuits
- General information
- Care and maintenance
- Power unit
- Minor engine repair
- Engine overhaul
- Lubrication system
- Cooling system
- Ignition system
- Supply system
- Injection system (petrol)
- Injection system (diesel)
- Exhaust system
- Transmission
- Clutch
- Manual gearbox
- Automatic gearbox
- Cardan gear
- Rear axle and shafts
- Chassis
- Front suspension
- Rear suspension
- Steering
- Wheels and tires
- Brake system
- Body
- Body elements
- Electrical equipment
- Equipment and devices
- Electrical circuits