
Table of contents: Trunk lid ↓ Tailgate ↓
- Home
- BMW 5 Series
- E28
- Body
- Body elements
- Removal, installation and adjustment of the trunk lid / tailgate
Removal, installation and adjustment of the trunk lid / tailgate (BMW 5 Series E28)
Trunk lid
1. Open the trunk lid and cover the edges of the trunk with a rag to protect the painted surfaces when removing the lid.
2. Disconnect any cables or electrical wires attached to the trunk lid that may interfere with the removal of the lid.

3. Trace around the hinge bolts, marking their position.
4. Have an assistant support the lid, then loosen the hinge bolts on both sides of the lid and remove it.
5. Install in the reverse order. Align the hinge bolts to the lid with the marks made during removal.
6. After installation, close the cover and make sure it is flush with the adjacent body panels. Vertical and horizontal adjustments are made by moving the hinge bolts in their slots. Loosen the hinge bolts, move the cover and tighten the bolts.
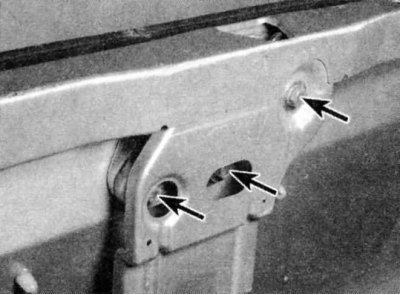
7. The height of the closed trunk lid in relation to the adjacent body panels can be changed by loosening the lock bolts (indicated by arrows)...
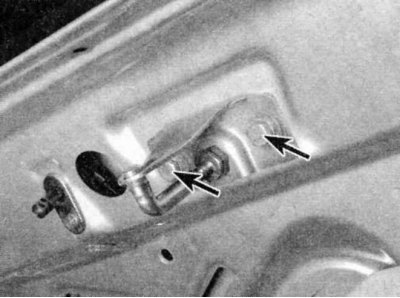
...and/or the drummer (indicated by arrows), by moving the striker and/or lock and tightening the bolts.
If your car radio is equipped with an anti-theft system, make sure you have entered the correct code before disconnecting the battery cable. Refer to Section Anti-theft audio system and instrument cluster language before disconnecting the wire.
If after connecting the wire, the inscriptions on your instrument panel appear in a language other than the one you need, refer to Section Anti-theft audio system and instrument cluster language, which describes the procedure for installing the required language.
Tailgate
1. Disconnect the negative battery cable.
2. Open the tailgate and place a rag over the rear edge of the roof to protect the painted surfaces while removing the tailgate. The glass can be removed separately by disconnecting the wiring and loosening the mounting screws - have an assistant hold the glass while you loosen the screws.
3. Remove the interior trim from the tailgate. Where necessary, remove the covering along the edge of the door to access the stop fasteners.

4. Disconnect the wiring and washer pipes. On some models, you may need to pull the wiring out of the rear pillar before disconnecting the connector.
5. Have an assistant support the tailgate in the open position and release the stops on both sides by loosening the mounting screws. Where necessary, remove the mounting pin or spring clip and remove the stop from the hinge.
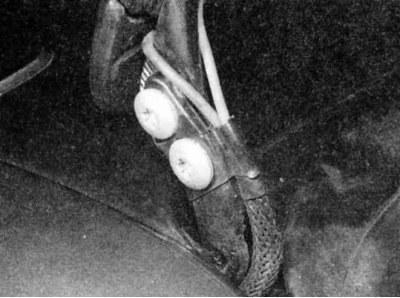
6. Fastening the stop to the tailgate.
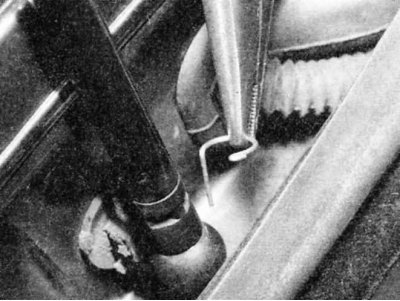
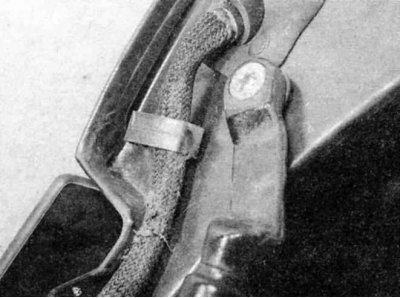
7. Removing the mounting pin to detach the lower part of the tailgate stop.
8. Mark the position of the hinge levers on the tailgate with a pencil.
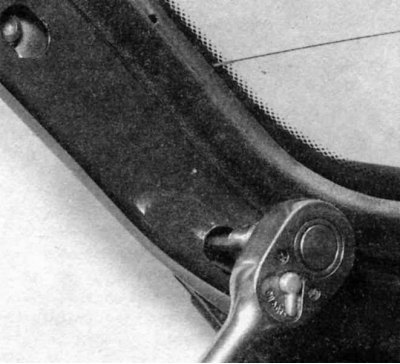
9. Loosen the screws and lift the tailgate off the hinge levers. You will need a socket wrench or a claw.
10. Install in reverse order, but make sure that all previously applied marks match. Check the tailgate to make sure that it closes exactly in the center between the rear pillars and that its lock works correctly.
[The original article is posted on the resource: BMWMan]
This article is available at russian, bulgarian, belarusian, ukrainian, serbian, croatian, romanian, polish, slovak, hungarian
Article verified: Zhuravleva Isolda
Share information:
Previous articles
БМВ E28: Body elements
Next articles
Similar articles on other types of BMW cars:
Trunk Lid/Tailgate and Support Pillars — Removal and Installation BMW 3 Series E46 (1998-2006, petrol)
Mechanical fuel pump — checking, adjustment, removal and installation BMW 3 Series E21 (1975-1983)
Removal, installation and adjustment of the trunk lid, replacement of… BMW 7 Series E38 (1994-2001)
Door — removal, installation and adjustment BMW 7 Series E32 (1986-1994)
Pistons — removal and installation BMW X3 E83 (2003-2010)
Hood — removal, installation and adjustment BMW X5 E53 (1999-2006)
Link in different formats to this page
Visitor comments
No comments yet
- General information
- Governing bodies
- Manual
- Maintenance
- Power unit
- Engine repair
- Lubrication system
- Cooling system
- Ignition system
- Supply system
- Injection system (gasoline)
- Injection system (diesel)
- Exhaust system
- Transmission
- Clutch
- Car gearbox
- Front axle
- Rear axle
- Chassis
- Steering
- Brake system
- Wheels and tires
- Body
- Interior
- Exterior
- Heating system
- Electrical equipment
- Equipment and devices
- Power devices
- Windscreen wipers
- Electrical circuits
- General information
- Manual
- Maintenance
- Power unit
- Engine repair
- Ignition system
- Engine lubrication system
- Cooling system
- Fuel system (gasoline)
- Fuel system (diesel)
- Exhaust system
- Transmission
- Clutch
- Car gearbox
- Chassis
- Front and rear suspension
- Steering
- Brake system
- Body
- Exterior
- Interior
- Electrical equipment
- Heating system
- Equipment and devices
- Power devices
- Electrical circuits
- General information
- Manual
- Maintenance
- Power unit
- Engine in a car
- Engine overhaul
- Cooling system
- Supply system
- Ignition system
- Control system
- Transmission
- Clutch
- Manual gearbox
- Automatic gearbox
- Transmission line
- Chassis
- Steering
- Front suspension
- Rear suspension
- Brake system
- Body
- Body elements
- Car care and painting
- Electrical equipment
- Heater and air conditioner
- Equipment and devices
- Starter and generator
- Electrical circuits
- General information
- Operation and maintenance
- Specifications
- Power unit
- Engine repair
- Cooling and lubrication system
- Supply system
- Ecotronic power supply system
- Fuel injection system
- Ignition system
- Transmission
- Clutch
- Gearbox BMW 242/4
- Gearbox Getrag 262/8
- Gearbox Getrag 265/6
- Automatic gearbox
- Cardan gear
- Rear axle
- Chassis
- Steering
- Front suspension
- Rear suspension
- Brake system
- Electrical equipment
- Equipment and devices
- Electrical circuits