
- Home
- BMW 7 Series
- E38
- Body
- Exterior
- Removal, installation and adjustment of the trunk lid, replacement of its components
Removal, installation and adjustment of the trunk lid, replacement of its components (BMW 7 Series E38)
Removal and installation the trunk lid
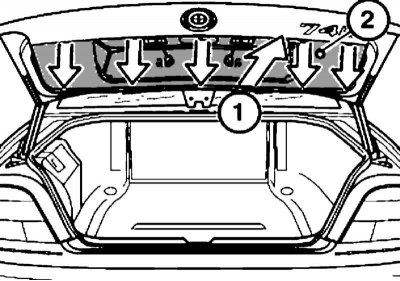
The trunk lid wiring harness does not have a connector, so the wiring harness must be removed from the lid before removing the lid.
1. Trace the hinges on the trunk lid to avoid adjusting it after installation.
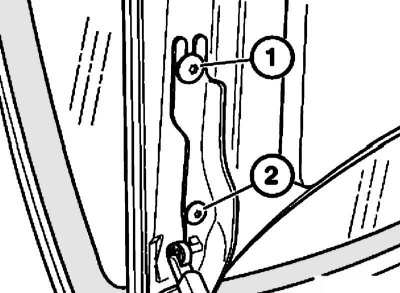
2. Loosen the screw (1) on the left and right, remove the screw (2) on the right and left and remove the luggage compartment lid towards the rear.
3. Installation is carried out in reverse order.
Adjustment
The clearance values are specified in the Chapter Specifications Body.
1. The adjustment of the trunk lid is carried out in the same way as the adjustment of the hood, using hinges, buffers and a lock.
Removal and installation racks
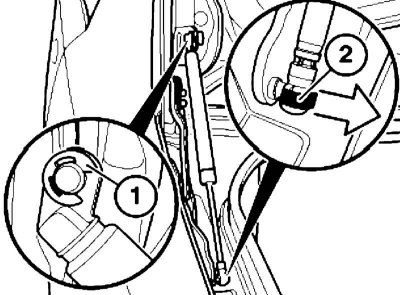
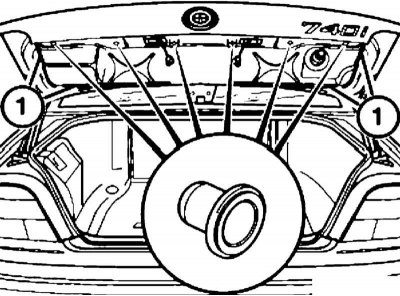
1. Open the luggage compartment lid, remove the retaining washer (1) and spring clip (2).
2. Remove the rack.
3. Installation is carried out in reverse order.
Removing and installing the decorative trim of the trunk lid
1. Remove the license plate mounting bolts and lift the trunk lid.
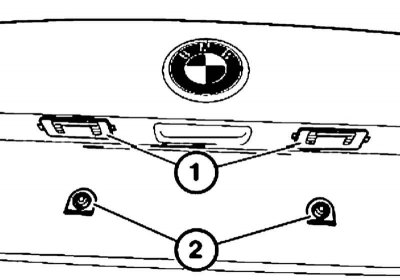
2. Remove the license plate lights (1) and disconnect the connector. Release the clamps (2).
3. Remove the seal.
When installing, the notches on the seal and on the trunk lid must match.
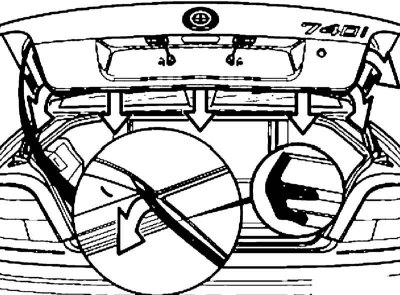
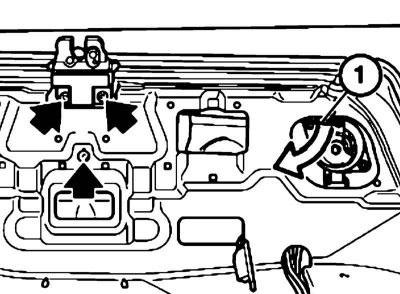
4. Lift the decorative cover by the bottom (1) through the lock cylinder (2) and release it from the clamps with a downward and backward movement.
5. Installation is carried out in the reverse order. Replace damaged fasteners, plugs and (if necessary) neoprene tape (1).
Removal and installation the trunk lock cylinder
1. Remove the trunk lid trim (see section Removal and installation luggage compartment trim elements and its lid).
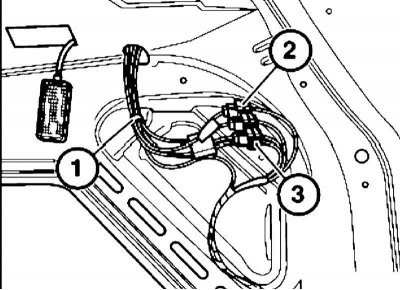
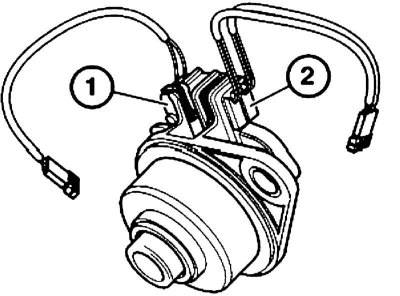
2. Remove the wiring harness clamp (1) and disconnect the connectors (2 and 3).
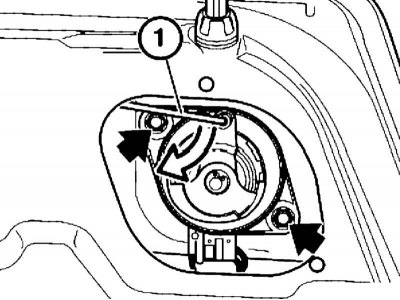
3. Disconnect the rod (1) of the lock cylinder, loosen the nuts and remove the lock cylinder.
When installing, make sure that the rod is positioned correctly.
4. Release the clamps and remove the microswitches (1 and 2).
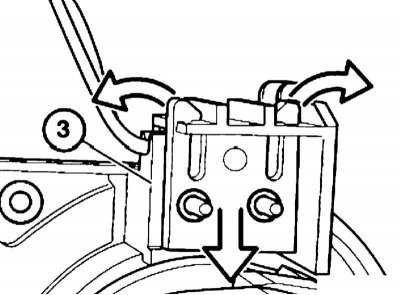
5. Lift the holder and remove the microswitch (3).
When replacing, if the colors of the wires and cambric of the microswitches differ, first apply the appropriate marks to them.
6. Installation is carried out in the reverse order. The lock cylinder must be installed on the same axis as the opening in the body. Check the correct operation with the trunk lid open.
Removal and installation the upper part of the luggage compartment lock
1. Remove the trunk lid trim (see section Removal and installation luggage compartment trim elements and its lid).
2. Remove the wiring harness clamp (1 per illustrations) and disconnect the middle connector (between connectors 2 and 3).
3. Disconnect the rod (1) of the lock cylinder drive, unscrew the bolts and remove the upper part of the luggage compartment lid lock.
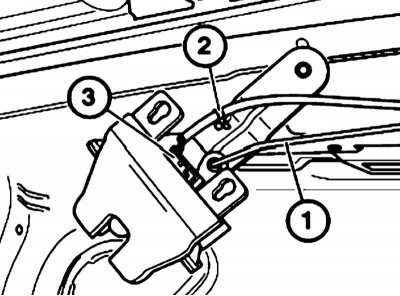
4. When replacing, disconnect the drive rod (1), cut the clamp (2) of the electrical wiring harness and remove the microswitch (3).
5. Installation is carried out in the reverse order. Check the correct operation with the trunk lid open.
(This article is based on data from the website BMWMAN.ru)
This article is available at russian, bulgarian, belarusian, ukrainian, serbian, croatian, romanian, polish, slovak, hungarian
Article verified: Polikarpov Saveliy
Share information:
Previous articles
БМВ E38: Exterior
Next articles
Similar articles on other types of BMW cars:
Trunk Lid/Tailgate Lock Components — Removal and Installation BMW 3 Series E46 (1998-2006, petrol)
Mechanical fuel pump — checking, adjustment, removal and installation BMW 3 Series E21 (1975-1983)
Removal, installation and adjustment of the trunk lid / tailgate BMW 5 Series E28 (1981-1988)
Removal and installation, adjustment of the tailgate — limousine BMW 5 Series E34 (1988-1996)
Pistons — removal and installation BMW X3 E83 (2003-2010)
Hood — removal, installation and adjustment BMW X5 E53 (1999-2006)
Link in different formats to this page
Visitor comments
No comments yet
- General information
- Introduction to guide
- Manual
- Maintenance
- Power unit
- Engine M60/1, M60/2 (petrol)
- M62 engine (petrol)
- M57 engine (diesel)
- M67 engine (diesel)
- Cooling system
- Fuel system (petrol)
- Fuel system (diesel)
- Exhaust system
- Ignition and control systems
- Charge and launch systems
- Transmission
- Clutch
- Mechanical gearbox
- Automatic gearbox
- Cardan and drive shafts
- Chassis
- Brake system
- Front suspension
- Rear suspension
- Steering
- Body
- Exterior
- Interior
- Electrical equipment
- Equipment and devices
- Lighting
- Heating and air conditioning
- Electrical circuits
- General information
- Care and maintenance
- Power unit
- Minor engine repair
- Engine overhaul
- Lubrication system
- Cooling system
- Ignition system
- Supply system
- Injection system (petrol)
- Injection system (diesel)
- Exhaust system
- Transmission
- Clutch
- Manual gearbox
- Automatic gearbox
- Cardan gear
- Rear axle and shafts
- Chassis
- Front suspension
- Rear suspension
- Steering
- Wheels and tires
- Brake system
- Body
- Body elements
- Electrical equipment
- Equipment and devices
- Electrical circuits