
Removal and installation
The front and rear doors are removed in the same way.
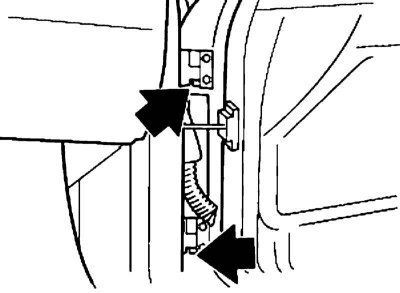
1. Remove the hex bolts at the top and bottom.
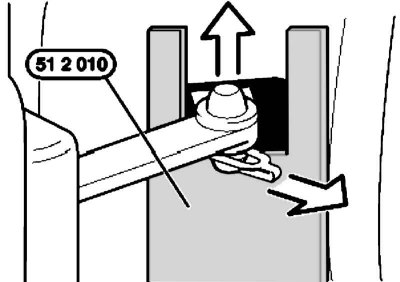
2. Remove the protective cover. If a bracket is installed, remove it. Fit tool no. 51 2 010 and drive the hinge pin up.
When installing for driving in buttonholes, install tool no. 51 2 010 from above.
3. Raise the door, remove it from the hinge and lower it onto a previously prepared support near the threshold so as not to load the door wiring.
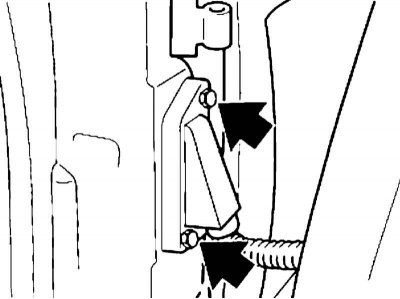
4. Turn out two screws of fastening of a socket of electroconducting. Pull the connector out of the A-pillar and disconnect it.
5. Installation is carried out in the reverse order.
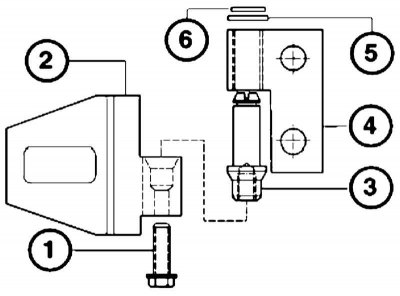
1 — Bolt with a six-sided head
2 - Fixed link of the upper loop, attached to the body
3 - Axis of the loop
4 - The movable link of the upper hinge with the hinge sleeve, is attached to the door
5 - Washer
6 - Lock washer
Adjustment
Before adjusting the front doors, adjust the rear doors, i.e. the rear doors are fitted to the welded rear fenders. In this case, the front fenders, which are bolted on, can be fitted to the front doors if necessary. When adjusting, the door must be equipped with glass and a power window mechanism.
Clearances are specified in the Specifications of the Chapter Body.
1. Loosen the fastening of the striker of the lock.
2. Completely remove the front door tubular seal.
3. Installation new doors, install spacers between the door and the hinges. For preliminary adjustment, install two washers, each 1 mm thick. Adjust the gap with the appropriate number of washers of the required thickness.
4. Lower the windows. When installing new doors, pre-adjust their position in height: without the lower dust cover of the door, the value of the lower gap along the entire length should be about 20 mm. Adjustment is carried out by moving the loops.
5. Check and, if necessary, adjust the front and rear clearances (on the back door - only the rear) - they should be uniform and be 5 mm. Adjustment is carried out by moving the loops.
6. When adjusting the rear door, check its position in height relative to the body. When adjusting the front door, check the relative height of the front and rear doors. If necessary, adjust the appropriate door height as described below.
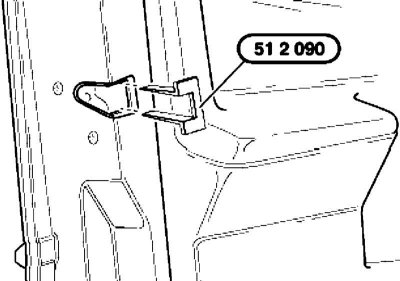
7. Insert template no. 51 2 090 into the door lock.
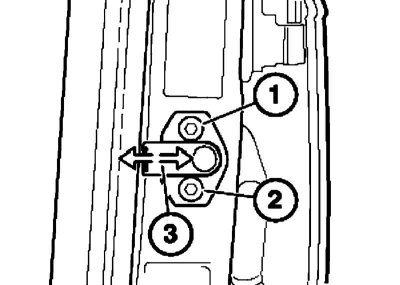
8. Loosen the screw (1). Loosen the screw (2) so that the striker of the lock could hardly be moved with a slight effort of the hand.
Do not change the depth stop adjustment (3).
9. Raise the door handle and, holding it in this position, close the door. The height and inclination of the striker of the lock is adjustable according to the template. Open the door and tighten the screws (1 and 2 on illustrations).
10. Check the tubular door seal for damage and replace if necessary. Install the door seal.
11. Install the lower dust cover on the door.
12. Installation front door, check the imprint of the tubular seal on the mating surface of the door. To do this, while in the car with the door closed, insert a thin (no more than 1 mm) rectangular plastic object (e.g. credit card) between the tubular seal and the door frame and slide this object along the mating surface of the seal and the frame, checking the fit of the seal. In the area of the ceiling between the A-pillar and the B-pillar, the test object must not be easily pulled out. If necessary, replace the seal or straighten the rebate on which the seal is fitted.
Excessive straightening of the rebate will increase the force required to close the door.