
Table of contents: Removal ↓ Installation ↓
- Home
- BMW 5 Series
- E39
- Body
- Exterior
- Removal and installation / adjustment of the door
Removal and installation / adjustment of the door (BMW 5 Series E39)
The front and rear doors of the passenger compartment are removed and installed in the same way.
Remove the hex bolt at each hinge using a 10mm socket and a hinge adapter.
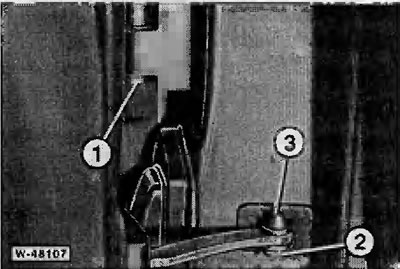
Remove the lock washer "2" from the side of pin "3" using a screwdriver.
Knock out pin "3" upwards using a punch; if necessary, hold it with a hammer against the door travel limiter.
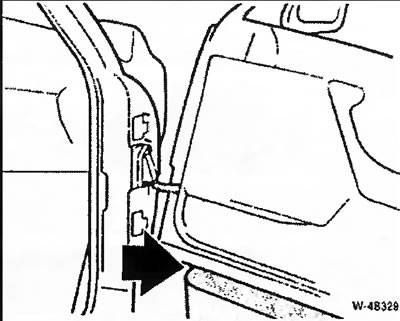
Remove the door from its hinges and place it on a suitable stand "arrow". The stand should be high enough so that the wiring harness running through the door is not under tension.

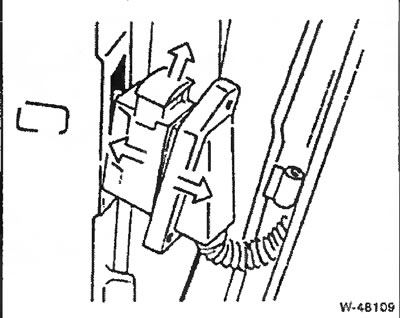
Unscrew the fastening of the "arrow" of the retaining frame of the plug. Then pull out the plug connector.
Pull the locking clip - top arrow - upwards and disconnect the plug connector.
Connect the plug connector of the power consumers and press the locking clamp. Press the plug connector to the door pillar and secure with the retaining frame.
1 - Hexagon head bolt
2 - upper hinge from the body side
3 - hinge pin
4 - upper hinge with bearing bushing on the door side
5 - washer
6 - lock washer
Together with an assistant, place the door on the upper and lower hinges. The door is guided by pins "3". By placing adjusting washers on the hinge, the door can be adjusted again. When installing the old door, its adjustment is usually not required.
Screw a hexagon head bolt "1" into each joint.
Hammer in the door travel limiter pin and secure with a clamp.
Close the door and check whether the gap between the door and the body is uniform along the perimeter. If necessary, loosen the hexagonal-head bolts at the hinges and adjust the door height using the upper bolts.
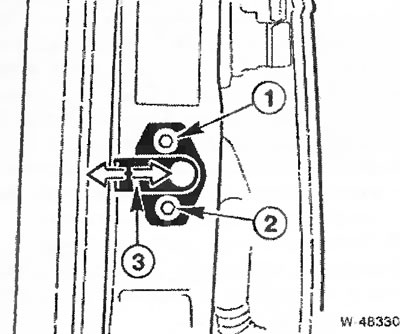
Using a slotted screwdriver, loosen fastening "1" of the locking pin at pillar B, and loosen fastening "2" so that the locking wedge can only be moved.
Raise and hold the door handle. Close the door - as a result, the locking wedge is adjusted in height and tilt.
Carefully open the door and tighten the mounting bolts to a torque of 30 Nm.
Removal
Remove the hex bolt at each hinge using a 10mm socket and a hinge adapter.
Remove the lock washer "2" from the side of pin "3" using a screwdriver.
Knock out pin "3" upwards using a punch; if necessary, hold it with a hammer against the door travel limiter.
Remove the door from its hinges and place it on a suitable stand "arrow". The stand should be high enough so that the wiring harness running through the door is not under tension.
Attention: Do not damage the varnish on the door and front wall; if necessary, cover them with adhesive tape to protect them from damage.
Unscrew the fastening of the "arrow" of the retaining frame of the plug. Then pull out the plug connector.
Pull the locking clip - top arrow - upwards and disconnect the plug connector.
Installation
Connect the plug connector of the power consumers and press the locking clamp. Press the plug connector to the door pillar and secure with the retaining frame.
1 - Hexagon head bolt
2 - upper hinge from the body side
3 - hinge pin
4 - upper hinge with bearing bushing on the door side
5 - washer
6 - lock washer
Together with an assistant, place the door on the upper and lower hinges. The door is guided by pins "3". By placing adjusting washers on the hinge, the door can be adjusted again. When installing the old door, its adjustment is usually not required.
Screw a hexagon head bolt "1" into each joint.
Hammer in the door travel limiter pin and secure with a clamp.
Close the door and check whether the gap between the door and the body is uniform along the perimeter. If necessary, loosen the hexagonal-head bolts at the hinges and adjust the door height using the upper bolts.
Note: When installing a new door, adjusting washers are placed under the hinges to move it outward or inward.
Attention: Door adjustment is only possible when the door is complete (for example, if there is a window lift, window glass, etc.), since the adjustment is affected by the weight of the door. To adjust, remove the door seal. If the front and rear side doors were removed, adjust the rear door first, then the front.
Using a slotted screwdriver, loosen fastening "1" of the locking pin at pillar B, and loosen fastening "2" so that the locking wedge can only be moved.
Note: Do not change the depth adjustment of the locking wedge "3".
Raise and hold the door handle. Close the door - as a result, the locking wedge is adjusted in height and tilt.
Note: For better adjustment of the locking wedge, the BMW-51 2 090 gauge is installed on the door lock in the workshop. If the gauge is not used, then after adjustment the so-called "crackling" of the locking wedge may occur.
Carefully open the door and tighten the mounting bolts to a torque of 30 Nm.
Note: the door may be recessed inwards by no more than 1 mm from the front side, and protruding outwards by no more than 1 mm from the rear side. A worn locking wedge must first be replaced.
This article is available at russian, bulgarian, belarusian, ukrainian, serbian, croatian, romanian, polish, slovak, hungarian
Article verified: Ilyinsky Matvey
Share information:
Previous articles
БМВ E39: Exterior
Next articles
Similar articles on other types of BMW cars:
Removal and installation, door adjustment BMW 3 Series E36 (1990-2000)
Removal, installation and adjustment of the door BMW 3 Series E46 (1998-2006)
Door — removal, installation and adjustment BMW 7 Series E32 (1986-1994)
Removal, installation and adjustment of doors BMW 7 Series E38 (1994-2001)
Removal and installation the rear door BMW X3 E83 (2003-2010)
Removal and installation the upper luggage door lock BMW X5 E53 (1999-2006)
Link in different formats to this page
Visitor comments
No comments yet
- General information
- Governing bodies
- Manual
- Maintenance
- Power unit
- Engine repair
- Lubrication system
- Cooling system
- Ignition system
- Supply system
- Injection system (gasoline)
- Injection system (diesel)
- Exhaust system
- Transmission
- Clutch
- Car gearbox
- Front axle
- Rear axle
- Chassis
- Steering
- Brake system
- Wheels and tires
- Body
- Interior
- Exterior
- Heating system
- Electrical equipment
- Equipment and devices
- Power devices
- Windscreen wipers
- Electrical circuits
- General information
- Manual
- Maintenance
- Power unit
- Engine repair
- Ignition system
- Engine lubrication system
- Cooling system
- Fuel system (gasoline)
- Fuel system (diesel)
- Exhaust system
- Transmission
- Clutch
- Car gearbox
- Chassis
- Front and rear suspension
- Steering
- Brake system
- Body
- Exterior
- Interior
- Electrical equipment
- Heating system
- Equipment and devices
- Power devices
- Electrical circuits
- General information
- Manual
- Maintenance
- Power unit
- Engine in a car
- Engine overhaul
- Cooling system
- Supply system
- Ignition system
- Control system
- Transmission
- Clutch
- Manual gearbox
- Automatic gearbox
- Transmission line
- Chassis
- Steering
- Front suspension
- Rear suspension
- Brake system
- Body
- Body elements
- Car care and painting
- Electrical equipment
- Heater and air conditioner
- Equipment and devices
- Starter and generator
- Electrical circuits
- General information
- Operation and maintenance
- Specifications
- Power unit
- Engine repair
- Cooling and lubrication system
- Supply system
- Ecotronic power supply system
- Fuel injection system
- Ignition system
- Transmission
- Clutch
- Gearbox BMW 242/4
- Gearbox Getrag 262/8
- Gearbox Getrag 265/6
- Automatic gearbox
- Cardan gear
- Rear axle
- Chassis
- Steering
- Front suspension
- Rear suspension
- Brake system
- Electrical equipment
- Equipment and devices
- Electrical circuits