
Table of contents: Removal ↓ Installation ↓
- Home
- BMW 3 Series
- E46
- Body
- Exterior
- Removal, installation and adjustment of the door
Removal, installation and adjustment of the door (BMW 3 Series E46)
The door can be adjusted using washers placed in the hinge from below.
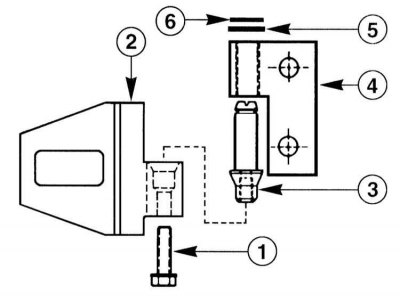
1 - bolt
2 - upper loop from the body side
3 - loop axis
4 - hinge with bushing, upper, from the door side
5 - washer
6 - lock washer
The front and rear doors are installed in the same way.
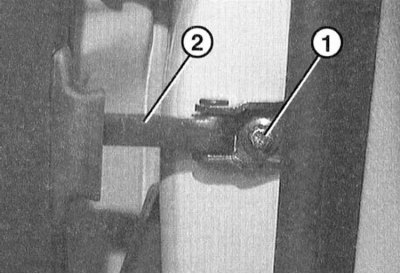
1. Unscrew bolt "1" and press door stop "2" away from pillar A.
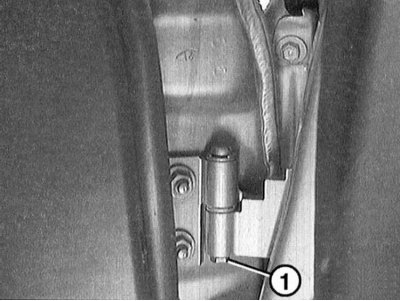
2. Remove bolt "1" at each hinge using a 10mm socket and ratchet.
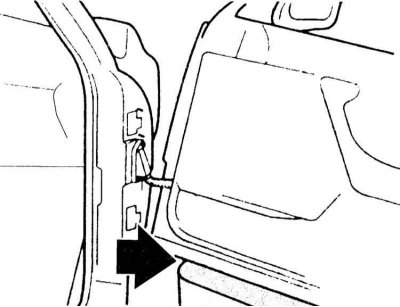
3. Remove the door from its hinges and place it on the linings (arrow on the illustration). The lining must be of such a height that the cable bundle is not under tension.

4. Unscrew the plug frame mounting bolts (arrows in the illustration). After this, remove the plug.
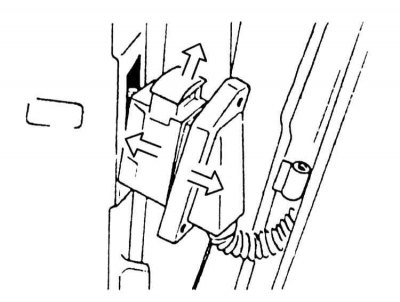
5. Pull the bracket up (top arrow). This will cause the connector to become disconnected.
6. Connect the consumer connector and fix it. Press the plug into the door pillar, tighten the frame mounting bolts to 5 N·m.
7. Insert the door into the hinges from the top and bottom with the help of an assistant. The door is guided by the axis "3". Using washers placed in the hinge from below, the door can be readjusted if necessary. When installing the same door, adjustment is usually not required.
8. Screw bolt "1" into each loop.
9. Attach the door stop to pillar A.
10. Close the door and check if the gap between the door and the body is uniform. If necessary, unscrew the bolts at the hinges and adjust the door height with the upper bolts.
The door is adjusted only in combination with related components, such as window lifters, glass, etc., since the position of the door depends on its weight. When adjusting the door seal, it is necessary to remove it. If the front and rear doors were removed, the rear door must be adjusted first, then the front one.

11. Loosen screw "1" securing the lock bracket to the B-pillar of the door with a Torx screwdriver and loosen screw "2" so that the bracket can move. Note: The depth adjustment "3" should not be changed.
12. Open the door handle and hold it. Close the door. This sets the height "4" and the angle of the lock bracket.
13. Carefully open the door and tighten the screws to a torque of 20 Nm.
1 - bolt
2 - upper loop from the body side
3 - loop axis
4 - hinge with bushing, upper, from the door side
5 - washer
6 - lock washer
The front and rear doors are installed in the same way.
Removal
1. Unscrew bolt "1" and press door stop "2" away from pillar A.
2. Remove bolt "1" at each hinge using a 10mm socket and ratchet.
To protect the paintwork on the door and front wall, tape them down
3. Remove the door from its hinges and place it on the linings (arrow on the illustration). The lining must be of such a height that the cable bundle is not under tension.
4. Unscrew the plug frame mounting bolts (arrows in the illustration). After this, remove the plug.
5. Pull the bracket up (top arrow). This will cause the connector to become disconnected.
Installation
6. Connect the consumer connector and fix it. Press the plug into the door pillar, tighten the frame mounting bolts to 5 N·m.
7. Insert the door into the hinges from the top and bottom with the help of an assistant. The door is guided by the axis "3". Using washers placed in the hinge from below, the door can be readjusted if necessary. When installing the same door, adjustment is usually not required.
8. Screw bolt "1" into each loop.
9. Attach the door stop to pillar A.
10. Close the door and check if the gap between the door and the body is uniform. If necessary, unscrew the bolts at the hinges and adjust the door height with the upper bolts.
When installing a new one, spacers are placed under the hinges to move the door outward or inward
The door is adjusted only in combination with related components, such as window lifters, glass, etc., since the position of the door depends on its weight. When adjusting the door seal, it is necessary to remove it. If the front and rear doors were removed, the rear door must be adjusted first, then the front one.
11. Loosen screw "1" securing the lock bracket to the B-pillar of the door with a Torx screwdriver and loosen screw "2" so that the bracket can move. Note: The depth adjustment "3" should not be changed.
If you need to remove the bracket, keep the following in mind. Instead of the top screw, screw in a stud to prevent the threaded strip from falling into the door pillar. Then unscrew the bottom screw and remove the bracket.
12. Open the door handle and hold it. Close the door. This sets the height "4" and the angle of the lock bracket.
13. Carefully open the door and tighten the screws to a torque of 20 Nm.
The door may not go inward more than 1 mm from the front side and protrude more than 1 mm from the back side. A worn lock bracket must be replaced first.
This article is available at russian, bulgarian, belarusian, ukrainian, serbian, croatian, romanian, polish, slovak, hungarian
Article verified: Sevastyanov Nikolay
Share information:
Previous articles
БМВ E46: Exterior
Next articles
Similar articles on other types of BMW cars:
Removal and installation, door adjustment BMW 5 Series E34 (1988-1996)
Removal and installation / adjustment of the door BMW 5 Series E39 (1995-2003)
Door — removal, installation and adjustment BMW 7 Series E32 (1986-1994)
Removal, installation and adjustment of doors BMW 7 Series E38 (1994-2001)
Removal and installation the rear door BMW X3 E83 (2003-2010)
Removal and installation the upper luggage door lock BMW X5 E53 (1999-2006)
Link in different formats to this page
Visitor comments
No comments yet
- General information
- Manual
- Maintenance
- Power unit
- Engine repair
- Cooling system
- Power system (gasoline)
- Injection system (gasoline)
- Fuel system (diesel)
- Exhaust system
- Ignition system
- Charge and launch systems
- Transmission
- Car gearbox
- Clutch and drive shafts
- Chassis
- Brake system
- Suspension front and rear
- Steering
- Body
- Body care and repair
- Exterior
- Interior
- Electrical equipment
- Troubleshooting
- Lighting and signaling
- Equipment and devices
- Heater and air conditioner
- Electrical circuits
- General information
- Manual
- Repair on the road
- Weekly checks
- Maintenance
- Troubleshooting
- Power unit
- 4 cylinder engines
- 6 cylinder engines
- Engine overhaul
- Cooling and heating
- Fuel and exhaust system
- Starting and charging system
- Ignition system
- Transmission
- Clutch
- Mechanical gearbox
- Automatic gearbox
- Cardan and drive shafts
- Chassis
- Brake system
- Wheel suspension
- Steering
- Body
- Exterior
- Interior
- Electrical equipment
- Equipment and devices
- Electrical circuits
- General information
- Maintenance
- Power unit
- Engine repair
- Cooling system
- Ignition system
- Supply system
- Fuel injection system
- Exhaust system
- Transmission
- Clutch
- Car gearbox
- Front and rear axle
- Chassis
- Steering
- Brake system
- Body
- Exterior
- Interior
- Electrical equipment
- Heating system
- Equipment and devices
- Power devices
- Electrical circuits
- Power unit
- M10/M20 engine
- M40 engine
- Ignition system
- Lubrication system
- Cooling system
- Supply system
- Fuel injection
- Exhaust system
- Transmission
- Clutch
- Manual gearbox
- Front axle
- Rear axle
- Chassis
- Steering
- Brake system
- Body
- Exterior
- Interior
- Electrical equipment
- Heating system
- Equipment and devices
- Electrical circuits
- General information
- Specifications
- Operation and maintenance
- 4-cylinder engine
- Engine repair
- Cooling and lubrication system
- Supply system
- Ignition system
- 6-cylinder engine
- Engine repair
- Cooling and lubrication system
- Supply system
- Fuel injection system
- Ignition system
- Transmission
- Clutch
- 4-speed manual gearbox
- 5-speed manual gearbox
- Automatic gearbox
- Cardan and rear axle
- Chassis
- Steering
- Front suspension
- Rear suspension
- Brake system
- Electrical equipment
- Equipment and devices
- Electrical circuits