



- Home
- BMW 3 Series
- E46
- Body
- Exterior
- Removal and installation door trim
Removal and installation door trim (BMW 3 Series E46)
This describes how to remove the front door trim. The process for removing the rear door trim is similar. The differences are described at the end of the Section.
1. Disconnect the negative (-) battery cable with the ignition off. The battery is located in the luggage compartment behind the cover on the right side. In BMW 316i, 318i cars, the battery is located in the engine compartment.
2. Insulate the negative terminal of the battery to prevent accidental contact with it.
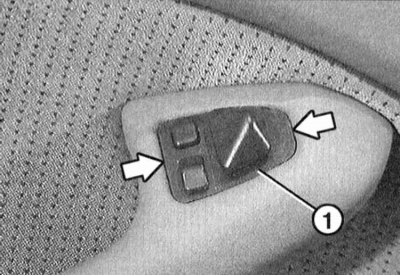
3. Remove the mirror switch "1" upwards using two small screwdrivers. The screwdrivers are placed at the points shown in the illustration by arrows. Disconnect the two plug connections and remove the mirror switch.
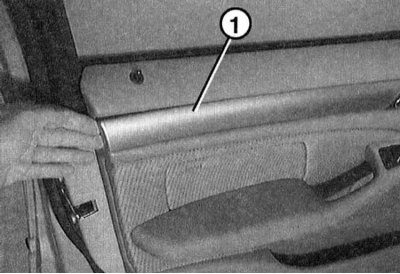
4. Remove the visor "1" from the door from the rear end using your fingers. Start removing from the rear end. The visor is secured with four clamps.
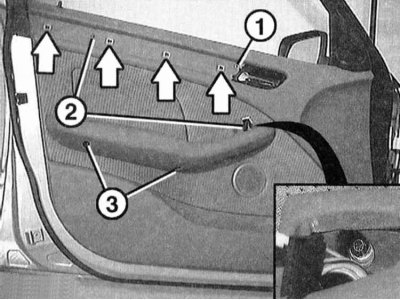
5. Remove the screws (1/2/3) with a Torx T20 screwdriver.
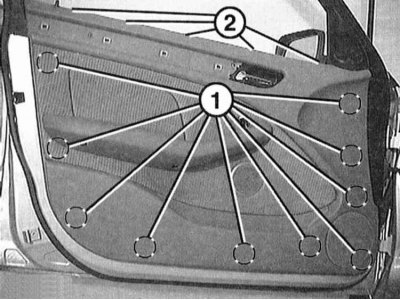
6. Press the trim away from the door and detach it at points "1". Use a plastic wedge, such as HAZET 1965-20, to press it away.
7. Pull the trim away from the door at the top and disconnect it at points "2" from the brackets, starting from the hinge side.
8. Lift the door trim through the locking button.
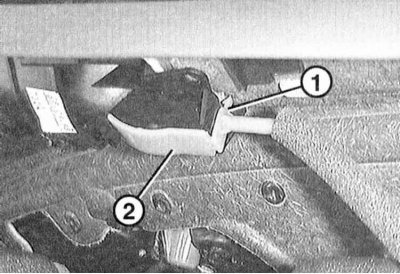
9. Disconnect the inner door drive cable. To do this, open the inner door drive lever. In this position, disconnect the white plastic clip "1" and remove the cable "2" back from the drive lever.
10. On the back of the panel, unplug the speaker connector. Disconnect the two cable fasteners and pull the electrical wires through.
11. Remove the door trim.
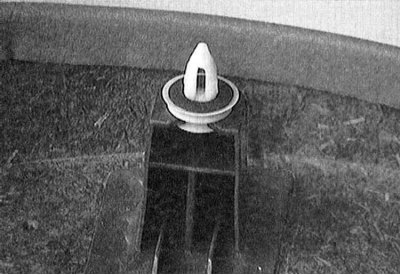
12. Check the door trim clips and replace if necessary.
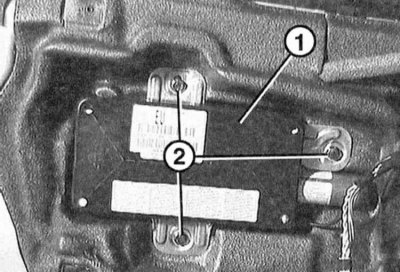
13. Unscrew the three mounting bolts "3" of the side airbag "1". From the back side, disconnect the yellow connector and remove the airbag.
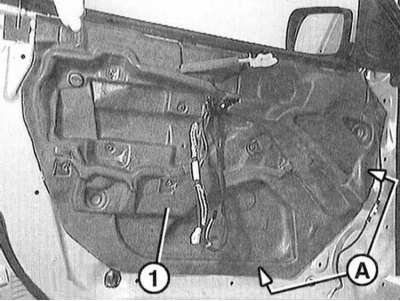
14. Detach cover "1" from the door along the contour. To do this, pull it a little with your fingers, then use a plastic wedge to push back the glue roller on the door.
15. Carefully glue the cover onto the door cutout, making sure that it matches the holes.
16. Check if the negative (-) battery cable is disconnected. If not, disconnect it with the ignition off.
17. Reinstall the side airbag. To do this, connect the yellow connector on the back side and secure it so that a distinct click is heard. Check that the plug connection is securely locked. Secure the side airbag with three new screws to a torque of 8.5 Nm.
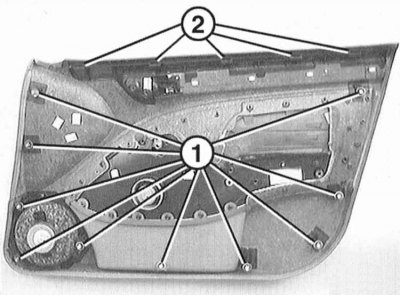
18. Check the reliability of the fastening of the clamps "1" of the door trim, replace if necessary. 2 - supports of the upper brackets.
19. Pull the electrical wires through the back of the trim. Secure the cables and connect the speaker connector. If necessary, secure the mirror drive plug with adhesive tape in the door trim cutout.
20. Connect the cable of the inner door drive to the lever. In this case, insert the clamp from the front, press it from the back and fix the hook.
21. Lift the door trim above the locking button.
22. Place the trim on top of the brackets and press down. If necessary, pat it with your palm.
23. Position the trim over the holes in the plastic clips and gently press it down with your palms.
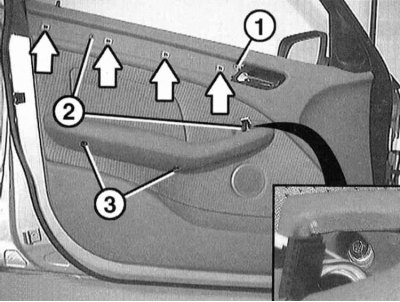
24. Fasten the door trim with screws (1/2/3). Make sure that the longer screw is screwed in at point "1".
25. Insert the top visor with four clips into the support elements and press down. If necessary, gently press with your palms.
26. Connect the mirror switch connector and press the switch into the door trim hole.
27. Connect the negative (-) battery cable with the ignition off. Set the clock.
Cars with electric windows:
28. Lift the window switch up at the switch.
Cars without electric windows:
29. Remove the visor in place of the window switch using two small screwdrivers.
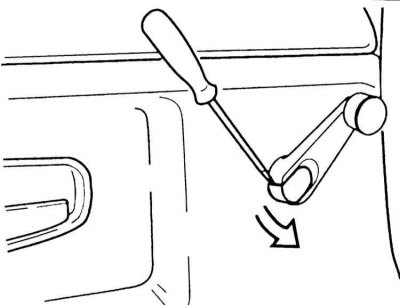
30. Remove the window lift handle. To do this:
[The article was copied from an online resource: «bmwman.ru»]
Removal
1. Disconnect the negative (-) battery cable with the ignition off. The battery is located in the luggage compartment behind the cover on the right side. In BMW 316i, 318i cars, the battery is located in the engine compartment.
Disconnecting the battery will erase the fault memory of some control units. If necessary, read the fault memory before disconnecting the battery. Refer to Section Troubleshooting. It is advisable to carry out the work in a service station.
2. Insulate the negative terminal of the battery to prevent accidental contact with it.
3. Remove the mirror switch "1" upwards using two small screwdrivers. The screwdrivers are placed at the points shown in the illustration by arrows. Disconnect the two plug connections and remove the mirror switch.
4. Remove the visor "1" from the door from the rear end using your fingers. Start removing from the rear end. The visor is secured with four clamps.
5. Remove the screws (1/2/3) with a Torx T20 screwdriver.
Screw "1" is longer than the others. The arrows are the supports for the upper visor.
6. Press the trim away from the door and detach it at points "1". Use a plastic wedge, such as HAZET 1965-20, to press it away.
7. Pull the trim away from the door at the top and disconnect it at points "2" from the brackets, starting from the hinge side.
8. Lift the door trim through the locking button.
9. Disconnect the inner door drive cable. To do this, open the inner door drive lever. In this position, disconnect the white plastic clip "1" and remove the cable "2" back from the drive lever.
10. On the back of the panel, unplug the speaker connector. Disconnect the two cable fasteners and pull the electrical wires through.
11. Remove the door trim.
12. Check the door trim clips and replace if necessary.
Before removing the airbag, be sure to read the safety instructions for the airbag, refer to Section Power steering (servo control).
13. Unscrew the three mounting bolts "3" of the side airbag "1". From the back side, disconnect the yellow connector and remove the airbag.
The mounting bolts are coated with thread locking compound and need to be replaced.
14. Detach cover "1" from the door along the contour. To do this, pull it a little with your fingers, then use a plastic wedge to push back the glue roller on the door.
Be especially careful at the bottom and front of "A". A damaged door cover must be replaced.
Installation
15. Carefully glue the cover onto the door cutout, making sure that it matches the holes.
Be careful not to damage the door covers, otherwise there will be a draft in the car. The adhesive mass should be applied along the contour. If necessary, restore the adhesive seal with BMW butyl cord.
16. Check if the negative (-) battery cable is disconnected. If not, disconnect it with the ignition off.
17. Reinstall the side airbag. To do this, connect the yellow connector on the back side and secure it so that a distinct click is heard. Check that the plug connection is securely locked. Secure the side airbag with three new screws to a torque of 8.5 Nm.
18. Check the reliability of the fastening of the clamps "1" of the door trim, replace if necessary. 2 - supports of the upper brackets.
19. Pull the electrical wires through the back of the trim. Secure the cables and connect the speaker connector. If necessary, secure the mirror drive plug with adhesive tape in the door trim cutout.
20. Connect the cable of the inner door drive to the lever. In this case, insert the clamp from the front, press it from the back and fix the hook.
21. Lift the door trim above the locking button.
22. Place the trim on top of the brackets and press down. If necessary, pat it with your palm.
23. Position the trim over the holes in the plastic clips and gently press it down with your palms.
24. Fasten the door trim with screws (1/2/3). Make sure that the longer screw is screwed in at point "1".
25. Insert the top visor with four clips into the support elements and press down. If necessary, gently press with your palms.
26. Connect the mirror switch connector and press the switch into the door trim hole.
There should be no people in the vehicle when connecting the battery
27. Connect the negative (-) battery cable with the ignition off. Set the clock.
Differences for the rear door trim
Cars with electric windows:
28. Lift the window switch up at the switch.
Cars without electric windows:
29. Remove the visor in place of the window switch using two small screwdrivers.
30. Remove the window lift handle. To do this:
- Remove the visor with a screwdriver (arrow on the illustration).
- Remove the screw underneath.
- Remove the window lift handle from the shaft together with the washer.
[The article was copied from an online resource: «bmwman.ru»]
This article is available at russian, bulgarian, belarusian, ukrainian, serbian, croatian, romanian, polish, slovak, hungarian
Article verified: Sevastyanov Nikolay
Share information:
Previous articles
БМВ E46: Exterior
Next articles
Similar articles on other types of BMW cars:
Removal and installation door trim BMW 5 Series E34 (1988-1996)
Removal and installation the rear door trim (Touring) BMW 5 Series E39 (1995-2003)
Removal and installation trim and soundproofing of the front door BMW 7 Series E38 (1994-2001)
Door — removal, installation and adjustment BMW 7 Series E32 (1986-1994)
Removal and installation the rear door BMW X3 E83 (2003-2010)
Removal and installation the front door trim BMW X5 E53 (1999-2006)
Removal and installation door trim BMW 5 Series E34 (1988-1996)
Removal and installation the rear door trim (Touring) BMW 5 Series E39 (1995-2003)
Removal and installation trim and soundproofing of the front door BMW 7 Series E38 (1994-2001)
Door — removal, installation and adjustment BMW 7 Series E32 (1986-1994)
Removal and installation the rear door BMW X3 E83 (2003-2010)
Removal and installation the front door trim BMW X5 E53 (1999-2006)
Link in different formats to this page
Visitor comments
No comments yet
- General information
- Manual
- Maintenance
- Power unit
- Engine repair
- Cooling system
- Power system (gasoline)
- Injection system (gasoline)
- Fuel system (diesel)
- Exhaust system
- Ignition system
- Charge and launch systems
- Transmission
- Car gearbox
- Clutch and drive shafts
- Chassis
- Brake system
- Suspension front and rear
- Steering
- Body
- Body care and repair
- Exterior
- Interior
- Electrical equipment
- Troubleshooting
- Lighting and signaling
- Equipment and devices
- Heater and air conditioner
- Electrical circuits
- General information
- Manual
- Repair on the road
- Weekly checks
- Maintenance
- Troubleshooting
- Power unit
- 4 cylinder engines
- 6 cylinder engines
- Engine overhaul
- Cooling and heating
- Fuel and exhaust system
- Starting and charging system
- Ignition system
- Transmission
- Clutch
- Mechanical gearbox
- Automatic gearbox
- Cardan and drive shafts
- Chassis
- Brake system
- Wheel suspension
- Steering
- Body
- Exterior
- Interior
- Electrical equipment
- Equipment and devices
- Electrical circuits
- General information
- Maintenance
- Power unit
- Engine repair
- Cooling system
- Ignition system
- Supply system
- Fuel injection system
- Exhaust system
- Transmission
- Clutch
- Car gearbox
- Front and rear axle
- Chassis
- Steering
- Brake system
- Body
- Exterior
- Interior
- Electrical equipment
- Heating system
- Equipment and devices
- Power devices
- Electrical circuits
- Power unit
- M10/M20 engine
- M40 engine
- Ignition system
- Lubrication system
- Cooling system
- Supply system
- Fuel injection
- Exhaust system
- Transmission
- Clutch
- Manual gearbox
- Front axle
- Rear axle
- Chassis
- Steering
- Brake system
- Body
- Exterior
- Interior
- Electrical equipment
- Heating system
- Equipment and devices
- Electrical circuits
- General information
- Specifications
- Operation and maintenance
- 4-cylinder engine
- Engine repair
- Cooling and lubrication system
- Supply system
- Ignition system
- 6-cylinder engine
- Engine repair
- Cooling and lubrication system
- Supply system
- Fuel injection system
- Ignition system
- Transmission
- Clutch
- 4-speed manual gearbox
- 5-speed manual gearbox
- Automatic gearbox
- Cardan and rear axle
- Chassis
- Steering
- Front suspension
- Rear suspension
- Brake system
- Electrical equipment
- Equipment and devices
- Electrical circuits