
- Home
- BMW 5 Series
- E39
- Body
- Exterior
- Removal and installation door trim
Removal and installation door trim (BMW 5 Series E39)
The procedure for removing the trim from the front doors is described. For the rear doors, removal is performed similarly. The differences in the operations are given at the end of the chapter.
Disconnect the negative (-) battery cable. The battery is located in the luggage compartment behind the right side trim.
Insulate the negative battery terminal to prevent accidental electrical contact.
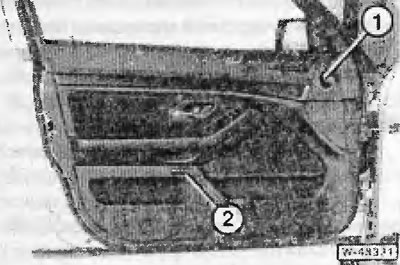
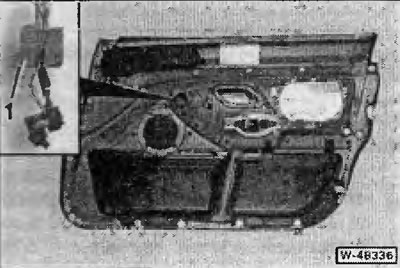
Unscrew bolt "1" located in the air duct.
Press the footwell lighting lamp at the bottom of the trim, disconnect the plug connector and remove the lamp.
Press the switch "2" of the seat position memory device with a small screwdriver, disconnect the plug connector and remove the switch.
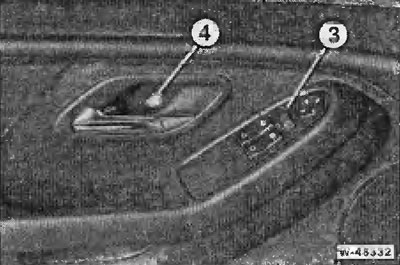
Use a small screwdriver to press the control panel "3" for the windows and rear-view mirrors.
Disconnect the plug connectors:
Remove the control panel.
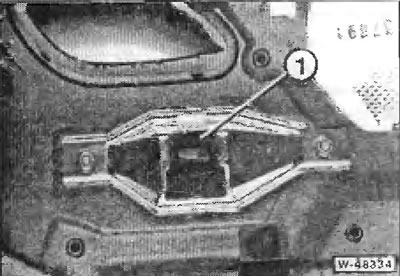
Remove trim "4" from the door handle recess (drawing W-48332) and unscrew the screw located underneath it.
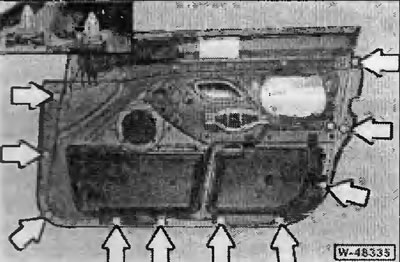
Unfasten the door trim from the sides and bottom - to do this, pull the trim away from the door with your fingers by the edge. The location of the clamps is shown by the arrows below in Figure W-4B335.
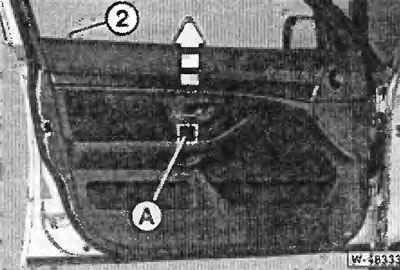
Slide the trim upwards and thereby detach it from the central clamp and from the upper spring clamps.
The central clamp is located on the inside of the lining in zone "A".
Move the door lock opening drive from the inside through the hole in the trim.
Lift the door trim above the button "2" for locking the door from the inside and remove it.
If the middle clip "1" remains in the door, it must be pulled out and, as shown in the figure, inserted into the trim.
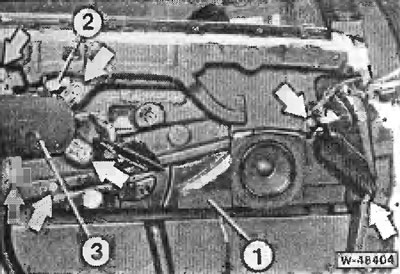
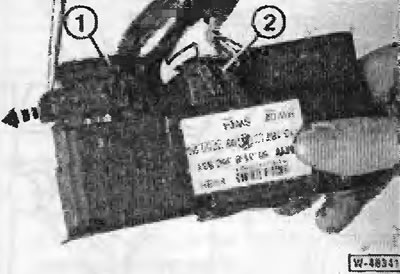
Disconnect the speaker wire, unscrew the speaker box "1" mount and remove the box.
Disconnect the plug connector (orange) "2" of the side airbag. Loosen the fastening of the side airbag "3" and move it upwards together with the closing board, for example into the luggage compartment.
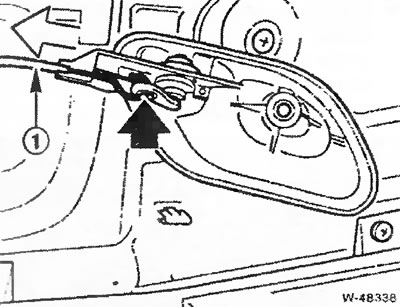
Pull Bowden rod "1" back, unhook it from the door release handle from the inside and remove it.
If necessary, carefully remove the foam trim from the door.
Carefully glue the foam lining to the door.
Attach a Bowden rod to the door release handle from the inside.
Screw the side airbag to the door frame and connect the plug connector (orange).
Screw the speaker box on and connect the plug connector.
Check if all the clips for the interior door trim are present, replace damaged clips with new ones.
Place the door trim, pass the door release handle from the inside and the electrical wires through the holes. Insert the window lift wires into the sound insulation "1" and lightly glue it to the edges of the hole in the trim. Make sure that the door lock drive cable from the inside is located in the plastic counter support.
Insert the inner door trim from above through the locking button. Place the door shaft trim on top, pull it slightly from below and, pressing diagonally downwards at the top with your fingertips, secure it in the five upper spring clamps.
Press and secure the door trim around the perimeter and in the middle.
Screw the door trim into the air duct.
Screw the recess of the inner door handle, press the cover plate.
Connect the plug connectors or, respectively, attach the plugs to the switches and, by pressing the locking lever, place the plugs on the switches and secure them.
Press the switches into the trim and secure them.
Connect the plug connector of the footwell light and secure the light.
Close the door and open it using the inside handle. Check if the handle returns to its original position. If necessary, remove the door trim and check the correct installation of the cable traction.
Connect the battery ground (-) cable. Set the clock.
Remove the window lift lever:
Removal
Disconnect the negative (-) battery cable. The battery is located in the luggage compartment behind the right side trim.
Caution: This will erase the contents of the electronic storage devices. Follow the instructions in the chapter "Removal and installation the battery".
Insulate the negative battery terminal to prevent accidental electrical contact.
Unscrew bolt "1" located in the air duct.
Press the footwell lighting lamp at the bottom of the trim, disconnect the plug connector and remove the lamp.
Press the switch "2" of the seat position memory device with a small screwdriver, disconnect the plug connector and remove the switch.
Use a small screwdriver to press the control panel "3" for the windows and rear-view mirrors.
Disconnect the plug connectors:
- Plug connector 1: Press the locking latch to the side with a screwdriver without lifting it. The switch is lifted upwards by means of a lever mechanism.
- Plug connector 2: Press the locking hook down and swing the locking bracket to the side - this causes the switch to rise up.
Remove the control panel.
Remove trim "4" from the door handle recess (drawing W-48332) and unscrew the screw located underneath it.
Unfasten the door trim from the sides and bottom - to do this, pull the trim away from the door with your fingers by the edge. The location of the clamps is shown by the arrows below in Figure W-4B335.
Slide the trim upwards and thereby detach it from the central clamp and from the upper spring clamps.
The central clamp is located on the inside of the lining in zone "A".
Move the door lock opening drive from the inside through the hole in the trim.
Lift the door trim above the button "2" for locking the door from the inside and remove it.
If the middle clip "1" remains in the door, it must be pulled out and, as shown in the figure, inserted into the trim.
Disconnect the speaker wire, unscrew the speaker box "1" mount and remove the box.
Caution: Observe safety precautions when working with inflatable airbag.
Disconnect the plug connector (orange) "2" of the side airbag. Loosen the fastening of the side airbag "3" and move it upwards together with the closing board, for example into the luggage compartment.
Pull Bowden rod "1" back, unhook it from the door release handle from the inside and remove it.
If necessary, carefully remove the foam trim from the door.
Note: The adhesive seal adheres better to the foam liner when it is removed with a jerk at low temperatures.
Installation
Carefully glue the foam lining to the door.
Attention: the lining must not be damaged, otherwise there will be a draft in the car. The adhesive mass must be applied along the perimeter, if necessary, buy a synthetic rubber cord at a BMW service station and repair the adhesive seal.
Attach a Bowden rod to the door release handle from the inside.
Screw the side airbag to the door frame and connect the plug connector (orange).
Screw the speaker box on and connect the plug connector.
Check if all the clips for the interior door trim are present, replace damaged clips with new ones.
Place the door trim, pass the door release handle from the inside and the electrical wires through the holes. Insert the window lift wires into the sound insulation "1" and lightly glue it to the edges of the hole in the trim. Make sure that the door lock drive cable from the inside is located in the plastic counter support.
Insert the inner door trim from above through the locking button. Place the door shaft trim on top, pull it slightly from below and, pressing diagonally downwards at the top with your fingertips, secure it in the five upper spring clamps.
Press and secure the door trim around the perimeter and in the middle.
Screw the door trim into the air duct.
Screw the recess of the inner door handle, press the cover plate.
Connect the plug connectors or, respectively, attach the plugs to the switches and, by pressing the locking lever, place the plugs on the switches and secure them.
Press the switches into the trim and secure them.
Connect the plug connector of the footwell light and secure the light.
Close the door and open it using the inside handle. Check if the handle returns to its original position. If necessary, remove the door trim and check the correct installation of the cable traction.
Connect the battery ground (-) cable. Set the clock.
Differences in working operations when working with the rear door trim
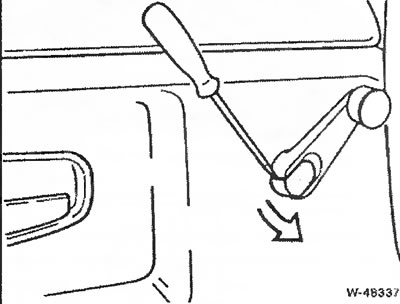
Remove the window lift lever:
- Use a screwdriver to press the cover off.
- Unscrew the screw located under the cover.
- Remove the window lift lever together with the washer from the axle.
This article is available at russian, bulgarian, belarusian, ukrainian, serbian, croatian, romanian, polish, slovak, hungarian
Article verified: Ilyinsky Matvey
Share information:
Previous articles
БМВ E39: Exterior
Next articles
Similar articles on other types of BMW cars:
Removal and installation door trim BMW 3 Series E30 (1982-1994)
Removal and installation door trim BMW 3 Series E36 (1990-2000)
Removal and installation trim and soundproofing of the front door BMW 7 Series E38 (1994-2001)
Door — removal, installation and adjustment BMW 7 Series E32 (1986-1994)
Removal and installation the rear door BMW X3 E83 (2003-2010)
Removal and installation the front door trim BMW X5 E53 (1999-2006)
Link in different formats to this page
Visitor comments
No comments yet
- General information
- Governing bodies
- Manual
- Maintenance
- Power unit
- Engine repair
- Lubrication system
- Cooling system
- Ignition system
- Supply system
- Injection system (gasoline)
- Injection system (diesel)
- Exhaust system
- Transmission
- Clutch
- Car gearbox
- Front axle
- Rear axle
- Chassis
- Steering
- Brake system
- Wheels and tires
- Body
- Interior
- Exterior
- Heating system
- Electrical equipment
- Equipment and devices
- Power devices
- Windscreen wipers
- Electrical circuits
- General information
- Manual
- Maintenance
- Power unit
- Engine repair
- Ignition system
- Engine lubrication system
- Cooling system
- Fuel system (gasoline)
- Fuel system (diesel)
- Exhaust system
- Transmission
- Clutch
- Car gearbox
- Chassis
- Front and rear suspension
- Steering
- Brake system
- Body
- Exterior
- Interior
- Electrical equipment
- Heating system
- Equipment and devices
- Power devices
- Electrical circuits
- General information
- Manual
- Maintenance
- Power unit
- Engine in a car
- Engine overhaul
- Cooling system
- Supply system
- Ignition system
- Control system
- Transmission
- Clutch
- Manual gearbox
- Automatic gearbox
- Transmission line
- Chassis
- Steering
- Front suspension
- Rear suspension
- Brake system
- Body
- Body elements
- Car care and painting
- Electrical equipment
- Heater and air conditioner
- Equipment and devices
- Starter and generator
- Electrical circuits
- General information
- Operation and maintenance
- Specifications
- Power unit
- Engine repair
- Cooling and lubrication system
- Supply system
- Ecotronic power supply system
- Fuel injection system
- Ignition system
- Transmission
- Clutch
- Gearbox BMW 242/4
- Gearbox Getrag 262/8
- Gearbox Getrag 265/6
- Automatic gearbox
- Cardan gear
- Rear axle
- Chassis
- Steering
- Front suspension
- Rear suspension
- Brake system
- Electrical equipment
- Equipment and devices
- Electrical circuits