
- Home
- BMW 3 Series
- E46
- Body
- Exterior
- Hood fitting
Hood fitting (BMW 3 Series E46)
The drive connecting both hood locks must be adjusted so that it has no play. The drive shell must be completely seated in the guide in the lock. Otherwise, due to the tension of the hood drive, the cable in the guide may slip out, after which the locks will not open.
Since the hood is fitted and secured to the unpainted body, subsequent displacement of the hood may expose its unpainted surfaces.
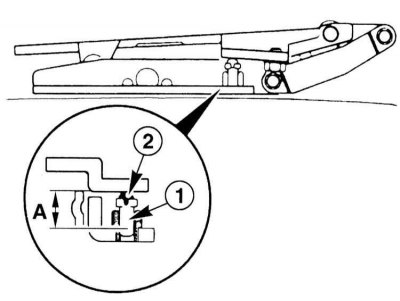
1. Adjust screw "1" of the hinge on the left and right to obtain dimension A = 12 mm.
2. Check stop "2", replace the loop if necessary.
Adjusting the hood drive
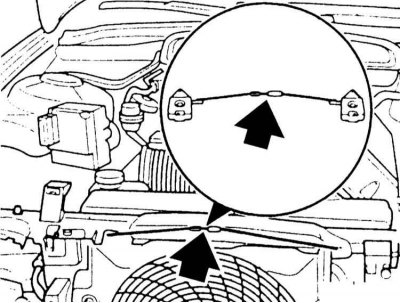
3. Adjust the hood drive so that it has no play.
The drive cable must not be taut. For clarity, the drive and locks are shown in the removed state.
4. Screw the hood stop in completely.
Side hood installation
5. Loosen screws "2" and "3" of hinge "1" on the left and right so that the hood can move. 4 - fastening of the ground cable (refer to illustration 13.3).
6. Close the hood and align it with the fenders at the front and sides.
If the adjustment range is not sufficient, loosen the hood hinge mounting screws and move the hinges on the body.
7. Carefully open the hood and secure the hinge screws.
Height adjustment of the hood
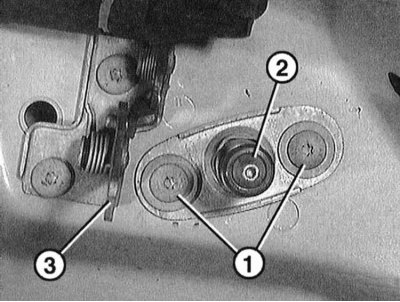
8. Loosen screws "1" securing both stops so that the stops can be moved. 3 - grab hook.
9. Close the hood several times until the locks can be aligned.
10. Tighten the lock stop mounting screws.

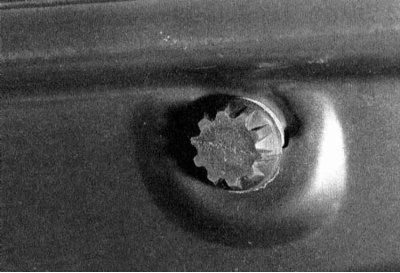
11. Unscrew the lock nut "1" and turn the stop "2" with the socket wrench "3".
12. Thus, set the hood to the same height in relation to the wings. At the same time, watch the parallel gap in relation to the front bumper.
13. Tighten the lock nut.
14. Check that the locks and hooks "4" are correctly mated, repeat the adjustment if necessary.
Adjusting the stop
15. Open the hood.
16. Unscrew the stop so that the hood is under some tension. To do this, form two columns of approximately 10 mm height from plasticine. Install the columns on the stops and close the hood. Open the hood and measure the height of the stop and the compressed column. Unscrew the stops by the value of the obtained size + 0.5 mm. Thus, adjust all the stops.
17. Check if the stop fits against all stops without any gap, otherwise repeat the adjustment.
The hood should not be higher than the fender, otherwise there may be wind noise when driving.
This article is available at russian, bulgarian, belarusian, ukrainian, serbian, croatian, romanian, polish, slovak, hungarian
Article verified: Sevastyanov Nikolay
Share information:
Previous articles
БМВ E46: Exterior
Next articles
Similar articles on other types of BMW cars:
Fitting the engine compartment hood BMW 5 Series E34 (1988-1996)
Engine compartment hood structure BMW 5 Series E39 (1995-2003)
Engine hood — removal and installation BMW 7 Series E32 (1986-1994)
Removal, installation and adjustment of the hood, replacement of its… BMW 7 Series E38 (1994-2001)
Car Maintenance — hood BMW X3 E83 (2003-2010)
Hood — removal, installation and adjustment BMW X5 E53 (1999-2006)
Link in different formats to this page
Visitor comments
No comments yet
- General information
- Manual
- Maintenance
- Power unit
- Engine repair
- Cooling system
- Power system (gasoline)
- Injection system (gasoline)
- Fuel system (diesel)
- Exhaust system
- Ignition system
- Charge and launch systems
- Transmission
- Car gearbox
- Clutch and drive shafts
- Chassis
- Brake system
- Suspension front and rear
- Steering
- Body
- Body care and repair
- Exterior
- Interior
- Electrical equipment
- Troubleshooting
- Lighting and signaling
- Equipment and devices
- Heater and air conditioner
- Electrical circuits
- General information
- Manual
- Repair on the road
- Weekly checks
- Maintenance
- Troubleshooting
- Power unit
- 4 cylinder engines
- 6 cylinder engines
- Engine overhaul
- Cooling and heating
- Fuel and exhaust system
- Starting and charging system
- Ignition system
- Transmission
- Clutch
- Mechanical gearbox
- Automatic gearbox
- Cardan and drive shafts
- Chassis
- Brake system
- Wheel suspension
- Steering
- Body
- Exterior
- Interior
- Electrical equipment
- Equipment and devices
- Electrical circuits
- General information
- Maintenance
- Power unit
- Engine repair
- Cooling system
- Ignition system
- Supply system
- Fuel injection system
- Exhaust system
- Transmission
- Clutch
- Car gearbox
- Front and rear axle
- Chassis
- Steering
- Brake system
- Body
- Exterior
- Interior
- Electrical equipment
- Heating system
- Equipment and devices
- Power devices
- Electrical circuits
- Power unit
- M10/M20 engine
- M40 engine
- Ignition system
- Lubrication system
- Cooling system
- Supply system
- Fuel injection
- Exhaust system
- Transmission
- Clutch
- Manual gearbox
- Front axle
- Rear axle
- Chassis
- Steering
- Brake system
- Body
- Exterior
- Interior
- Electrical equipment
- Heating system
- Equipment and devices
- Electrical circuits
- General information
- Specifications
- Operation and maintenance
- 4-cylinder engine
- Engine repair
- Cooling and lubrication system
- Supply system
- Ignition system
- 6-cylinder engine
- Engine repair
- Cooling and lubrication system
- Supply system
- Fuel injection system
- Ignition system
- Transmission
- Clutch
- 4-speed manual gearbox
- 5-speed manual gearbox
- Automatic gearbox
- Cardan and rear axle
- Chassis
- Steering
- Front suspension
- Rear suspension
- Brake system
- Electrical equipment
- Equipment and devices
- Electrical circuits