
Table of contents: Removal ↓ Installation ↓
- Home
- BMW 5 Series
- E39
- Body
- Exterior
- Removal and installation the rear bumper
Removal and installation the rear bumper (BMW 5 Series E39)
The bumper is designed so that it can withstand impacts without damage at vehicle speeds of up to 4 km/h. The impact energy is absorbed by a fiberglass beam located inside and two energy-absorbing buffers.
Loosen the mudguard fastenings in the right and left wheel arches. To do this, remove the spacer clamps, having first knocked out the pins in the center of the clamps using a curved screwdriver with external slots measuring 2.5-3.0 mm. If the spacer clamps have caps, first press the pins with a screwdriver, and then remove the clamps. Finally, pull out the mudguards by moving them away from the bumper.
Note: You do not need to remove the wheels for this.
Open the luggage compartment, remove the rear trim, see page 133.
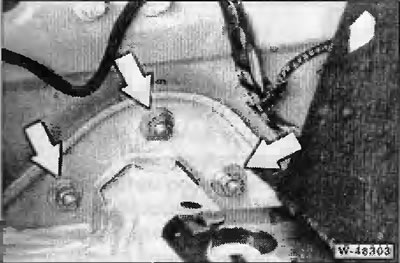
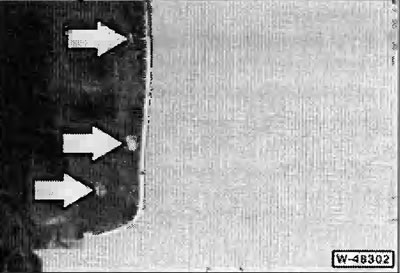
Using a 13 mm wrench, unscrew the 3 "arrow" nuts on the left and right sides of the bumper mount.
For vehicles equipped with Park Distance Control (PDC), loosen the cable tie, disconnect the plug connector and release the cables. Pull the bumper back slightly and remove the cable insert together with the cables.
With the help of an assistant, remove the bumper by moving it backwards.
If required, complete the bumper, see drawing W-48301.
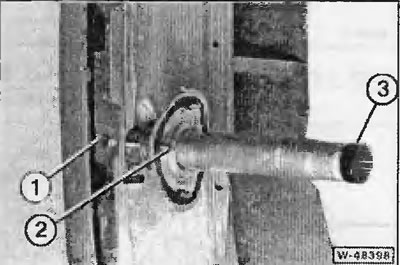
If necessary, place the plastic plug "3" on the energy-absorbing buffer. When removed, the plug often remains in the receiver of the energy-absorbing buffer.
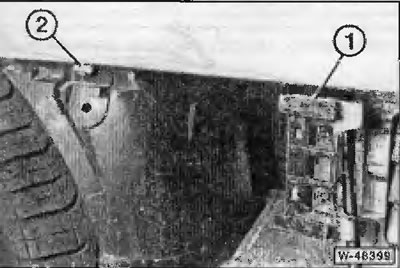
Together with an assistant, insert the bumper into the side guides "1" and push it forward. Press the front part from the side and move the bumper forward along the stop. In this case, the front guide of the bumper should enter the holder "2".
For vehicles with a PDC system, install the wire insert together with the wires, connect the plug connector and secure the wires with a clamp in the position they occupied before removal.
Raise the rear bumper slightly, align it parallel to the body and tighten the fastener to 20 Nm. The distance between the bumper and the body should be 5±1 mm.
The height of the bumper can be adjusted with the bumper removed by turning the plastic head with an internal hexagon located in the energy-absorbing buffers.
Install the rear luggage compartment trim.
Attach the rear mudguards, insert the expansion clamps and drive the expansion pins of the clamps until they stop.
Removal
Loosen the mudguard fastenings in the right and left wheel arches. To do this, remove the spacer clamps, having first knocked out the pins in the center of the clamps using a curved screwdriver with external slots measuring 2.5-3.0 mm. If the spacer clamps have caps, first press the pins with a screwdriver, and then remove the clamps. Finally, pull out the mudguards by moving them away from the bumper.
Note: You do not need to remove the wheels for this.
Open the luggage compartment, remove the rear trim, see page 133.
Using a 13 mm wrench, unscrew the 3 "arrow" nuts on the left and right sides of the bumper mount.
For vehicles equipped with Park Distance Control (PDC), loosen the cable tie, disconnect the plug connector and release the cables. Pull the bumper back slightly and remove the cable insert together with the cables.
With the help of an assistant, remove the bumper by moving it backwards.
Installation
If required, complete the bumper, see drawing W-48301.
If necessary, place the plastic plug "3" on the energy-absorbing buffer. When removed, the plug often remains in the receiver of the energy-absorbing buffer.
Together with an assistant, insert the bumper into the side guides "1" and push it forward. Press the front part from the side and move the bumper forward along the stop. In this case, the front guide of the bumper should enter the holder "2".
For vehicles with a PDC system, install the wire insert together with the wires, connect the plug connector and secure the wires with a clamp in the position they occupied before removal.
Raise the rear bumper slightly, align it parallel to the body and tighten the fastener to 20 Nm. The distance between the bumper and the body should be 5±1 mm.
The height of the bumper can be adjusted with the bumper removed by turning the plastic head with an internal hexagon located in the energy-absorbing buffers.
Install the rear luggage compartment trim.
Attach the rear mudguards, insert the expansion clamps and drive the expansion pins of the clamps until they stop.
This article is available at russian, bulgarian, belarusian, ukrainian, serbian, croatian, romanian, polish, slovak, hungarian
Article verified: Ilyinsky Matvey
Share information:
Previous articles
БМВ E39: Exterior
Next articles
Similar articles on other types of BMW cars:
Removal and installation the rear bumper BMW 3 Series E30 (1982-1994)
Removal and installation the rear bumper BMW 3 Series E36 (1990-2000)
Rear bumper — removal and installation BMW 7 Series E32 (1986-1994)
Removal and installation of the rear bumper and its components BMW 7 Series E38 (1994-2001)
Removal and installation the rear door BMW X3 E83 (2003-2010)
Rear disc — removal and installation BMW X5 E53 (1999-2006)
Link in different formats to this page
Visitor comments
No comments yet
- General information
- Governing bodies
- Manual
- Maintenance
- Power unit
- Engine repair
- Lubrication system
- Cooling system
- Ignition system
- Supply system
- Injection system (gasoline)
- Injection system (diesel)
- Exhaust system
- Transmission
- Clutch
- Car gearbox
- Front axle
- Rear axle
- Chassis
- Steering
- Brake system
- Wheels and tires
- Body
- Interior
- Exterior
- Heating system
- Electrical equipment
- Equipment and devices
- Power devices
- Windscreen wipers
- Electrical circuits
- General information
- Manual
- Maintenance
- Power unit
- Engine repair
- Ignition system
- Engine lubrication system
- Cooling system
- Fuel system (gasoline)
- Fuel system (diesel)
- Exhaust system
- Transmission
- Clutch
- Car gearbox
- Chassis
- Front and rear suspension
- Steering
- Brake system
- Body
- Exterior
- Interior
- Electrical equipment
- Heating system
- Equipment and devices
- Power devices
- Electrical circuits
- General information
- Manual
- Maintenance
- Power unit
- Engine in a car
- Engine overhaul
- Cooling system
- Supply system
- Ignition system
- Control system
- Transmission
- Clutch
- Manual gearbox
- Automatic gearbox
- Transmission line
- Chassis
- Steering
- Front suspension
- Rear suspension
- Brake system
- Body
- Body elements
- Car care and painting
- Electrical equipment
- Heater and air conditioner
- Equipment and devices
- Starter and generator
- Electrical circuits
- General information
- Operation and maintenance
- Specifications
- Power unit
- Engine repair
- Cooling and lubrication system
- Supply system
- Ecotronic power supply system
- Fuel injection system
- Ignition system
- Transmission
- Clutch
- Gearbox BMW 242/4
- Gearbox Getrag 262/8
- Gearbox Getrag 265/6
- Automatic gearbox
- Cardan gear
- Rear axle
- Chassis
- Steering
- Front suspension
- Rear suspension
- Brake system
- Electrical equipment
- Equipment and devices
- Electrical circuits