
- Home
- BMW 5 Series
- E39
- Body
- Exterior
- Adjusting the engine compartment hood
Adjusting the engine compartment hood (BMW 5 Series E39)
Caution: The Bowden cable that connects both hood locks must be adjusted without any play. The cable sheath must always be in the lock guide. Otherwise, when opening the hood, the cable may slip out, after which the lock can no longer be opened.
Note: Since the hood is adjusted and bolted to the unpainted body at the factory, subsequent hood assembly may expose unpainted surfaces.

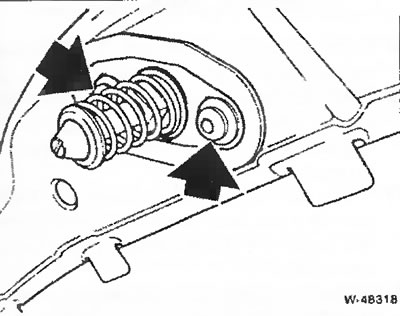
Adjust limit bolt "1" to size A = 25±1 mm.
Check the limiting buffer "2" for damage; if necessary, replace the joint with a new one.
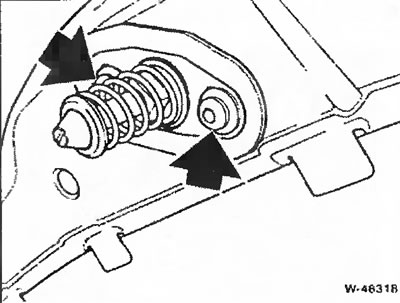
Adjusting the hood lock rod
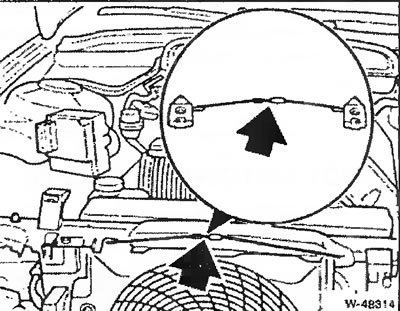
Using the adjusting device, adjust the traction so that there are no gaps.
Note: The cable must not be taut. For better presentation, the Broaden cable and locks are shown in the removed state.
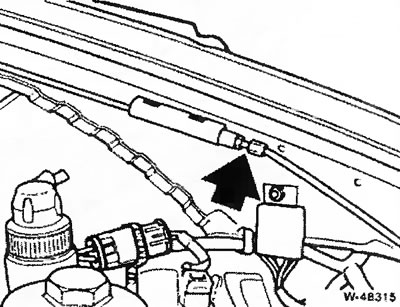
If the adjustment range is insufficient, it should be changed using the adjusting bolt "arrow".

Screw in the limiting buffers completely.
Lateral adjustment of the hood
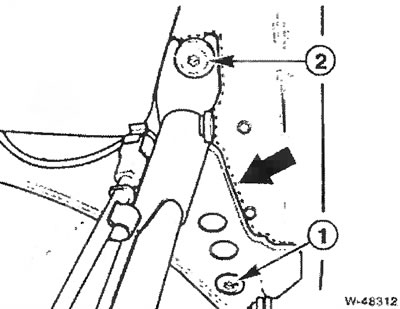
Loosen bolts "1" and "2" for fastening the hinge on the left and right so that the hood can be moved.
Close the engine compartment hood and align it from the front and sides in relation to the fenders.
Caution: If sufficient adjustment range is not provided, loosen the bolts securing the hinges to the body and move the hinges relative to the body.
Carefully open the hood and tighten the hinge mounting bolts.
Rear hood height adjustment
Adjust the hood height in the hinge area. To do this, close the hood and measure its displacement in height relative to the wings.
Support the engine hood securely or have an assistant support it.
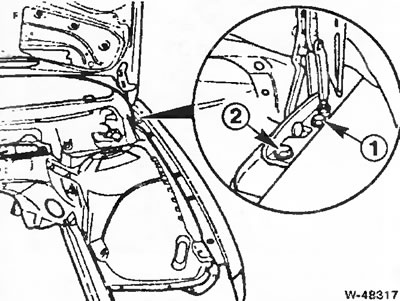
Unscrew bolts "1" and "2" and, in accordance with the measured displacement of the hood in height, remove or insert the adjusting linings.
Tighten the mounting bolts on the left and right in sequence.
Check the hood height again and repeat the adjustment if necessary.
Rearranging the hood height in front
Loosen both bolts securing the locking pins enough to allow the pins to move.
Close the engine compartment hood several times to center the locks.
Note: Do not lock the hood.
Tighten the locking pin mounting bolts.
Loosen lock nut "1" and turn locking pin "2" with a screwdriver.
In this way, adjust the hood height relative to the wings. At the same time, ensure that the gaps at the front trim are parallel.
Tighten the lock nut securely.
Check that the locks and locking hook are functioning correctly and repeat the adjustment if necessary.
Adjusting the Limit Buffer
Open the engine compartment hood.
Turn the limiting buffers out so far that the hood does not touch them in the closed position. Make two cylinders of about 10 mm height from chewing gum or bread mass, install these cylinders on both limiting buffers and close the hood. Open the hood and measure the total height of the limiting buffer with the deformed mass of the cylinder. Then turn each limiting buffer out to the height of the corresponding measured distance +0.5 mm.
Check for gaps between the limiting buffers and the hood in the closed position. Repeat the adjustment if necessary.
Caution: When closed, the hood should not be higher than the fenders, otherwise it will cause wind noise when driving.
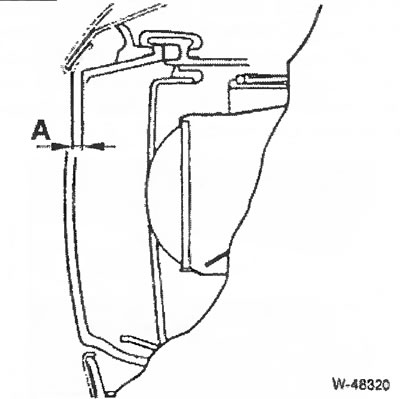
Measure the bonnet protrusion above the headlight lens. The prescribed value of dimension A should be 4±1 mm, otherwise adjust the headlight position.
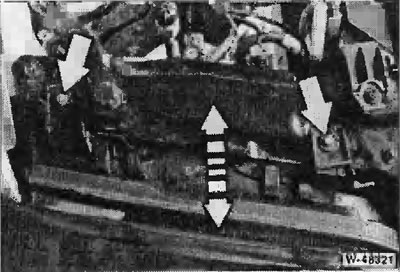
Loosen the "arrow" bolts and move the headlight forward or backward.
Note: The headlight should not be in a tense state; if necessary, loosen and move the lower headlight mounting bolts.
If the headlight has moved, it is necessary to adjust the angle of the headlight beam.
The original source of the article is on the website: bmwman.ru
This article is available at russian, bulgarian, belarusian, ukrainian, serbian, croatian, romanian, polish, slovak, hungarian
Article verified: Ilyinsky Matvey
Share information:
Previous articles
БМВ E39: Exterior
Next articles
Similar articles on other types of BMW cars:
Engine compartment hood BMW 3 Series E36 (1990-2000)
Removal and installation the engine compartment hood BMW 3 Series E30 (1982-1994)
Engine hood — removal and installation BMW 7 Series E32 (1986-1994)
Checking the condition and replacing hoses and tubes in the engine… BMW 7 Series E38 (1994-2001)
The most important thing in the engine compartment BMW X3 E83 (2003-2010)
Adjusting the engine valve timing BMW X5 E53 (1999-2006)
Link in different formats to this page
Visitor comments
No comments yet
- General information
- Governing bodies
- Manual
- Maintenance
- Power unit
- Engine repair
- Lubrication system
- Cooling system
- Ignition system
- Supply system
- Injection system (gasoline)
- Injection system (diesel)
- Exhaust system
- Transmission
- Clutch
- Car gearbox
- Front axle
- Rear axle
- Chassis
- Steering
- Brake system
- Wheels and tires
- Body
- Interior
- Exterior
- Heating system
- Electrical equipment
- Equipment and devices
- Power devices
- Windscreen wipers
- Electrical circuits
- General information
- Manual
- Maintenance
- Power unit
- Engine repair
- Ignition system
- Engine lubrication system
- Cooling system
- Fuel system (gasoline)
- Fuel system (diesel)
- Exhaust system
- Transmission
- Clutch
- Car gearbox
- Chassis
- Front and rear suspension
- Steering
- Brake system
- Body
- Exterior
- Interior
- Electrical equipment
- Heating system
- Equipment and devices
- Power devices
- Electrical circuits
- General information
- Manual
- Maintenance
- Power unit
- Engine in a car
- Engine overhaul
- Cooling system
- Supply system
- Ignition system
- Control system
- Transmission
- Clutch
- Manual gearbox
- Automatic gearbox
- Transmission line
- Chassis
- Steering
- Front suspension
- Rear suspension
- Brake system
- Body
- Body elements
- Car care and painting
- Electrical equipment
- Heater and air conditioner
- Equipment and devices
- Starter and generator
- Electrical circuits
- General information
- Operation and maintenance
- Specifications
- Power unit
- Engine repair
- Cooling and lubrication system
- Supply system
- Ecotronic power supply system
- Fuel injection system
- Ignition system
- Transmission
- Clutch
- Gearbox BMW 242/4
- Gearbox Getrag 262/8
- Gearbox Getrag 265/6
- Automatic gearbox
- Cardan gear
- Rear axle
- Chassis
- Steering
- Front suspension
- Rear suspension
- Brake system
- Electrical equipment
- Equipment and devices
- Electrical circuits