
Table of contents: Removal ↓ Installation ↓
- Home
- BMW 5 Series
- E39
- Body
- Exterior
- Removal and installation gas-filled shock absorbers of the rear door and rear window frame Touring
Removal and installation gas-filled shock absorbers of the rear door and rear window frame Touring (BMW 5 Series E39)
Gas-filled shock absorbers for the rear door and rear window frame:
The mounting of gas-filled shock absorbers "1" and "2" in the rear area of the roof is not shown in the figures.
The gas-filled shock absorber of the rear door "2" functions in the same way as the gas-filled shock absorber of the rear window frame.
Open the rear window frame and the rear door.
Remove the cover of the gas-filled shock absorber of the rear window glass. To do this, open the window glass and unscrew 2 screws "1" of the wire guide cover.
On the left and right sides of the narrow side of the trim, release the lock "1" and fold back the wire guide "2".
Detach the wire guide "1" from the receiver "2" of the cover "3".
Close the rear window and open the rear door.
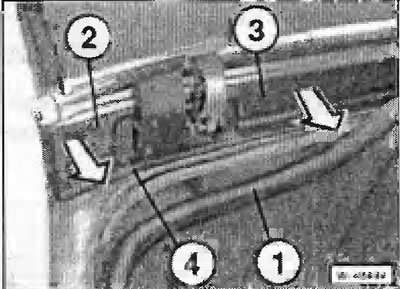
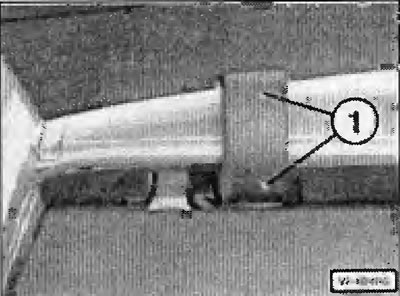
Remove the protective trim "1" from the rear door opening in the hinge area.
Remove plastic covers "2" and "3" from the body opening by moving them backwards and stretch connection "4" in different directions.
To avoid scratching, cover the sealing flange with two layers of adhesive tape together with the fabric adhesive seal "1".
Insert a suitable protective film. At the service station, BMW film 51 2153 is used for this purpose.
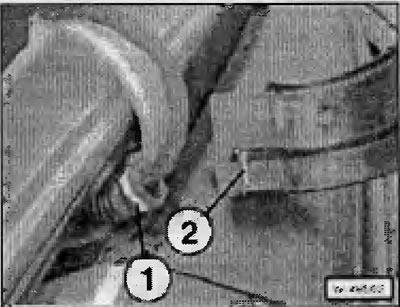
Remove the lock washer from the hinge.
Remove the gas-filled shock absorber.
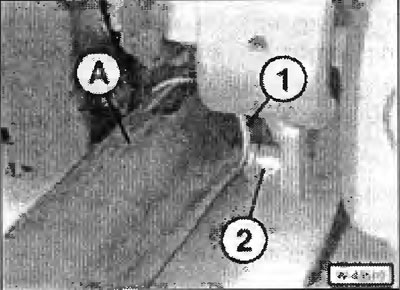
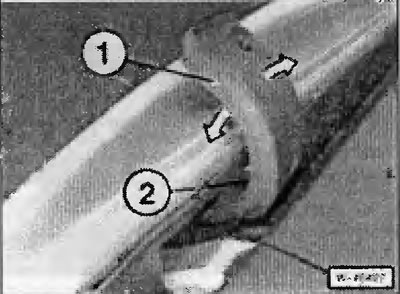
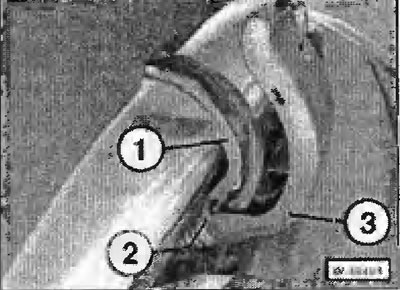
Slide the auxiliary pipe or special device 51 2 152 "A" onto the gas-filled shock absorber so that mark "1" is opposite pin "2" of the hinge.
Press the auxiliary pipe or special tool 51 2 152 downwards from the rear and thereby detach the gas-filled shock absorber from the spherical head. Remove the gas-filled shock absorber and special tool 51 2 152 towards the rear.
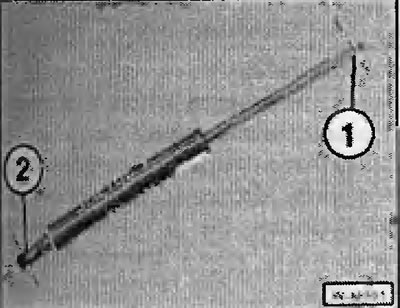
Insert the gas-filled shock absorber into the auxiliary pipe. Make sure that the ball joint "2" is turned 90° to the receiving sphere of the pin.
Place a new lock washer on the hinge.
Subsequent installation is carried out in reverse order.
Insert the wire guide cover so that the receiver "1" of the cover coincides with the wire guide "2".
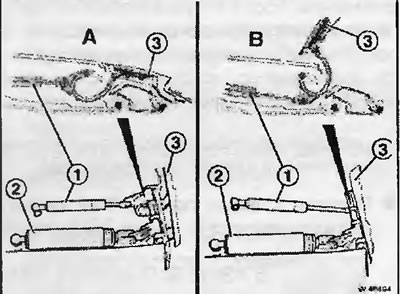
- 1 - gas-filled shock absorber of the rear window frame
- 2 - gas-filled shock absorber of the rear door
- 3 - rear window frame
The mounting of gas-filled shock absorbers "1" and "2" in the rear area of the roof is not shown in the figures.
- A - rear window frame "3" and rear door closed.
- B - the rear window frame "3" is open and the rear door is closed.
The gas-filled shock absorber of the rear door "2" functions in the same way as the gas-filled shock absorber of the rear window frame.
Removal
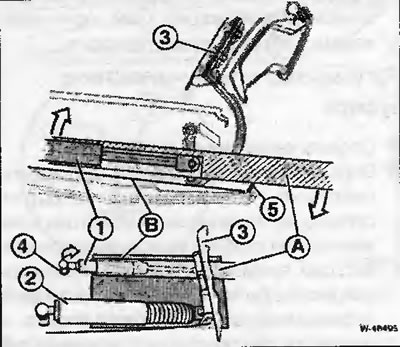
- 1 - gas-filled shock absorber of the rear window frame
- 2 - gas-filled shock absorber of the rear door
- 3 - rear window frame
- 4 - fastening the gas-filled shock absorber to the body
- 5 - protective fabric sticker on the sealing flange
Open the rear window frame and the rear door.
Note: To remove the gas-filled shock absorber of the rear window frame "1", a special pipe or tool 51 2 152 from BMW is required. Removal of the gas-filled shock absorber "2" is carried out in the same way using tool 51 2151.
Remove the cover of the gas-filled shock absorber of the rear window glass. To do this, open the window glass and unscrew 2 screws "1" of the wire guide cover.
On the left and right sides of the narrow side of the trim, release the lock "1" and fold back the wire guide "2".
Detach the wire guide "1" from the receiver "2" of the cover "3".
Close the rear window and open the rear door.
Remove the protective trim "1" from the rear door opening in the hinge area.
Remove plastic covers "2" and "3" from the body opening by moving them backwards and stretch connection "4" in different directions.
To avoid scratching, cover the sealing flange with two layers of adhesive tape together with the fabric adhesive seal "1".
Insert a suitable protective film. At the service station, BMW film 51 2153 is used for this purpose.
Remove the lock washer from the hinge.
Caution: After detaching the gas-filled shock absorber, support the rear door from falling down. There is a risk of injury and damage to parts!
Note: When removing the gas-filled shock absorber, press the rear door slightly.
Remove the gas-filled shock absorber.
Slide the auxiliary pipe or special device 51 2 152 "A" onto the gas-filled shock absorber so that mark "1" is opposite pin "2" of the hinge.
Press the auxiliary pipe or special tool 51 2 152 downwards from the rear and thereby detach the gas-filled shock absorber from the spherical head. Remove the gas-filled shock absorber and special tool 51 2 152 towards the rear.
Installation
Insert the gas-filled shock absorber into the auxiliary pipe. Make sure that the ball joint "2" is turned 90° to the receiving sphere of the pin.
Note: Only in this case is it possible to correctly install and securely fix the gas-filled shock absorber. If some correction is required, the ball joint should only be turned clockwise.
Place a new lock washer on the hinge.
Subsequent installation is carried out in reverse order.
Insert the wire guide cover so that the receiver "1" of the cover coincides with the wire guide "2".
This article is available at russian, bulgarian, belarusian, ukrainian, serbian, croatian, romanian, polish, slovak, hungarian
Article verified: Ilyinsky Matvey
Share information:
Previous articles
БМВ E39: Exterior
Next articles
Similar articles on other types of BMW cars:
Removal and installation rear shock absorbers BMW 3 Series E30 (1982-1994)
Removal and installation rear shock absorbers BMW 3 Series E36 (1990-2000)
Rear shock absorber strut — removal and installation BMW 7 Series E32 (1986-1994)
Removal and installation rear door trim and sound insulation BMW 7 Series E38 (1994-2001)
Removal and installation the rear door BMW X3 E83 (2003-2010)
Removal and installation the rear door window lifter with electric… BMW X5 E53 (1999-2006)
Link in different formats to this page
Visitor comments
No comments yet
- General information
- Governing bodies
- Manual
- Maintenance
- Power unit
- Engine repair
- Lubrication system
- Cooling system
- Ignition system
- Supply system
- Injection system (gasoline)
- Injection system (diesel)
- Exhaust system
- Transmission
- Clutch
- Car gearbox
- Front axle
- Rear axle
- Chassis
- Steering
- Brake system
- Wheels and tires
- Body
- Interior
- Exterior
- Heating system
- Electrical equipment
- Equipment and devices
- Power devices
- Windscreen wipers
- Electrical circuits
- General information
- Manual
- Maintenance
- Power unit
- Engine repair
- Ignition system
- Engine lubrication system
- Cooling system
- Fuel system (gasoline)
- Fuel system (diesel)
- Exhaust system
- Transmission
- Clutch
- Car gearbox
- Chassis
- Front and rear suspension
- Steering
- Brake system
- Body
- Exterior
- Interior
- Electrical equipment
- Heating system
- Equipment and devices
- Power devices
- Electrical circuits
- General information
- Manual
- Maintenance
- Power unit
- Engine in a car
- Engine overhaul
- Cooling system
- Supply system
- Ignition system
- Control system
- Transmission
- Clutch
- Manual gearbox
- Automatic gearbox
- Transmission line
- Chassis
- Steering
- Front suspension
- Rear suspension
- Brake system
- Body
- Body elements
- Car care and painting
- Electrical equipment
- Heater and air conditioner
- Equipment and devices
- Starter and generator
- Electrical circuits
- General information
- Operation and maintenance
- Specifications
- Power unit
- Engine repair
- Cooling and lubrication system
- Supply system
- Ecotronic power supply system
- Fuel injection system
- Ignition system
- Transmission
- Clutch
- Gearbox BMW 242/4
- Gearbox Getrag 262/8
- Gearbox Getrag 265/6
- Automatic gearbox
- Cardan gear
- Rear axle
- Chassis
- Steering
- Front suspension
- Rear suspension
- Brake system
- Electrical equipment
- Equipment and devices
- Electrical circuits