
- Home
- BMW 3 Series
- E36
- Chassis
- Steering
- Removal and installation steering rods
Removal and installation steering rods (BMW 3 Series E36)
Removal
Remove the wheel cap. Loosen the wheel bolts with the vehicle on the ground.
Mark the position of the wheel disc on the hub with paint. This will allow the balanced wheel to be installed in its original place.
Raise the front of the car and remove the wheel.
(Figure W 4003) Loosen the nut securing the steering tip joint. Press out the steering tip joint using a suitable puller.

Option without steering damper: Release the tension strap and slide off the bellows.
Option with steering damper: Bend back the locking strut.
Caution: Do not use a hammer as this may damage the steering mechanism.
Loosen the steering rod lock nut using BMW tool 322100 or 322110 (on vehicles with steering damper). If a special tool is not available, loosen the steering rod using a pipe wrench or a 32 mm spanner.
Examination
Rotate the steering tip joint in different directions. If it moves easily or if there is play, replace the steering tip joint.
Check integrity and sealing (no traces of grease) cuffs. If the cuff is damaged, replace the steering tip joint.
Installation

Measure the old tie rod. Screw the tie rod end onto the tie rod, maintaining dimension -c-. Lock the tie rod end.
If necessary, clean the steering knuckle joint pin and the seat on the steering knuckle arm from grease.
Check and replace the corrugated cover if necessary
Tighten the steering rod with a new locking nut.
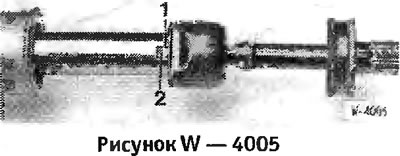
Protrusion "1" on the locking piece enters into notch "2" of the toothed rack.
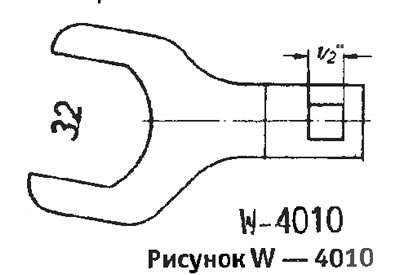
Tighten the steering rod to a torque of 70 Nm. In workshops, a 32 mm flat spanner mounted on a torque wrench is used for this purpose. Such a wrench can be made independently from a 5 mm thick steel sheet.
Bend the locking piece with a pipe wrench. Caution: To avoid damaging the toothed rack, never bend the locking piece with a hammer.
Put on the corrugated cover and secure it with a tightening strap. Do not allow the corrugated cover to twist.
Insert the steering rod into the steering linkage arm. Tighten the new self-locking nut with a tightening torque of 40 Nm.
Put the wheel on.
Lower the car.
Tighten the wheel bolts crosswise to 110 Nm.
Check the alignment.
(The original text is available on the website: «bmwman.ru»)
This article is available at russian, bulgarian, belarusian, ukrainian, serbian, croatian, romanian, polish, slovak, hungarian
Article verified: Chebotarev Vladislav
Share information:
Previous articles
БМВ E36: Steering
Next articles
Similar articles on other types of BMW cars:
Removal and installation steering rods BMW 5 Series E34 (1988-1996)
Removal and installation the steering wheel BMW 5 Series E39 (1995-2003)
Removal and installation steering rods, steering knuckle and pendulum… BMW 7 Series E38 (1994-2001)
Steering wheel — removal and installation BMW 7 Series E32 (1986-1994)
Removal and installation the power steering gear BMW X3 E83 (2003-2010)
Removal and installation the steering wheel BMW X5 E53 (1999-2006)
Link in different formats to this page
Visitor comments
No comments yet
- General information
- Manual
- Maintenance
- Power unit
- Engine repair
- Cooling system
- Power system (gasoline)
- Injection system (gasoline)
- Fuel system (diesel)
- Exhaust system
- Ignition system
- Charge and launch systems
- Transmission
- Car gearbox
- Clutch and drive shafts
- Chassis
- Brake system
- Suspension front and rear
- Steering
- Body
- Body care and repair
- Exterior
- Interior
- Electrical equipment
- Troubleshooting
- Lighting and signaling
- Equipment and devices
- Heater and air conditioner
- Electrical circuits
- General information
- Manual
- Repair on the road
- Weekly checks
- Maintenance
- Troubleshooting
- Power unit
- 4 cylinder engines
- 6 cylinder engines
- Engine overhaul
- Cooling and heating
- Fuel and exhaust system
- Starting and charging system
- Ignition system
- Transmission
- Clutch
- Mechanical gearbox
- Automatic gearbox
- Cardan and drive shafts
- Chassis
- Brake system
- Wheel suspension
- Steering
- Body
- Exterior
- Interior
- Electrical equipment
- Equipment and devices
- Electrical circuits
- General information
- Maintenance
- Power unit
- Engine repair
- Cooling system
- Ignition system
- Supply system
- Fuel injection system
- Exhaust system
- Transmission
- Clutch
- Car gearbox
- Front and rear axle
- Chassis
- Steering
- Brake system
- Body
- Exterior
- Interior
- Electrical equipment
- Heating system
- Equipment and devices
- Power devices
- Electrical circuits
- Power unit
- M10/M20 engine
- M40 engine
- Ignition system
- Lubrication system
- Cooling system
- Supply system
- Fuel injection
- Exhaust system
- Transmission
- Clutch
- Manual gearbox
- Front axle
- Rear axle
- Chassis
- Steering
- Brake system
- Body
- Exterior
- Interior
- Electrical equipment
- Heating system
- Equipment and devices
- Electrical circuits
- General information
- Specifications
- Operation and maintenance
- 4-cylinder engine
- Engine repair
- Cooling and lubrication system
- Supply system
- Ignition system
- 6-cylinder engine
- Engine repair
- Cooling and lubrication system
- Supply system
- Fuel injection system
- Ignition system
- Transmission
- Clutch
- 4-speed manual gearbox
- 5-speed manual gearbox
- Automatic gearbox
- Cardan and rear axle
- Chassis
- Steering
- Front suspension
- Rear suspension
- Brake system
- Electrical equipment
- Equipment and devices
- Electrical circuits