
Table of contents: Removal ↓ Installation ↓
- Home
- BMW 3 Series
- E46
- Power unit
- Cooling and heating
- Electric Cooling Fan — Removal and Installation
Electric Cooling Fan — Removal and Installation (BMW 3 Series E46)
Removal
Main fan
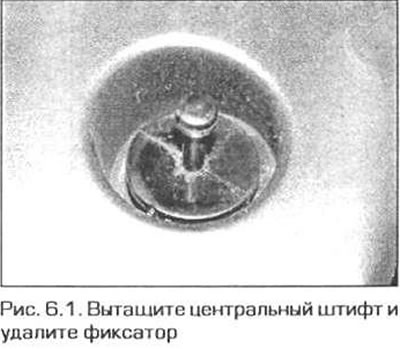
1. Remove the cover from the front panel under the hood by removing the fasteners (Fig. 6.1). If there is a plastic cover above the engine, unscrew the two screws securing it, lift it up and pull it forward. Remove the cover. On the model with the N42 engine, remove the air cleaner (see chapter 4A).
2. Raise the front of the car and place it on reliable supports. Remove the crankcase guard from under the engine.
3. Remove the secondary air injection filter assembly from the fan housing by releasing it from the retainer. Also release the air inlet hose from the retainer and slide it off the housing.
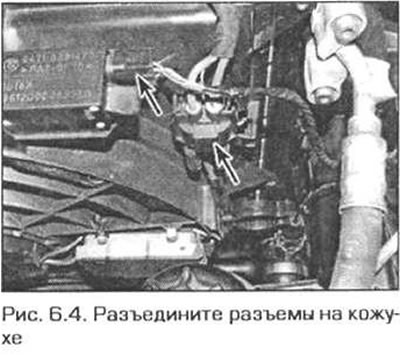
4. Disconnect the electrical connectors on the casing (Fig. 6.4).
5. Disconnect the hoses on the underside of the casing (if any). To remove the retainers, first pull the center pin out of the retainer, then the retainer itself.
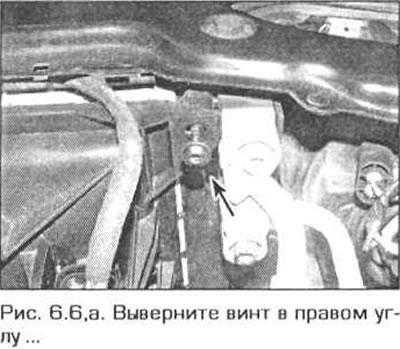
6. Remove the screw in the upper right corner of the casing and remove the retainer in the left corner (fig. 6.6,a,b).

7. Lift the fan and remove it from the engine compartment, being careful not to damage the radiator.
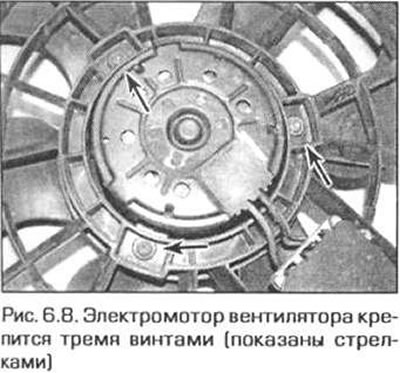
8. Unscrew the three screws (Fig. 6.8) and separate the fan motor from the casing. Note: Do not lift the fan by its blades - this may disturb the fan's balance and it will make a lot of noise during operation.
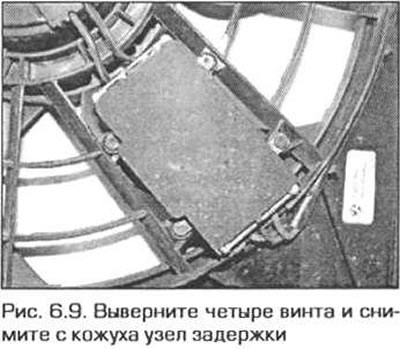
9. If necessary, remove the delay unit from the casing, which is secured with four screws (Fig. 6.9).
Auxiliary fan
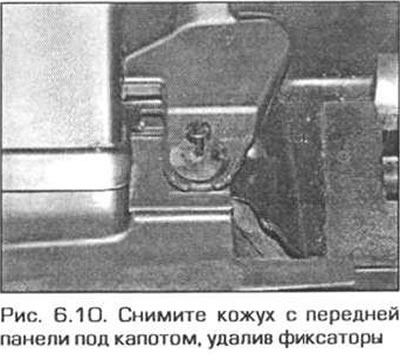
10. Remove the cover from the front panel under the hood by removing the fasteners (Fig. 6.10).
11. Remove the front bumper as shown in chapter 11.
12. Disconnect the fan motor electrical connector.
13. Remove the fan shroud by removing the four fasteners.
14. Remove the fan with the electric motor by unscrewing the four mounting screws.
Installation
15. Install the fan in the reverse order of removal. Make sure that the protrusions on the underside of the casing fit into the corresponding grooves on the radiator body.
(The original text of the article is available on the resource bmwman.ru)
This article is available at russian, bulgarian, belarusian, ukrainian, serbian, croatian, romanian, polish, slovak, hungarian
Article verified: Ilyinsky Matvey
Share information:
Previous articles
БМВ E46: Cooling and heating
Next articles
Similar articles on other types of BMW cars:
Removal and installation an electric window lifter BMW 5 Series E39 (1995-2003)
Removal and installation the oil pan BMW 5 Series E12 (1972-1981)
Removal and installation the cooling system radiator BMW 7 Series E38 (1994-2001)
Cylinder Head Cover — Removal and Installation BMW 7 Series E32 (1986-1994)
Pistons — removal and installation BMW X3 E83 (2003-2010)
Removal and installation the front door window lift with electric… BMW X5 E53 (1999-2006)
Link in different formats to this page
Visitor comments
No comments yet
- General information
- Manual
- Maintenance
- Power unit
- Engine repair
- Cooling system
- Power system (gasoline)
- Injection system (gasoline)
- Fuel system (diesel)
- Exhaust system
- Ignition system
- Charge and launch systems
- Transmission
- Car gearbox
- Clutch and drive shafts
- Chassis
- Brake system
- Suspension front and rear
- Steering
- Body
- Body care and repair
- Exterior
- Interior
- Electrical equipment
- Troubleshooting
- Lighting and signaling
- Equipment and devices
- Heater and air conditioner
- Electrical circuits
- General information
- Manual
- Repair on the road
- Weekly checks
- Maintenance
- Troubleshooting
- Power unit
- 4 cylinder engines
- 6 cylinder engines
- Engine overhaul
- Cooling and heating
- Fuel and exhaust system
- Starting and charging system
- Ignition system
- Transmission
- Clutch
- Mechanical gearbox
- Automatic gearbox
- Cardan and drive shafts
- Chassis
- Brake system
- Wheel suspension
- Steering
- Body
- Exterior
- Interior
- Electrical equipment
- Equipment and devices
- Electrical circuits
- General information
- Maintenance
- Power unit
- Engine repair
- Cooling system
- Ignition system
- Supply system
- Fuel injection system
- Exhaust system
- Transmission
- Clutch
- Car gearbox
- Front and rear axle
- Chassis
- Steering
- Brake system
- Body
- Exterior
- Interior
- Electrical equipment
- Heating system
- Equipment and devices
- Power devices
- Electrical circuits
- Power unit
- M10/M20 engine
- M40 engine
- Ignition system
- Lubrication system
- Cooling system
- Supply system
- Fuel injection
- Exhaust system
- Transmission
- Clutch
- Manual gearbox
- Front axle
- Rear axle
- Chassis
- Steering
- Brake system
- Body
- Exterior
- Interior
- Electrical equipment
- Heating system
- Equipment and devices
- Electrical circuits
- General information
- Specifications
- Operation and maintenance
- 4-cylinder engine
- Engine repair
- Cooling and lubrication system
- Supply system
- Ignition system
- 6-cylinder engine
- Engine repair
- Cooling and lubrication system
- Supply system
- Fuel injection system
- Ignition system
- Transmission
- Clutch
- 4-speed manual gearbox
- 5-speed manual gearbox
- Automatic gearbox
- Cardan and rear axle
- Chassis
- Steering
- Front suspension
- Rear suspension
- Brake system
- Electrical equipment
- Equipment and devices
- Electrical circuits