



Table of contents: Removal ↓ Installation ↓
- Home
- BMW 5 Series
- E34
- Body
- Exterior
- Removal and installation the rear bumper
Removal and installation the rear bumper (BMW 5 Series E34)
The design of the rear bumper is such that collisions at speeds of up to 4 km/h do not cause any damage. The energy of the collision is absorbed by the beam located inside and two hydraulic shock absorbers.
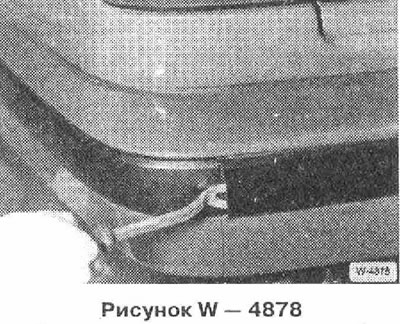
Carefully remove the middle bumper trim.
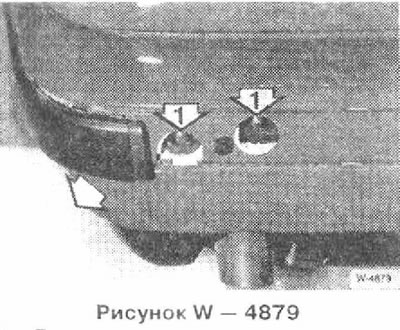
Hook the left and right bumper covers and pull them back.
Unscrew 4 nuts 1 and pull the bumper back.
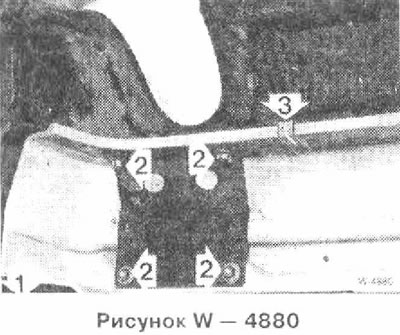
Pull back rubber gasket 1, unscrew reinforcement 2, remove brackets 3.
Pull out the fastening plugs, remove the heat shields,
Assemble the bumper.
Insert the bumper into the side guides and press.
(Figure W — 4879) Distance A between bumper and body should be 5-6 mm. apply a gasket and align if necessary. In this position, tighten 4 bolts "arrows" with a torque of 45 Nm.
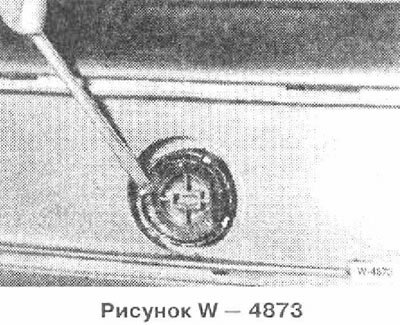
If necessary, align the bumper flush with the body. To do this, turn the threaded sleeve with a screwdriver (narrow outer ring). While doing this, hold the inner cover with a second screwdriver. At service stations, the BMW 51 1040 device is used for this purpose.
Press the middle bumper cover. First hook the side bumper covers on the sides and then snap them into place.
Removal
Carefully remove the middle bumper trim.
Hook the left and right bumper covers and pull them back.
Unscrew 4 nuts 1 and pull the bumper back.
Pull back rubber gasket 1, unscrew reinforcement 2, remove brackets 3.
Pull out the fastening plugs, remove the heat shields,
Installation
Assemble the bumper.
Insert the bumper into the side guides and press.
(Figure W — 4879) Distance A between bumper and body should be 5-6 mm. apply a gasket and align if necessary. In this position, tighten 4 bolts "arrows" with a torque of 45 Nm.
If necessary, align the bumper flush with the body. To do this, turn the threaded sleeve with a screwdriver (narrow outer ring). While doing this, hold the inner cover with a second screwdriver. At service stations, the BMW 51 1040 device is used for this purpose.
Press the middle bumper cover. First hook the side bumper covers on the sides and then snap them into place.
This article is available at russian, bulgarian, belarusian, ukrainian, serbian, croatian, romanian, polish, slovak, hungarian
Article verified: Polikarpov Saveliy
Share information:
Previous articles
БМВ E34: Exterior
Next articles
Similar articles on other types of BMW cars:
Removal and installation the rear bumper BMW 3 Series E30 (1982-1994)
Removal and installation the rear bumper BMW 3 Series E36 (1990-2000)
Rear bumper — removal and installation BMW 7 Series E32 (1986-1994)
Removal and installation of the rear bumper and its components BMW 7 Series E38 (1994-2001)
Removal and installation the rear door BMW X3 E83 (2003-2010)
Rear disc — removal and installation BMW X5 E53 (1999-2006)
Removal and installation the rear bumper BMW 3 Series E30 (1982-1994)
Removal and installation the rear bumper BMW 3 Series E36 (1990-2000)
Rear bumper — removal and installation BMW 7 Series E32 (1986-1994)
Removal and installation of the rear bumper and its components BMW 7 Series E38 (1994-2001)
Removal and installation the rear door BMW X3 E83 (2003-2010)
Rear disc — removal and installation BMW X5 E53 (1999-2006)
Link in different formats to this page
Visitor comments
No comments yet
- General information
- Governing bodies
- Manual
- Maintenance
- Power unit
- Engine repair
- Lubrication system
- Cooling system
- Ignition system
- Supply system
- Injection system (gasoline)
- Injection system (diesel)
- Exhaust system
- Transmission
- Clutch
- Car gearbox
- Front axle
- Rear axle
- Chassis
- Steering
- Brake system
- Wheels and tires
- Body
- Interior
- Exterior
- Heating system
- Electrical equipment
- Equipment and devices
- Power devices
- Windscreen wipers
- Electrical circuits
- General information
- Manual
- Maintenance
- Power unit
- Engine repair
- Ignition system
- Engine lubrication system
- Cooling system
- Fuel system (gasoline)
- Fuel system (diesel)
- Exhaust system
- Transmission
- Clutch
- Car gearbox
- Chassis
- Front and rear suspension
- Steering
- Brake system
- Body
- Exterior
- Interior
- Electrical equipment
- Heating system
- Equipment and devices
- Power devices
- Electrical circuits
- General information
- Manual
- Maintenance
- Power unit
- Engine in a car
- Engine overhaul
- Cooling system
- Supply system
- Ignition system
- Control system
- Transmission
- Clutch
- Manual gearbox
- Automatic gearbox
- Transmission line
- Chassis
- Steering
- Front suspension
- Rear suspension
- Brake system
- Body
- Body elements
- Car care and painting
- Electrical equipment
- Heater and air conditioner
- Equipment and devices
- Starter and generator
- Electrical circuits
- General information
- Operation and maintenance
- Specifications
- Power unit
- Engine repair
- Cooling and lubrication system
- Supply system
- Ecotronic power supply system
- Fuel injection system
- Ignition system
- Transmission
- Clutch
- Gearbox BMW 242/4
- Gearbox Getrag 262/8
- Gearbox Getrag 265/6
- Automatic gearbox
- Cardan gear
- Rear axle
- Chassis
- Steering
- Front suspension
- Rear suspension
- Brake system
- Electrical equipment
- Equipment and devices
- Electrical circuits