
Table of contents: Removal ↓ Installation ↓
- Home
- BMW 5 Series
- E34
- Electrical equipment
- Equipment and devices
- Removal and installation the windshield wiper mechanism
Removal and installation the windshield wiper mechanism (BMW 5 Series E34)
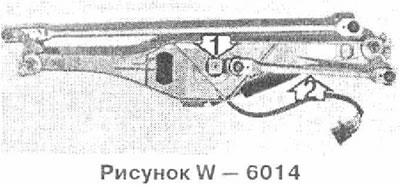
The windshield wiper motor is removed together with the rods. Before removing, mark the position of the brushes on the glass with adhesive tape.
Disconnect the ground wire from the battery.
Remove the wiper arms. Tilt the arm away from the windshield, releasing the plastic cover. Lift the cover, lower the arm again and fold the cover back completely.
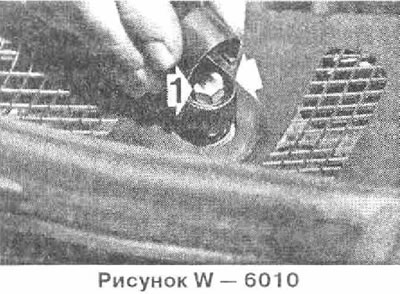
Unscrew the fastening nut 1 and remove the brush lever from the axle.
Remove the brush lever.
Remove the bulkhead trim and heater fan.
On vehicles equipped with air conditioning, remove the temperature sensor with wiring from the fan housing.
Release the "arrow" clamps with a screwdriver. On some models, screws are installed instead of clamps. Release the remaining clamps inside with your fingers and remove the side elements of the case with the ventilation flaps.
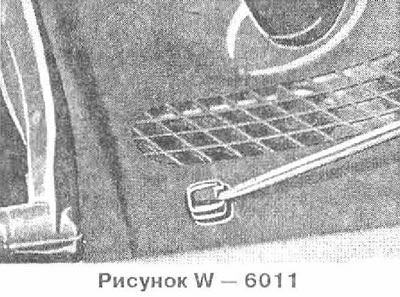
Remove the left plastic grille under the windshield. To do this, use a screwdriver to pull out the upper parts of the clips, then pull the clips out completely.
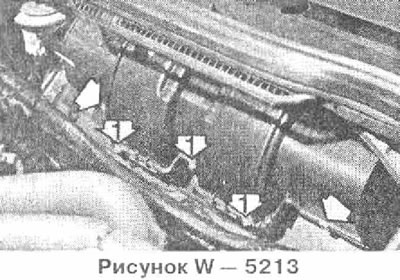
Loosen the nuts on both support axles and remove the washers located underneath them.
Disconnect the windshield wiper motor connector.
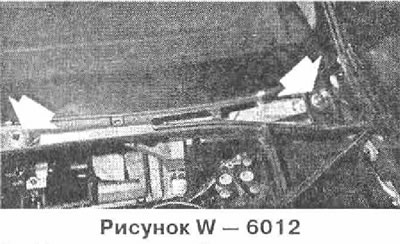
Press the windshield wiper linkage down and pull it out to the side.
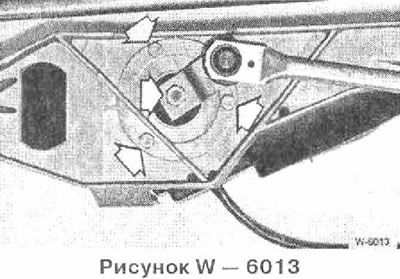
If necessary, loosen the motor screws. The brush pressure adjustment device motor (ADV motor) is mounted on vehicles with an extended equipment set with three screws on the left windshield wiper support. In case of failure, the motor assembly is replaced, since precise adjustment is impossible.
Insert the motor into the wiper rods.
If the motor was removed, connect the connector to the motor.
Connect the ground wire to the battery.
Turn the motor on briefly and turn it off with the windshield wiper switch until the motor returns to its original position.
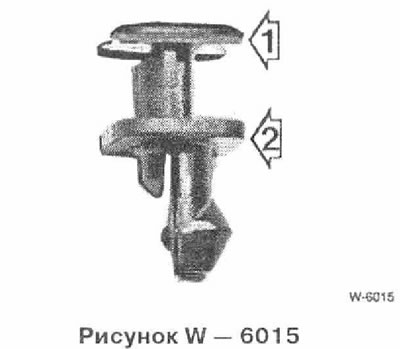
Align parts 1 and 2 so that they are in line, then screw on the motor.
Insert the windshield wiper rods and screw them to the support axles, using spacer washers.
Connect the connector and insert it into the support.
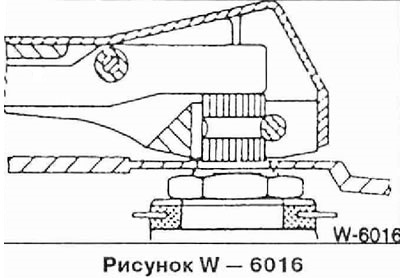
Press the plastic grille under the windshield and secure it with clamps. In this case, the upper part 1 is inserted into the lower part 2. Replace damaged clamps.
Place the brush levers in accordance with the marking made during removal and tighten the nuts. When re-adjusting, measure the distance from the brush to the lower edge of the glass with a ruler. At the edge of the brush, this measurement should be 1.5 cm.
Wet the windshield and check that the wipers are installed in their original position. If necessary, rearrange the wiper arms.
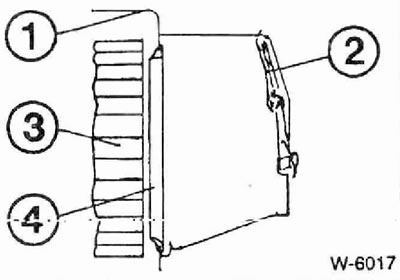
1 Corps
2 Air damper
3 Fan impeller
4 Input box
Install and secure the upper part of the heater fan with the air damper. On cars with air conditioners, pay attention to the installation position of the input box.
Install the heater fan motor.
Removal
Disconnect the ground wire from the battery.
Remove the wiper arms. Tilt the arm away from the windshield, releasing the plastic cover. Lift the cover, lower the arm again and fold the cover back completely.
Unscrew the fastening nut 1 and remove the brush lever from the axle.
Caution: On vehicles with an adjustable wiper drive (ADV), when removing from the driver's side, remove the bolt at the location indicated by the arrow.
Remove the brush lever.
Remove the bulkhead trim and heater fan.
On vehicles equipped with air conditioning, remove the temperature sensor with wiring from the fan housing.
Release the "arrow" clamps with a screwdriver. On some models, screws are installed instead of clamps. Release the remaining clamps inside with your fingers and remove the side elements of the case with the ventilation flaps.
Caution: On vehicles equipped with air conditioning, disconnect the cable from the top with the ventilation flaps closed. To close the air flap, set the air volume regulator in the passenger compartment to zero. Connect the battery and briefly turn on the ignition to close the flap: disconnect the battery.
Remove the left plastic grille under the windshield. To do this, use a screwdriver to pull out the upper parts of the clips, then pull the clips out completely.
Loosen the nuts on both support axles and remove the washers located underneath them.
Disconnect the windshield wiper motor connector.
Press the windshield wiper linkage down and pull it out to the side.
If necessary, loosen the motor screws. The brush pressure adjustment device motor (ADV motor) is mounted on vehicles with an extended equipment set with three screws on the left windshield wiper support. In case of failure, the motor assembly is replaced, since precise adjustment is impossible.
Installation
Insert the motor into the wiper rods.
If the motor was removed, connect the connector to the motor.
Connect the ground wire to the battery.
Turn the motor on briefly and turn it off with the windshield wiper switch until the motor returns to its original position.
Align parts 1 and 2 so that they are in line, then screw on the motor.
Insert the windshield wiper rods and screw them to the support axles, using spacer washers.
Connect the connector and insert it into the support.
Press the plastic grille under the windshield and secure it with clamps. In this case, the upper part 1 is inserted into the lower part 2. Replace damaged clamps.
Place the brush levers in accordance with the marking made during removal and tighten the nuts. When re-adjusting, measure the distance from the brush to the lower edge of the glass with a ruler. At the edge of the brush, this measurement should be 1.5 cm.
Caution: Press the brush lever all the way down, otherwise the brush pressure control (ADV) will not work properly.
Wet the windshield and check that the wipers are installed in their original position. If necessary, rearrange the wiper arms.
1 Corps
2 Air damper
3 Fan impeller
4 Input box
Install and secure the upper part of the heater fan with the air damper. On cars with air conditioners, pay attention to the installation position of the input box.
Install the heater fan motor.
This article is available at russian, bulgarian, belarusian, ukrainian, serbian, croatian, romanian, polish, slovak, hungarian
Article verified: Polikarpov Saveliy
Share information:
Previous articles
БМВ E34: Equipment and devices
Next articles
Similar articles on other types of BMW cars:
Removal and installation the windshield wiper mechanism BMW 3 Series E36 (1990-2000)
Removal and installation the windshield wiper motor BMW 3 Series E21 (1975-1983)
Windscreen Wiper/Cowl Cover Drive Mechanism — Removal and Installation BMW 7 Series E32 (1986-1994)
Removal and installation windshield wiper arms and blades BMW 7 Series E38 (1994-2001)
Pistons — removal and installation BMW X3 E83 (2003-2010)
Removal and installation the pedal mechanism trim BMW X5 E53 (1999-2006)
Link in different formats to this page
Visitor comments
No comments yet
- General information
- Governing bodies
- Manual
- Maintenance
- Power unit
- Engine repair
- Lubrication system
- Cooling system
- Ignition system
- Supply system
- Injection system (gasoline)
- Injection system (diesel)
- Exhaust system
- Transmission
- Clutch
- Car gearbox
- Front axle
- Rear axle
- Chassis
- Steering
- Brake system
- Wheels and tires
- Body
- Interior
- Exterior
- Heating system
- Electrical equipment
- Equipment and devices
- Power devices
- Windscreen wipers
- Electrical circuits
- General information
- Manual
- Maintenance
- Power unit
- Engine repair
- Ignition system
- Engine lubrication system
- Cooling system
- Fuel system (gasoline)
- Fuel system (diesel)
- Exhaust system
- Transmission
- Clutch
- Car gearbox
- Chassis
- Front and rear suspension
- Steering
- Brake system
- Body
- Exterior
- Interior
- Electrical equipment
- Heating system
- Equipment and devices
- Power devices
- Electrical circuits
- General information
- Manual
- Maintenance
- Power unit
- Engine in a car
- Engine overhaul
- Cooling system
- Supply system
- Ignition system
- Control system
- Transmission
- Clutch
- Manual gearbox
- Automatic gearbox
- Transmission line
- Chassis
- Steering
- Front suspension
- Rear suspension
- Brake system
- Body
- Body elements
- Car care and painting
- Electrical equipment
- Heater and air conditioner
- Equipment and devices
- Starter and generator
- Electrical circuits
- General information
- Operation and maintenance
- Specifications
- Power unit
- Engine repair
- Cooling and lubrication system
- Supply system
- Ecotronic power supply system
- Fuel injection system
- Ignition system
- Transmission
- Clutch
- Gearbox BMW 242/4
- Gearbox Getrag 262/8
- Gearbox Getrag 265/6
- Automatic gearbox
- Cardan gear
- Rear axle
- Chassis
- Steering
- Front suspension
- Rear suspension
- Brake system
- Electrical equipment
- Equipment and devices
- Electrical circuits