
Table of contents: Removal ↓ Installation ↓
- Home
- BMW 7 Series
- E32
- Electrical equipment
- Equipment and devices
- Windscreen Wiper/Cowl Cover Drive Mechanism — Removal and Installation
Windscreen Wiper/Cowl Cover Drive Mechanism — Removal and Installation (BMW 7 Series E32)
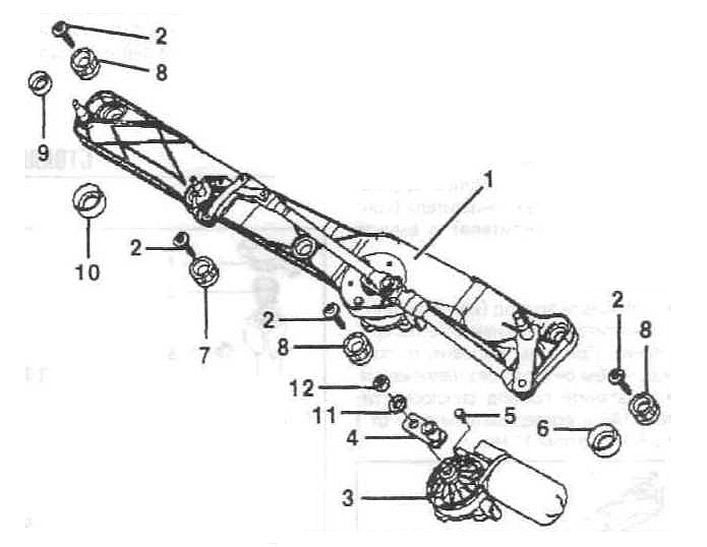
Windscreen wiper motor and rods
1 - Windscreen wiper console;
2 - bolt;
3 - windshield wiper motor;
4 - engine crank;
5 — bolt;
6 - support sleeve of round hole;
9 - upper part of the damping ring;
10 - lower part of the damping ring;
11 - spring washer;
12 — nut.
Removal
Mark the position of the windshield wiper arms on the windshield by sticking pieces of tape onto the glass near the arms.
Pull or pry the covers off the mounting nuts with a small screwdriver.
Unscrew the nuts.
Pull both wiper arm rods together.
Caution: Do not bend the levers when doing this. To make it easier to remove the levers, it is better to use a suitable puller.
Unhook the left lever cover upwards.
Loosen the nut on the arm support and pull the wiper arm up.
Remove the adjusting washer from the support. This washer is very tightly seated, so a suitable puller is required to remove it.
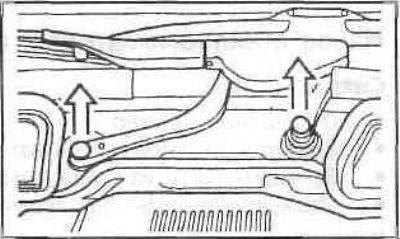
Pull the rubber seal up from the engine compartment bulkhead. Disconnect the clamps on the air ducts on the left and right.
Rotate the air ducts towards the center line of the car, thus releasing them from their mountings, and remove them.
Remove the left and right cabin air filter elements.
Pull the wire clip out to the side. Unhook the filter housing from the back and remove it.
Remove the fairing cover. To do this, release the eight sliding rivets (clips): unscrew the sliding pins with a screwdriver and pry up the clamps.
Unscrew the screws and remove the cover of the wiper rod.
Remove the wire cover by first turning all the fasteners 90°.
Release the plug and remove it. To do this, slide the fastening latch downwards so that the plug moves away from the contacts.
Remove the five windshield wiper drive mounting bolts (wiper consoles) and remove the drive.
Installation
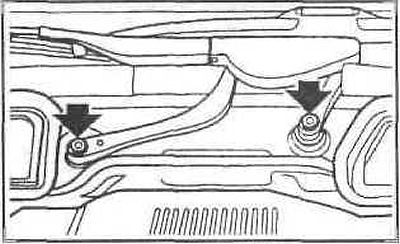
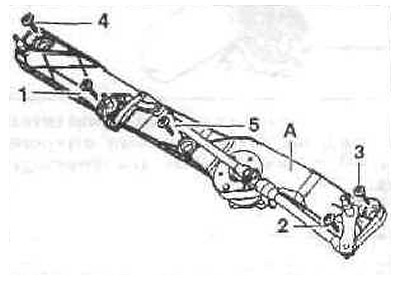
Insert the wiper drive (console) and tighten the mounting bolts. At the same time, align the drive so that it stands without tension.
Tighten the windscreen wiper drive (A) in sequence from 1 to 5 to a torque of 10 Nm.
Install the plug, insert the latch from the side and press the plug onto the contacts.
Install the wire cover and secure it by turning the four fasteners.
Further installation is carried out in the reverse order of removal.
This article is available at russian, bulgarian, belarusian, ukrainian, serbian, croatian, romanian, polish, slovak, hungarian
Article verified: Sevastyanov Nikolay
Share information:
Previous articles
БМВ E32: Equipment and devices
Next articles
Similar articles on other types of BMW cars:
Windscreen wiper drive — removal and installation BMW 3 Series E46 (1998-2006, petrol)
Removal and installation the windshield wiper mechanism BMW 3 Series E36 (1990-2000)
Removal and installation the windshield wiper drive/cowl cover BMW 5 Series E39 (1995-2003)
Removal and installation the windshield wiper mechanism BMW 5 Series E34 (1988-1996)
Pistons — removal and installation BMW X3 E83 (2003-2010)
Removal and installation the pedal mechanism trim BMW X5 E53 (1999-2006)
Link in different formats to this page
Visitor comments
No comments yet
- General information
- Introduction to guide
- Manual
- Maintenance
- Power unit
- Engine M60/1, M60/2 (petrol)
- M62 engine (petrol)
- M57 engine (diesel)
- M67 engine (diesel)
- Cooling system
- Fuel system (petrol)
- Fuel system (diesel)
- Exhaust system
- Ignition and control systems
- Charge and launch systems
- Transmission
- Clutch
- Mechanical gearbox
- Automatic gearbox
- Cardan and drive shafts
- Chassis
- Brake system
- Front suspension
- Rear suspension
- Steering
- Body
- Exterior
- Interior
- Electrical equipment
- Equipment and devices
- Lighting
- Heating and air conditioning
- Electrical circuits
- General information
- Care and maintenance
- Power unit
- Minor engine repair
- Engine overhaul
- Lubrication system
- Cooling system
- Ignition system
- Supply system
- Injection system (petrol)
- Injection system (diesel)
- Exhaust system
- Transmission
- Clutch
- Manual gearbox
- Automatic gearbox
- Cardan gear
- Rear axle and shafts
- Chassis
- Front suspension
- Rear suspension
- Steering
- Wheels and tires
- Brake system
- Body
- Body elements
- Electrical equipment
- Equipment and devices
- Electrical circuits