
Table of contents: Removal ↓ Installation ↓
- Home
- BMW 5 Series
- E39
- Body
- Interior
- Removal and installation the front seat
Removal and installation the front seat (BMW 5 Series E39)
Caution: If the seat has an electric drive for adjusting the seat and a fault occurs in the drive, follow the instructions at the end of the chapter.
Removal
Using the seat height adjustment mechanism, set the seat to its highest position. Move the seat forward as far as it will go.
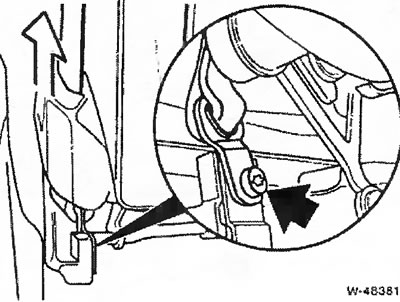
Remove the seat belt mounting bolt.
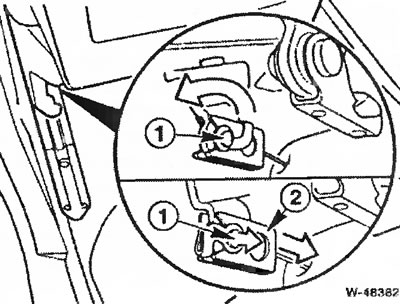
Release the stopper "1" by moving it backwards and pull it inward. Press the Bowden rod "2" forward to adjust the height of the seat belt.
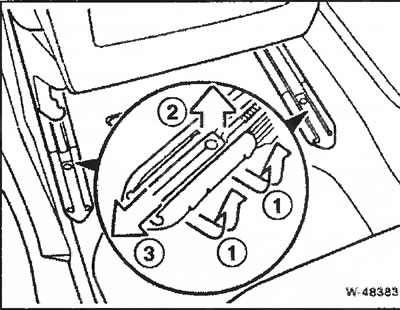
The pads are turned out with an upward movement from the inside "1", for which release the clamp tongues, lift them up in the middle "2" and remove them with a backward movement "3".
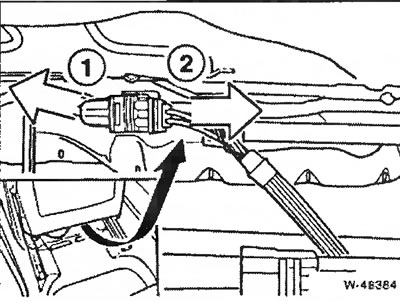
Unfasten plug "1" and disconnect "2".
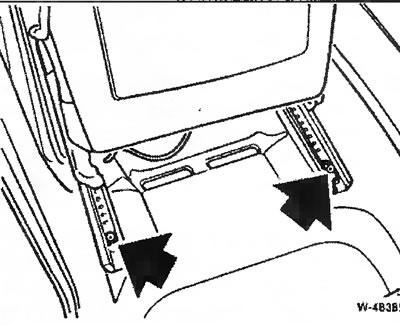
Remove the rear mounting bolts.
Move the seat all the way back.
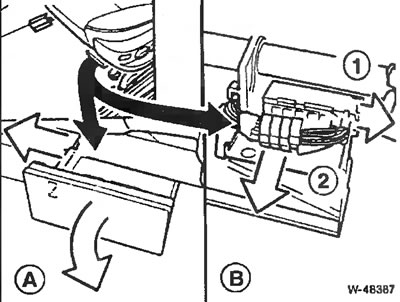
If there is an electric drive: A - unfasten and fold forward the cover, B - unfasten "1" and disconnect "2" plug.
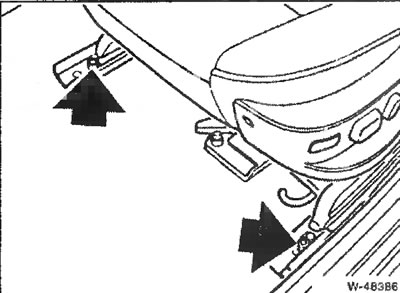
Remove the front bolts.
Remove the front seat from the vehicle.
Caution: If the seat is transported, dismantled or removed for a long period, the seat belt tensioner must be deactivated, see page 144.
Installation
Insert and align the seat. Note: The floor covering in the area of the mounting bolts must not get between the seat rails and the floor, as this may subsequently lead to the occurrence of scratching noises.
Attach the seat with new bolts, first at the rear, then at the front. Do not tighten the bolts. Caution If the old bolts are used again, their threads must first be treated with a non-loosening agent, such as Loctite 270.
Tighten the mounting bolts to a torque of 40 Nm in the following sequence: front inner, front outer, rear inner and rear outer.
Electrical seat adjustment: Move the seat all the way back. Connect and secure the plug. Install the cover.
Connect and lock the multi-pin plug connector.
Secure the pads,
Attach and lock the Bowden rod of the seat belt height adjustment mechanism.
Tighten the lower seat belt mounting bolt to 50 Nm.
Actions to take if a defect occurs in the electric drive for adjusting the seat in the longitudinal direction
Remove the cover from the inner seat rail.
By changing the tilt of the seat, move it upward.
If available, disconnect the hose from the pump that adjusts the backrest to a comfortable position for the spine.
Loosen the 2 bolts at the front of the seat rail and fold the front seat back.
Unscrew the 2 bolts securing the seat drive actuator in the longitudinal direction and remove the actuator.
Operate the seat forward/backward movement control switch.
If the actuator does not work: install and operate the new actuator. If the rearrangement is successful, the actuator is OK and only the actuator should be replaced.
If the actuator works but the seat does not move, the drive is faulty and must be replaced.
Disconnect the seat drive plug connector in the longitudinal direction.
Use large nippers to cut the connecting shaft.
Unscrew the 2 nuts and remove the drive on the left and right. After this, the seat can be moved manually.
Bolt the seat rails to the seat frame at the front (for removal only).
Remove the seat and replace the tires.
This article is available at russian, bulgarian, belarusian, ukrainian, serbian, croatian, romanian, polish, slovak, hungarian
Article verified: Ilyinsky Matvey
Share information:
Previous articles
БМВ E39: Interior
Next articles
Similar articles on other types of BMW cars:
Front Seat Heating System Components — Removal and Installation BMW 3 Series E46 (1998-2006, petrol)
Removal and installation the front seat headrest BMW 3 Series E46 (1998-2006)
Removal and installation the front seat BMW 7 Series E32 (1986-1994)
Removal and installation the front wing BMW 7 Series E38 (1994-2001)
Removal and installation the electronic unit of the front passenger… BMW X3 E83 (2003-2010)
Removal and installation front door glass BMW X5 E53 (1999-2006)
Front Seat Heating System Components — Removal and Installation BMW 3 Series E46 (1998-2006, petrol)
Removal and installation the front seat headrest BMW 3 Series E46 (1998-2006)
Removal and installation the front seat BMW 7 Series E32 (1986-1994)
Removal and installation the front wing BMW 7 Series E38 (1994-2001)
Removal and installation the electronic unit of the front passenger… BMW X3 E83 (2003-2010)
Removal and installation front door glass BMW X5 E53 (1999-2006)
Link in different formats to this page
Visitor comments
No comments yet
- General information
- Governing bodies
- Manual
- Maintenance
- Power unit
- Engine repair
- Lubrication system
- Cooling system
- Ignition system
- Supply system
- Injection system (gasoline)
- Injection system (diesel)
- Exhaust system
- Transmission
- Clutch
- Car gearbox
- Front axle
- Rear axle
- Chassis
- Steering
- Brake system
- Wheels and tires
- Body
- Interior
- Exterior
- Heating system
- Electrical equipment
- Equipment and devices
- Power devices
- Windscreen wipers
- Electrical circuits
- General information
- Manual
- Maintenance
- Power unit
- Engine repair
- Ignition system
- Engine lubrication system
- Cooling system
- Fuel system (gasoline)
- Fuel system (diesel)
- Exhaust system
- Transmission
- Clutch
- Car gearbox
- Chassis
- Front and rear suspension
- Steering
- Brake system
- Body
- Exterior
- Interior
- Electrical equipment
- Heating system
- Equipment and devices
- Power devices
- Electrical circuits
- General information
- Manual
- Maintenance
- Power unit
- Engine in a car
- Engine overhaul
- Cooling system
- Supply system
- Ignition system
- Control system
- Transmission
- Clutch
- Manual gearbox
- Automatic gearbox
- Transmission line
- Chassis
- Steering
- Front suspension
- Rear suspension
- Brake system
- Body
- Body elements
- Car care and painting
- Electrical equipment
- Heater and air conditioner
- Equipment and devices
- Starter and generator
- Electrical circuits
- General information
- Operation and maintenance
- Specifications
- Power unit
- Engine repair
- Cooling and lubrication system
- Supply system
- Ecotronic power supply system
- Fuel injection system
- Ignition system
- Transmission
- Clutch
- Gearbox BMW 242/4
- Gearbox Getrag 262/8
- Gearbox Getrag 265/6
- Automatic gearbox
- Cardan gear
- Rear axle
- Chassis
- Steering
- Front suspension
- Rear suspension
- Brake system
- Electrical equipment
- Equipment and devices
- Electrical circuits