
Note: It is recommended to practice on a suitable part before painting, for example.
Before painting, the repair area must be dried and cleaned of dust. If possible, blow it with compressed air.
Wet the floor of the work area with water.
Wipe the area to be painted and the surrounding areas with a silicone remover. It is best to treat the surface with a silicone-free polishing paste.
Before work, shake the paint can vigorously for 3-5 minutes, otherwise the surface being painted will become scuffed.
When using metallic paint, first spray a small amount of paint onto a piece of cardboard to remove any metallic particles from the spray can.
On large surfaces, spray paint vertically and horizontally, in a criss-cross pattern. Start from the outside of the surface and direct the paint stream outward in the other direction.
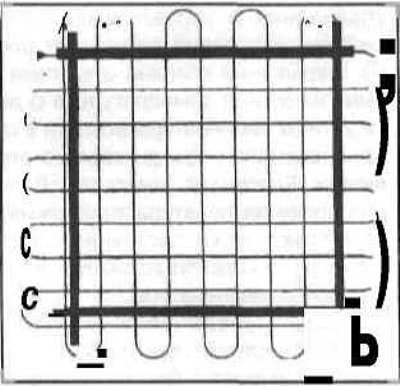
For small areas, spray the paint in a spiral motion, moving from the outside in, so as not to cover too much of the surrounding area. Move the paint can at the same speed and at the same distance from the surface being painted. The distance should be about 25 cm.
The layer of applied paint should, if possible, merge with the normal original paint without steps or sharp transitions. This is best achieved when at least four overlapping layers of paint are applied. Each subsequent layer should overlap the previous one by 2-3 cm.
Caution: If the paint is sprayed too close or the stream moves too slowly or at variable speeds, paint runs will occur. This means that the paint runs down in some places when too much is applied at one time. The same thing happens when the direction of the paint sprayer is changed.
The paint spraying process should be carried out with 5-minute pauses to evaporate the solvent until a uniform, dense layer of paint is obtained. The can of metallic paint should be shaken vigorously between stages, as small metal particles quickly settle.
Note: When painting with metallic paint, it is very difficult to match the new and old paint. Pigmentation (spraying of aluminum particles) will be uniform when the last layer is applied from a distance of 30 cm instead of 25 cm. Using this technology, it is possible to even out the color tone: slow movements of the paint stream and a richer layer create a darkening effect, while faster spraying results in a lighter paint layer.
When painting with metallic paint, the base paint must be covered with a layer of clear varnish, which gives the paint its characteristic shine. The varnish layer is applied at least three to four times, with a pause of several minutes between each stage to dry the varnish layer. Before applying the first layer, the base paint layer must dry for at least 30 minutes. The clear varnish must overlap the base paint layer by about the width of one palm. Before applying the varnish, protective paper must be glued in the appropriate places.
Release the sprayer by turning it over and pressing the head until no more paint comes out.
Immediately after finishing painting, remove all protective paper. This will allow the applied wet paint to spread over the transition area, ensuring a smooth transition.
Dry the painted areas. The drying process can be accelerated by heating the area, for example, with a photo lamp.
Caution: Do not use a fan heater as this may cause dust particles to settle on the fresh paint.
After the paint has hardened for at least 48 hours, remove paint dust from adjacent surfaces using a soft polishing agent, rubbing in the longitudinal direction only.
(The original text is available on the website «BMWMAN»)