
- Home
- BMW X3
- E83
- Electrical equipment
- Equipment and devices
- Windshield wiper
Windshield wiper (BMW X3 E83)
Adjusting the left or right windshield wiper
Note: Correctly adjusted wiper arm angle improves the cleaning performance of the glass. When making adjustments, follow the repair manual for the vehicle of the corresponding model.
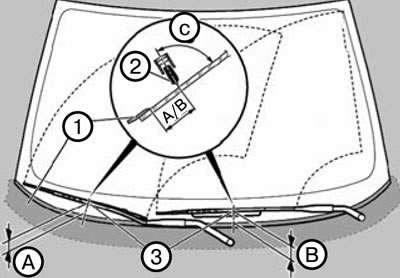
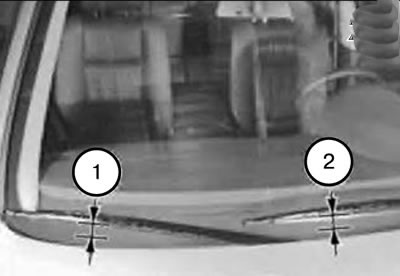
A/B = distance between wiper blade (2) and trim along fairing (1).
Note: Measured at the height of the wiper arm mounts (3).
C = angle between the middle section of the brush and the windshield.
Note:
- When adjusting with the 616100 tool, the scale value is set according to the table below.
- For right-hand drive vehicles, the mathematical sign of the scale values should be reversed.
- For left-hand drive vehicles, a scale sector from 0 to 10 is used.
- For right-hand drive vehicles, the scale sector is from 0 to +10.
| Wiper arm angle (C) | The meaning of the scale (left-hand drive) on the fixture | Adjustment size (A, B) of the windshield wiper arm | ||||
| Front passenger side | Driver's side | Front passenger side | Driver's side | Front passenger side | Driver's side | Rear window |
| 85,2°±1° | 85,4°±1° | -5 | -5 | 66±3 mm | 61±3 mm | 29±1 mm |
Checking/adjusting the angle of the wiper arms relative to the windshield
Note:
- Precise adjustment of the wiper arm angle improves the performance of the wiper.
- The installation angle can be checked using the tool 009331 and 616100.
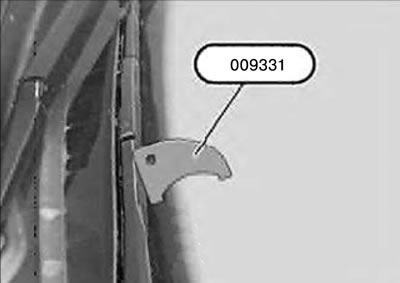
1. Check the installation angle of the windshield wiper arms using a gauge.
1) Before checking the wiper arm angle, briefly move the arms away from the windshield.
2) Install tool 009331 on the windshield near the wiper blade pivot point.
3) Check the gap width and adjust the position of the lever if necessary.
Note: To prevent damage, cover the wiper arm with fabric adhesive tape.
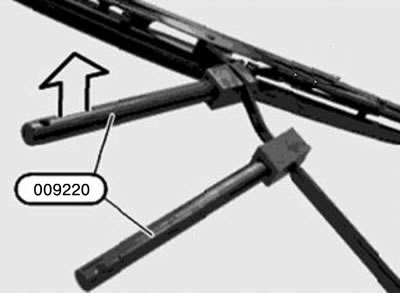
4) Press the 009220 tools in the appropriate direction until the required installation angle is achieved.
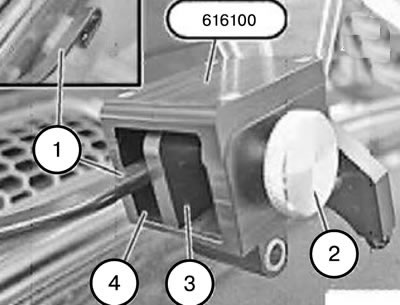
2. Check the installation angle of the windshield wiper arms using a protractor.
1) Remove the wiper blades.
2) Insert the wiper arm (1) into the 616100 angle gauge.
3) Secure the wiper arm (1) with the screw (2) and pressure plate (3) and install it on the glass.
4) Read the measurement result (in degrees), if necessary, adjust the position of the lever.
Note:
- The wiper arm (1) must fit correctly against the lower and side contact surfaces (4) of the 616100 protractor.
- For right-hand drive vehicles, the screw (2) must be located on the left side of the 616100 tool.
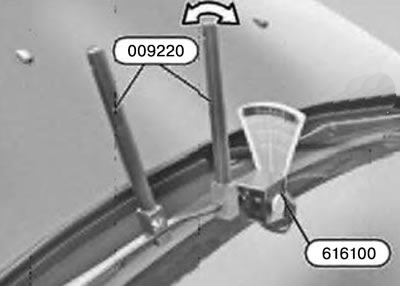
5) Press the 009220 tool in the appropriate direction until the required installation angle is reached.
Replacing both wiper blades
Caution: Make sure the windshield does not come into contact with the wiper arm without a blade.
1. Place the wiper blades in the removal position.
1) Turn on contact "R".
2) Press the windshield wiper lever and, turning on the "R" contact, bring the windshield wiper arms to a vertical position (allotted position).
3) Remove the ignition key from the lock.
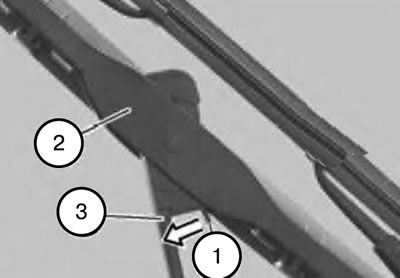
2. Fold back the windshield wiper arm (3).
3. Press the locking spring (1) in the direction indicated by the arrow.
4. Pull the wiper blade (2) towards the lever (3) and unhook it.
Note:
- When installing, insert and secure the new wiper blade.
- Fold the wiper arm toward the windshield.
Attention:
- The wiper arms must be pressed against the windshield before the "R" contact is turned on or the ignition is turned on or the engine is started, otherwise damage will occur.
- Turn on contact "R".
5. Installation should be carried out in the reverse order of removal, taking into account the above notes.
Replacing both wiper arms
1. Remove the protective cover.
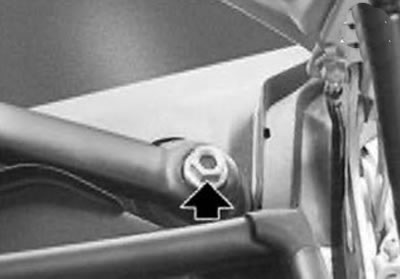
2. Unscrew the nut.
Note: When installing, it is necessary to strictly observe the tightening torque.
Tightening torque: 30 Nm.

Caution: When removing, do not allow the wiper arm to deform (danger of breakdown).
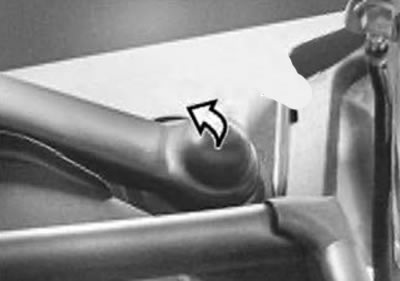
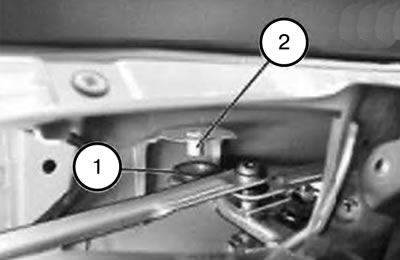
3. Disconnect the windshield wiper arm using tool 616060.
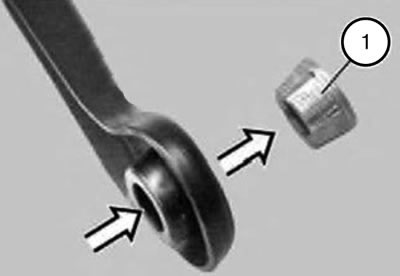
Note:
- When installing, make sure that the bushing (1) fits tightly in the lever.
- Replace the loose bushing (1).
4. The tightly seated bushing (1) of the windscreen wiper arm can be used again.
Note: The following operations are described for a wiper arm with a tightly seated bushing (1).
5. Bring the windshield wiper to the recessed position.
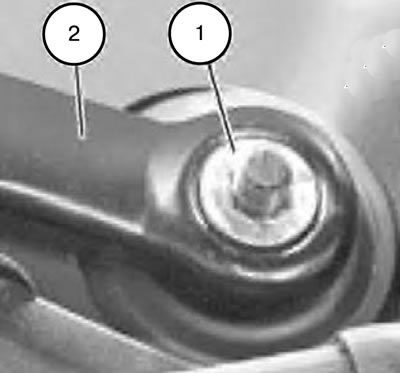
6. Place the lever (2) with the tightly fitting bushing (1) on the axle and tighten it.
Tightening torque: 30 Nm.
7. Check the adjustment of the wiper arm (2).
8. If adjustment needs to be made, replace the bushing (1).
Note: The following operations are described for the wiper arm with a new bushing (2).
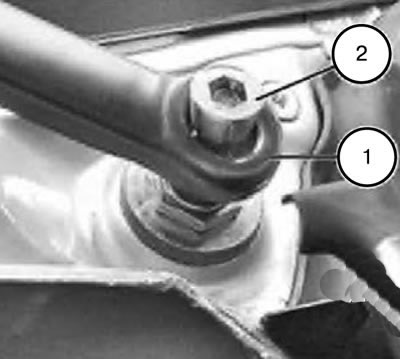
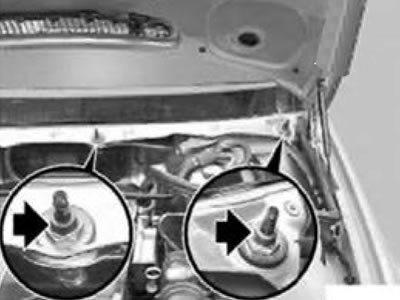
9. Bring the windshield wiper to the recessed position.
10. Place the lever (2) with the sleeve (1) on the axle and tighten it by hand.
1. 66±1.5 mm. 2. 61±1.5 mm.
11. Adjust the position of the corresponding wiper arm to the recessed position (the distance between the edge of the brush and the upper edge of the fairing shield is measured).
12. After this, tighten the wiper arm and check its position again.
Tightening torque: 30 Nm.
Removal and installation the windshield wiper arm bracket assembly
1. Remove the fairing strip.
2. Remove the heater partition.
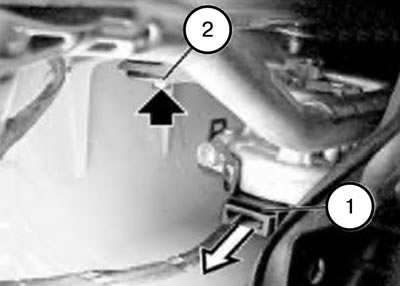
3. Unlock and disconnect the connector (1).
4. Unscrew the screw (2).
Tightening torque: 10 Nm.
Note: When installing, it is necessary to place the rubber bushing (1) of the wiper arm bracket onto the pin (2).
The original text is available on the website: «bmwman»
This article is available at russian, bulgarian, belarusian, ukrainian, serbian, croatian, romanian, polish, slovak, hungarian
Article verified: Polikarpov Saveliy
Share information:
Previous articles
БМВ E83: Equipment and devices
Next articles
Similar articles on other types of BMW cars:
Windshield wiper parts BMW 3 Series E21 (1975-1983)
Removal and installation the turn signal switch and windshield wiper BMW 3 Series E30 (1982-1994)
Windshield wiper parts BMW 5 Series E12 (1972-1981)
Removal and installation the turn signal switch and windshield wiper BMW 5 Series E34 (1988-1996)
Removal and installation windshield wiper arms and blades BMW 7 Series E38 (1994-2001)
Windscreen wiper blade rubbers — replacement BMW 7 Series E32 (1986-1994)
Installing Windshield Wiper Arms BMW X5 E53 (1999-2006)
Link in different formats to this page
Visitor comments
No comments yet
- General information
- Introduction to manual
- Troubleshooting
- User manual
- Maintenance
- Power unit
- Diesel engine M47 T2
- Diesel engine N47
- Diesel engine M57 T2/TU
- Petrol engine N46
- Petrol engine N52
- Petrol engine M54
- Cooling system
- Lubrication system
- Fuel system
- Engine management
- Intake and exhaust system
- Engine electrical equipment
- Transmission
- Clutch
- Gearbox and transfer case
- Drive shafts and axles
- Chassis
- Front suspension
- Rear suspension
- Brake system
- Steering system
- Body
- Exterior
- Doors and windows
- Safety system
- Air conditioner
- Electrical equipment
- Equipment and devices
- Lighting and signaling
- Electrical circuits