
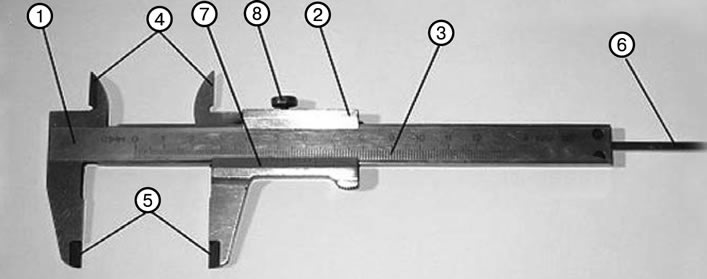
1. Bar. 2. Movable frame. 3. Barbell scale. 4. Sponges for internal measurements. 5. Sponges for external measurements. 6. Depth gauge ruler. 7. Vernier. 8. Screw for clamping the frame
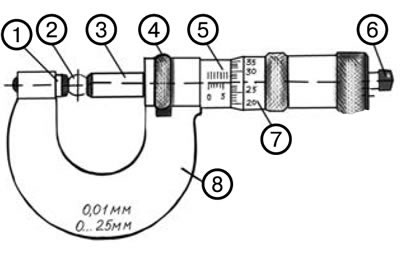
1. Heel. 2. Object of measurement. 3. Spindle. 4. Wheel. 5. Measuring scale (in mm). 6. Ratchet. 7. Drum vernier. 8. Bracket.
When taking measurements, the object (2) is clamped between the anvil and the micrometer screw (3). On the surface of the stem are two line scales, offset from each other by 0.5 mm and with a division value of 1 mm. The drum (7) rotates around a circular scale, which is also located on the drum's bevel. The micrometer screw can be locked in any position. The screw is equipped with a ratchet mechanism to ensure constant measuring pressure.
- 1. The object is placed between the heel and the micrometer screw, while rotating the drum, the spindle is set to the approximate size of the object.
- 2. The spindle is carefully moved closer until it comes into contact with the object being measured.
- 3. The size in mm is determined using the drum vernier, which corresponds to the horizontal index line of the stem scale.
- 4. The overall size of the measured object is determined.
Note: When in contact with the object being measured, do not tighten the spindle by rotating the drum sleeve by hand, as this may damage the micrometer. To determine the dimensions more accurately, it is necessary to ensure that the item is well secured.
A caliper is a universal tool designed for high-precision measurements of external and internal dimensions. In addition, a caliper can be used to determine the depth of holes and protrusions.
The measuring jaws of the caliper can also be used to measure the parallelism of the sides of workpieces.
Calipers have measurement limits of 0-125 mm (SHC-1), 0-160 mm (SHC-2) and 0-400 mm (SHC-3).
The most commonly used caliper is ShTs-1.
To measure external dimensions and check parallelism, the main measuring jaws of the tool are used, and to measure internal dimensions and mark them, auxiliary pointed jaws are used.
Using a depth gauge, determine the depth of holes and protrusions.
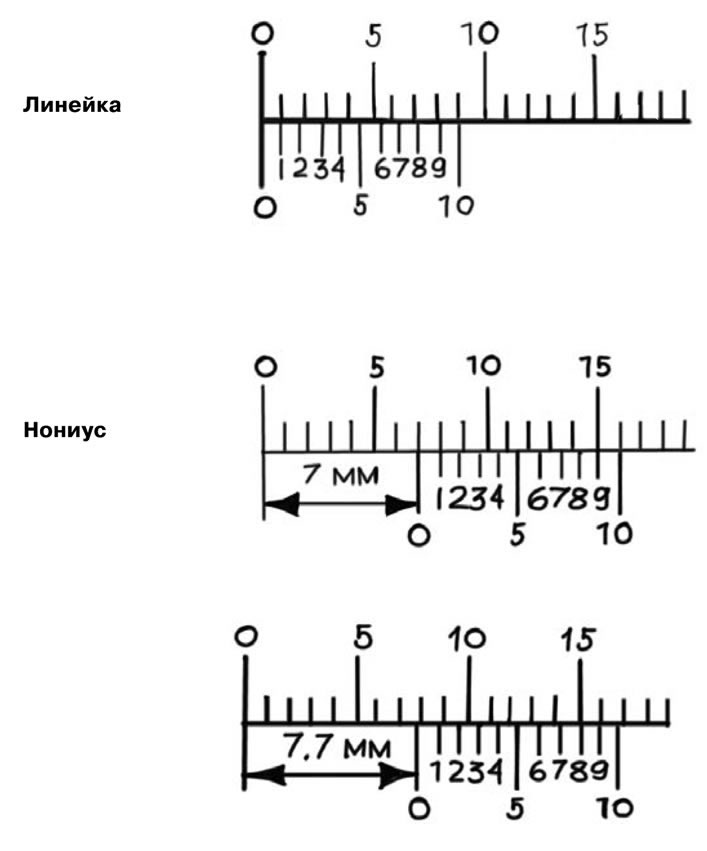
The caliper's design is based on a graduated ruler (bar) and an auxiliary vernier scale that moves along the main ruler/bar. This auxiliary scale can be used to count fractions of a division on the main scale.
The vernier scale operates on the difference in the division intervals between the main scale and the vernier scale. This difference is equal to the vernier scale division value, and the number of divisions depends on the division value.
If the scale division interval is 1 mm, and the vernier division interval is 0.9 mm, then the vernier division value is 0.1 mm.
Thus, if you combine the zero division of the vernier with the zero division of the main scale of the caliper, then the first division of the vernier will "lag" behind the first division of the main scale by the amount of the difference in the intervals of the scales, i.e. by 0.1 mm, the second division - by 0.2 mm, etc.
The tenth division of the vernier, having shifted by 1 mm, coincides with the ninth division of the main scale of the rod, that is, if the division value of 1 mm is divided by the number of divisions of the vernier (by 10), we get 0.1 mm (see picture)
Example:
- If the zero mark of the vernier coincides with any mark on the ruler, then this division indicates the size in whole millimeters.
- If the zero mark of the vernier does not coincide with the mark on the main scale, then the division on the ruler closest to the left shows a whole number of millimeters, and tenths are counted according to the vernier.
- To the whole number of millimetres are added as many tenths of a millimetre as there are vernier strokes until any vernier stroke completely coincides with one of the ruler strokes. The figure shows an example of reading 7 mm and 7.7 mm.
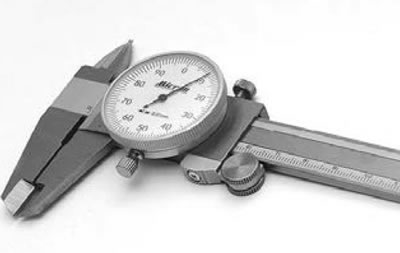
Some calipers are equipped with a dial indicator. The indicator scale allows you to adjust the zero setting and control tolerances.
During and after work, it is necessary to wipe the caliper with a napkin soaked in an aqueous alkaline solution, then dry it with a clean napkin. After finishing work, cover the surfaces of the caliper with a thin layer of any technical oil and place it in the case. Avoid harsh impacts or falls during operation to avoid bending of the rod and other damage, scratches on the measuring surfaces, and friction of the measuring surfaces against the controlled part.