
Table of contents: Removal ↓ Installation ↓
- Home
- BMW 3 Series
- E30
- Chassis
- Brake system
- Removal and installation rear brake pads
Removal and installation rear brake pads (BMW 3 Series E30)
Removal
Loosen the wheel bolts.
Remove the decorative cap. Mark the position of the wheel disks on the wheel hubs with paint. Thanks to this, the balanced wheel is subsequently installed in the same position.
Raise the rear of the car and remove the wheel.
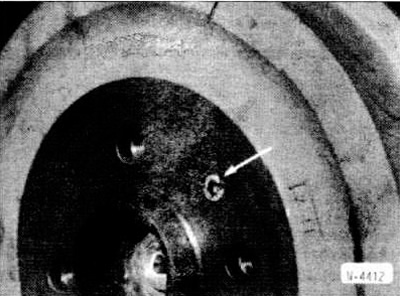
Loosen the brake drum mounting bolt using a 5 mm open-end wrench.
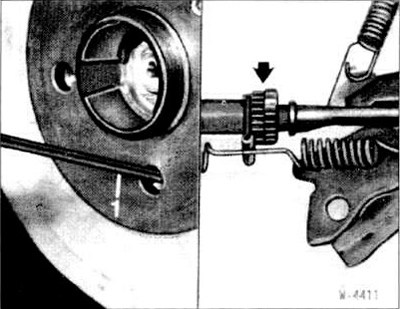
Spread the brake shoes. To do this, use screwdriver "1" to move the automatic brake shoe installation mechanism (arrow) through the holes for the wheel bolts. On the right side of the car, move the screwdriver from the bottom up, and on the left side - from the top down. Spread the brake shoes so that you can easily remove the brake drum. If necessary, completely release the brake cables at the brake lever (see section "Removal and installation handbrake brake pads").
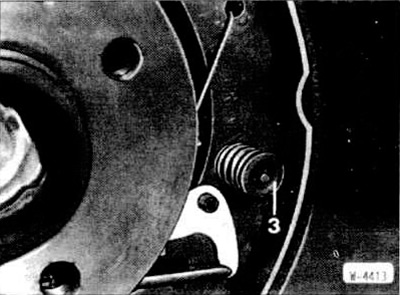
Using pliers, squeeze the cup of the pressure spring "3" tightly and turn the cup by 90°. When releasing, press on the pin of the spring cup from the rear side of the brake shield.
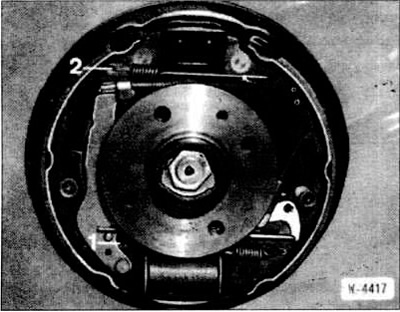
Disconnect the lower return spring "1" at the front, pull the brake shoe out of the wheel cylinder by hand. Disconnect the upper return spring "2" at the front. Pull out the front brake shoe with the pressure plate.
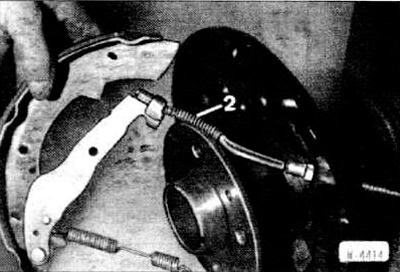
Disconnect the handbrake cable from the handbrake lever by moving the spring "2" and remove the brake shoe.
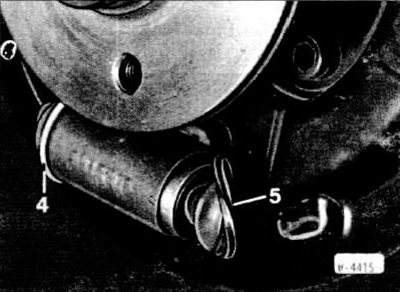
Remove the retaining ring "4" from the wheel brake cylinder and remove the boot "5".
Note: The cylinder piston should not come out. Check if there is moisture behind the dust cover. If necessary, repair or replace the wheel brake cylinder.
Installation
Be sure to replace all 4 brake pads at once and install pads from the same manufacturer. Both the brake pads and their linings can be replaced. Blow out the brake drums and brake shields with compressed air or wash with alcohol. Do not press the brake pedal with the brake pads removed, as the piston will come out of the cylinder. If the wheel brake cylinder is wet with brake fluid, repair it. Clean the thread of the pressure rod and lightly lubricate with sulfur-molybdenum grease. Send the scratched drums for boring, and both drums must be bored at the same time. The maximum permissible size for boring is 251 mm.
Caution: When replacing the brake pads, the return springs and heat clip are replaced at the same time.
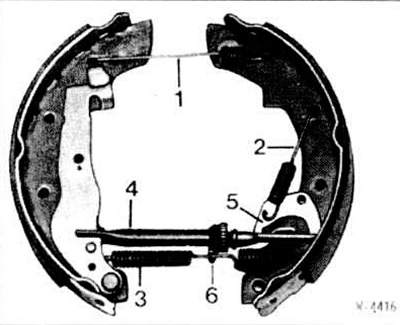
Location of handbrake components
1 Upper return spring
2 Lateral return spring
3 Lower return spring
4 Pressure bar
5 Automatic brake setting lever
6 Thermal clamp
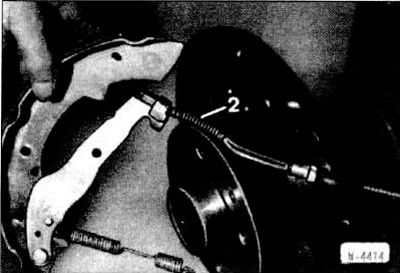
Connect the handbrake cable "2" to the handbrake lever.
Insert the spring cup pin into the brake shoe hole from the rear side of the brake shield. Put on the pressure spring. Use pliers to put on the spring cup. Hold the pin from behind and turn the spring cup 90°.
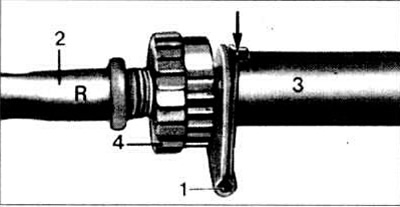
Unscrew gear "4" of the automatic brake setting mechanism. Check the ease of movement of the mechanism parts. If necessary, lightly lubricate the pressure plate. The gear on the left wheel has a right-hand thread "R", and the gear on the right wheel has a left-hand thread.
Note: The heat clamp must snap into the recess (arrow) on the pressure plate "3".
Insert the pressure plate from below into the drum brake.
Insert lever "5" of the automatic brake setting mechanism and secure with return spring "2".
Caution: Ensure correct position with return spring "2" (W-4416).
Insert the spring cup pin into the brake shoe hole from the rear side of the brake shield. Put on the pressure spring. Use pliers to put on the spring cup. Hold the pin from behind and turn the spring cup 90°.
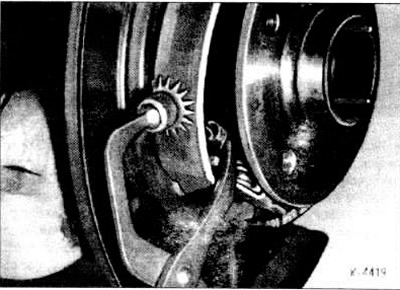
Connect the upper and lower return springs.
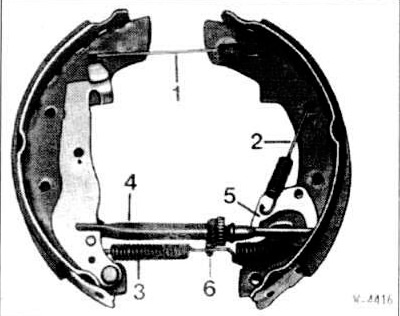
When installing return springs "1" and "3", pay attention to the position of the bends.
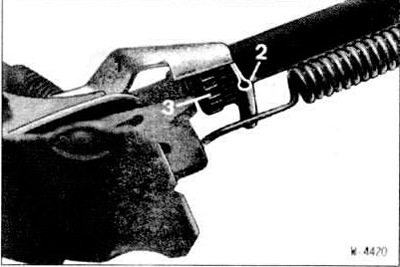
Check whether the automatic brake setting mechanism is engaged with gear "3" and whether the heat clamp "2" is in the recess.
Install the brake drum and turn it so that the hole in the brake drum matches the threaded hole in the flange. Tighten the brake drum mounting bolt with a 5 mm open-end wrench.
If the hydraulic circuit has been opened, for example when replacing a wheel brake cylinder, the air must be bled from the brake system before adjusting the rear wheel brake (see section "Bleeding the brake system").
Install the brake pads by pressing the brake pedal several times.
Before the brake pads are installed, you will hear clicking sounds coming from the rear brake. The wheel bolt hole shows how the brake pad installation mechanism works.
Adjust the handbrake (see section "Parking brake").
Install the wheel observing the marking of the disk position on the hub. Lower the car and cross-tighten the wheel bolts to a torque of 110 Nm.
This article is available at russian, bulgarian, belarusian, ukrainian, serbian, croatian, romanian, polish, slovak, hungarian
Article verified: Polikarpov Saveliy
Share information:
Previous articles
БМВ E30: Brake system
Next articles
Similar articles on other types of BMW cars:
Removal and installation rear disc brake pads BMW 5 Series E39 (1995-2003)
Removal and installation rear brake pads BMW 5 Series E34 (1988-1996)
Rear brake pads — removal and installation BMW 7 Series E32 (1986-1994)
Removal and installation the rear door BMW X3 E83 (2003-2010)
Rear disc — removal and installation BMW X5 E53 (1999-2006)
Removal and installation rear disc brake pads BMW 5 Series E39 (1995-2003)
Removal and installation rear brake pads BMW 5 Series E34 (1988-1996)
Rear brake pads — removal and installation BMW 7 Series E32 (1986-1994)
Removal and installation the rear door BMW X3 E83 (2003-2010)
Rear disc — removal and installation BMW X5 E53 (1999-2006)
Link in different formats to this page
Visitor comments
No comments yet
- General information
- Manual
- Maintenance
- Power unit
- Engine repair
- Cooling system
- Power system (gasoline)
- Injection system (gasoline)
- Fuel system (diesel)
- Exhaust system
- Ignition system
- Charge and launch systems
- Transmission
- Car gearbox
- Clutch and drive shafts
- Chassis
- Brake system
- Suspension front and rear
- Steering
- Body
- Body care and repair
- Exterior
- Interior
- Electrical equipment
- Troubleshooting
- Lighting and signaling
- Equipment and devices
- Heater and air conditioner
- Electrical circuits
- General information
- Manual
- Repair on the road
- Weekly checks
- Maintenance
- Troubleshooting
- Power unit
- 4 cylinder engines
- 6 cylinder engines
- Engine overhaul
- Cooling and heating
- Fuel and exhaust system
- Starting and charging system
- Ignition system
- Transmission
- Clutch
- Mechanical gearbox
- Automatic gearbox
- Cardan and drive shafts
- Chassis
- Brake system
- Wheel suspension
- Steering
- Body
- Exterior
- Interior
- Electrical equipment
- Equipment and devices
- Electrical circuits
- General information
- Maintenance
- Power unit
- Engine repair
- Cooling system
- Ignition system
- Supply system
- Fuel injection system
- Exhaust system
- Transmission
- Clutch
- Car gearbox
- Front and rear axle
- Chassis
- Steering
- Brake system
- Body
- Exterior
- Interior
- Electrical equipment
- Heating system
- Equipment and devices
- Power devices
- Electrical circuits
- Power unit
- M10/M20 engine
- M40 engine
- Ignition system
- Lubrication system
- Cooling system
- Supply system
- Fuel injection
- Exhaust system
- Transmission
- Clutch
- Manual gearbox
- Front axle
- Rear axle
- Chassis
- Steering
- Brake system
- Body
- Exterior
- Interior
- Electrical equipment
- Heating system
- Equipment and devices
- Electrical circuits
- General information
- Specifications
- Operation and maintenance
- 4-cylinder engine
- Engine repair
- Cooling and lubrication system
- Supply system
- Ignition system
- 6-cylinder engine
- Engine repair
- Cooling and lubrication system
- Supply system
- Fuel injection system
- Ignition system
- Transmission
- Clutch
- 4-speed manual gearbox
- 5-speed manual gearbox
- Automatic gearbox
- Cardan and rear axle
- Chassis
- Steering
- Front suspension
- Rear suspension
- Brake system
- Electrical equipment
- Equipment and devices
- Electrical circuits