
Table of contents: Removal ↓ Installation ↓
- Home
- BMW 3 Series
- E30
- Chassis
- Brake system
- Removal and installation rear disc brake pads. Models 325E/325i
Removal and installation rear disc brake pads. Models 325E/325i (BMW 3 Series E30)
Removal
Remove the decorative wheel cap.
Mark the position of the wheel rims on the rear wheel hubs with paint. This will ensure that the balanced wheel is subsequently installed in the same position.
Loosen the wheel bolts of the corresponding rear wheel. The vehicle must still be on the ground.
Raise the rear of the car and remove the wheel.
Caution: Do not swap the pads from the inside to the outside and vice versa, or from the right wheel to the left and vice versa. Swapping may cause uneven braking. Always replace all rear brake pads at the same time, even if only one pad has reached the wear limit. When reinstalling brake pads, they must be marked when removed.
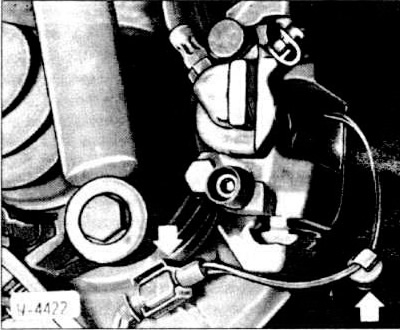
On the brake caliper of the right wheel, there is a wear sensor connector (arrow), but do not pull on the wire.
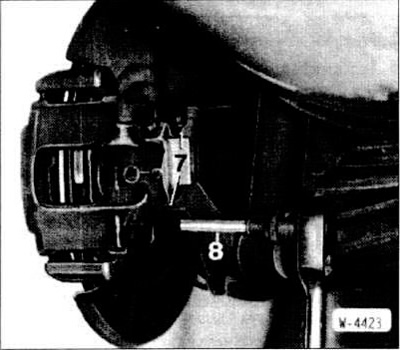
Remove the plastic caps from the mounting bolts "7" and unscrew the bolts with the open-end wrench "8".
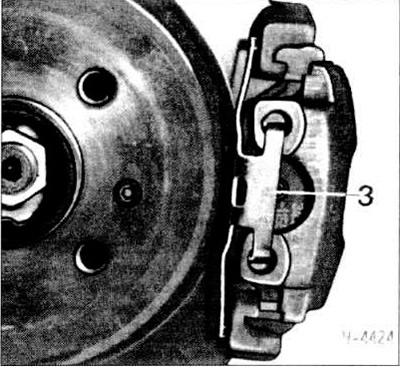
Press the clamp "3" with a screwdriver.
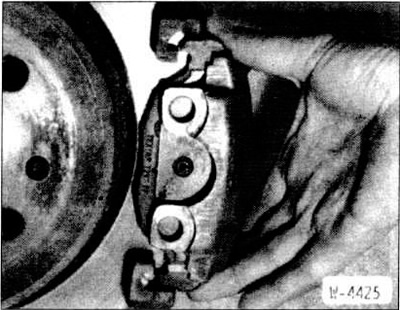
Pull back the floating caliper.
Remove the outer brake shoe.
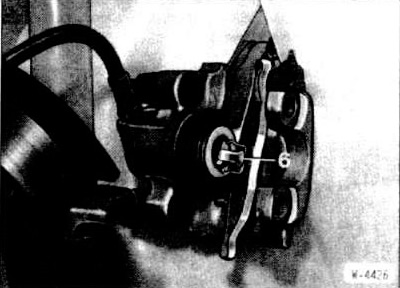
The inner brake shoe is secured in the brake piston by spring "6". Pull out the brake shoe.
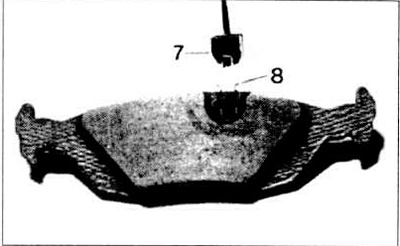
Press wear sensor "7" out of the inner brake pad.
If the insulation of the contact board is worn out, the wire insulation is damaged or the plastic part is worn out, replace the wear sensor.
Installation
Caution: When the brake pads are removed, do not press the brake pedal, as this will cause the piston to come out of the housing.
Clean the guide surfaces and the brake shoe seating areas in the housing shaft with a suitable soft metal brush or a cloth soaked in alcohol. Do not use mineral-containing substances or sharp tools.
Before installation, check the brake disc with your fingers for scratches. Scratched discs should be replaced. Before installing new brake pads, clean brake discs with a gray or bluish coating.
Measure the thickness of the brake disc (see section "Checking the thickness of brake discs").
Check the integrity of the dust cap on the brake piston "2" (W-4407). Replace a damaged cap immediately, as penetrating dirt quickly leads to brake caliper leaks. To do this, remove and disassemble the brake caliper (work must be performed at a service station).
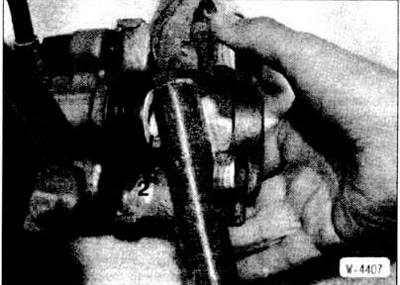
Press the brake piston "2" with a pressing device. This can also be done with a wooden rod (hammer handle), but at the same time, be especially careful to ensure that the piston is not tilted and that the dust cap is not damaged.
Caution: When the pistons are pressed, brake fluid is squeezed out of the brake cylinders into the expansion tank. Monitor the fluid level in the tank. It may be necessary to suck out the fluid.
To suck out the fluid, you can use a vessel used to release air from the brake system, or any plastic bottle that is intended only for brake fluid. Do not use beverage bottles! Brake fluid is poisonous and should never be sucked out by mouth through a hose. Use a suction device. After replacing the pads, the brake fluid level should not exceed the MAX mark, since the liquid expands when the temperature rises. Leaking brake fluid gets on the master cylinder, destroys the paint and causes corrosion.
Note: If the brake pads are heavily worn, check the ease of piston movement. If the piston moves with difficulty, send the caliper for repair (work must be performed at a service station).
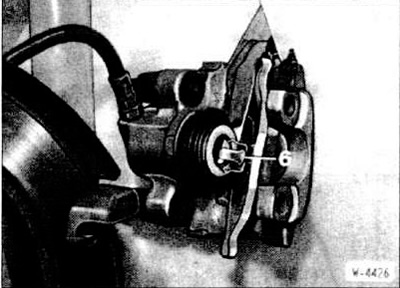
Insert the brake shoe with spring "6" into the brake piston.
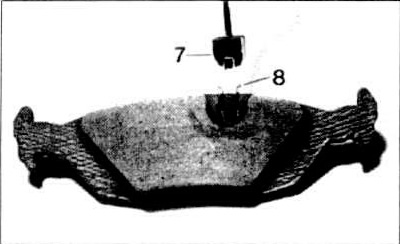
Attach the wear indicator "7" to the inner brake shoe on the right rear wheel. Ensure the correct position of the locking spring "8".
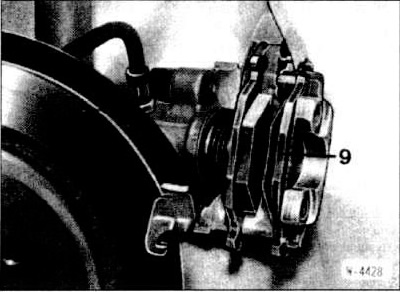
Insert the outer brake shoe "8" into the brake caliper and place the brake caliper on the brake disc. Ensure that the brake shoes are correctly seated in the guides.
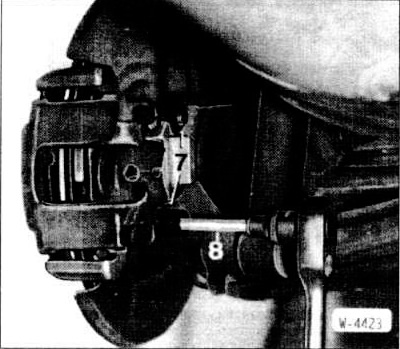
Clean the brake caliper mounting bolts "7" from any remaining locking compound. If necessary, go over the thread in the caliper with a tap. Replace bolts with damaged or rusted threads. Cover the bolt threads with a thin layer of locking compound and tighten with a 7 mm "8" spanner with a tightening torque of 30 Nm.
Place plastic caps on the bolts.
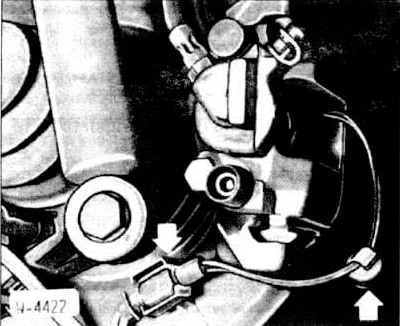
On the right side of the vehicle, connect the wear sensor connector and secure it to the pillar.
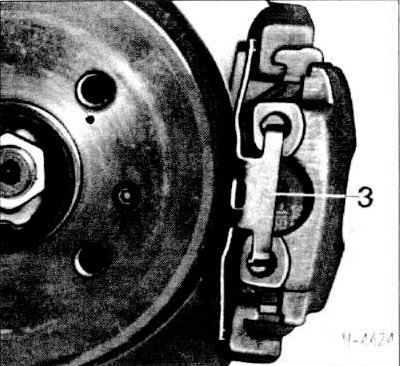
Place bracket "3" on the brake caliper.
Install the rear wheel observing the disc position marking on the hub. Lower the car and cross-tighten the wheel bolts to 110 Nm.
Install a decorative wheel cap.
Note: When the car is parked, press the brake pedal several times until you feel a hard resistance. This will cause the brake pads to move towards the brake discs and take their working position.
Check the brake fluid level in the expansion tank and, if necessary, top up the fluid to the MAX mark.
Carefully allow the new brake pads to break in by lightly pressing the brake pedal several times to brake the car from 80 km/h to 40 km/h. Allow the brakes to cool between successive brakings.
Attention: During the first 200 km of travel, avoid sudden braking until the vehicle comes to a complete stop.
This article is available at russian, bulgarian, belarusian, ukrainian, serbian, croatian, romanian, polish, slovak, hungarian
Article verified: Polikarpov Saveliy
Share information:
Previous articles
БМВ E30: Brake system
Next articles
Similar articles on other types of BMW cars:
Removal and installation rear disc brake pads BMW 5 Series E39 (1995-2003)
Removal and installation rear brake pads BMW 5 Series E34 (1988-1996)
Rear brake pads — removal and installation BMW 7 Series E32 (1986-1994)
Brake pads for rear disc brakes BMW X3 E83 (2003-2010)
Rear disc — removal and installation BMW X5 E53 (1999-2006)
Removal and installation rear disc brake pads BMW 5 Series E39 (1995-2003)
Removal and installation rear brake pads BMW 5 Series E34 (1988-1996)
Rear brake pads — removal and installation BMW 7 Series E32 (1986-1994)
Brake pads for rear disc brakes BMW X3 E83 (2003-2010)
Rear disc — removal and installation BMW X5 E53 (1999-2006)
Link in different formats to this page
Visitor comments
No comments yet
- General information
- Manual
- Maintenance
- Power unit
- Engine repair
- Cooling system
- Power system (gasoline)
- Injection system (gasoline)
- Fuel system (diesel)
- Exhaust system
- Ignition system
- Charge and launch systems
- Transmission
- Car gearbox
- Clutch and drive shafts
- Chassis
- Brake system
- Suspension front and rear
- Steering
- Body
- Body care and repair
- Exterior
- Interior
- Electrical equipment
- Troubleshooting
- Lighting and signaling
- Equipment and devices
- Heater and air conditioner
- Electrical circuits
- General information
- Manual
- Repair on the road
- Weekly checks
- Maintenance
- Troubleshooting
- Power unit
- 4 cylinder engines
- 6 cylinder engines
- Engine overhaul
- Cooling and heating
- Fuel and exhaust system
- Starting and charging system
- Ignition system
- Transmission
- Clutch
- Mechanical gearbox
- Automatic gearbox
- Cardan and drive shafts
- Chassis
- Brake system
- Wheel suspension
- Steering
- Body
- Exterior
- Interior
- Electrical equipment
- Equipment and devices
- Electrical circuits
- General information
- Maintenance
- Power unit
- Engine repair
- Cooling system
- Ignition system
- Supply system
- Fuel injection system
- Exhaust system
- Transmission
- Clutch
- Car gearbox
- Front and rear axle
- Chassis
- Steering
- Brake system
- Body
- Exterior
- Interior
- Electrical equipment
- Heating system
- Equipment and devices
- Power devices
- Electrical circuits
- Power unit
- M10/M20 engine
- M40 engine
- Ignition system
- Lubrication system
- Cooling system
- Supply system
- Fuel injection
- Exhaust system
- Transmission
- Clutch
- Manual gearbox
- Front axle
- Rear axle
- Chassis
- Steering
- Brake system
- Body
- Exterior
- Interior
- Electrical equipment
- Heating system
- Equipment and devices
- Electrical circuits
- General information
- Specifications
- Operation and maintenance
- 4-cylinder engine
- Engine repair
- Cooling and lubrication system
- Supply system
- Ignition system
- 6-cylinder engine
- Engine repair
- Cooling and lubrication system
- Supply system
- Fuel injection system
- Ignition system
- Transmission
- Clutch
- 4-speed manual gearbox
- 5-speed manual gearbox
- Automatic gearbox
- Cardan and rear axle
- Chassis
- Steering
- Front suspension
- Rear suspension
- Brake system
- Electrical equipment
- Equipment and devices
- Electrical circuits