
- Home
- BMW 3 Series
- E36
- Power unit
- Supply system
- Removal and installation, checking of temperature sensor
Removal and installation, checking of temperature sensor (BMW 3 Series E36)
The temperature sensor measures the engine temperature and transmits this information to the control unit. The temperature sensor contains an NTC element (NTC = negative temperature coefficient), the resistance of which decreases with increasing temperature. If the sensor fails, the control unit assumes the temperature value is +80°C. This corresponds to the temperature of a warmed-up engine, and at low outside temperatures and a cold engine, starting the engine is difficult and its operation is uneven.
Disconnect the connector.
Connect an ohmmeter to both contacts of the connector.
Measure the resistance and compare with the specified value. Intermediate values are possible at different temperatures. For specified values, see the table below.
If the result differs from the specified value, remove the sensor.
Place the sensor on a wire hook in a water bath so that it does not touch the walls of the vessel. Cool the water with ice cubes, and then warm it up on a hotplate. At the specified temperatures, remove the sensor and measure the resistance between its contacts.
If the temperature sensor is normal, connect the voltmeter to the connector contacts and ground.
Turn on the ignition. The specified value is about 5 volts. If there is no voltage, ring the wire.
Ring the ground wire.
If the sensor and wires are normal, the control unit is defective.
Remove the idle air control valve.

Unscrew the intake pipe support and the "arrow" cable channel. The temperature sensor is located in the engine block behind these parts.
Remove the temperature sensor connector.
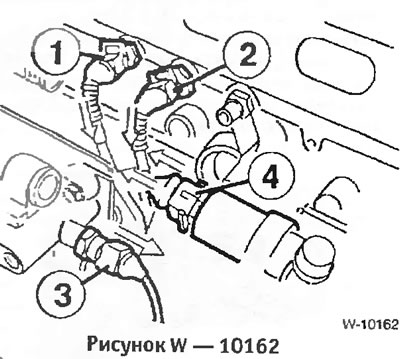
Unscrew the temperature sensor "1" DME. At the BMW service station, a special tool BMW-00 9160 is used for unscrewing. 2 - coolant temperature sensor for the gauge on the instrument panel. The figure shows a six-cylinder engine, the installation position on a four-cylinder engine is similar.
Screw in the temperature sensor with a new gasket and tighten to a torque of 12-14 Nm.
Connect the connector. Snap the wire retainer into place.
Fill with coolant and bleed air from the cooling system.
Make a test drive and check the tightness of the temperature sensor installation location; tighten it a little if necessary.
Examination
Disconnect the connector.
Connect an ohmmeter to both contacts of the connector.
Measure the resistance and compare with the specified value. Intermediate values are possible at different temperatures. For specified values, see the table below.
If the result differs from the specified value, remove the sensor.
Place the sensor on a wire hook in a water bath so that it does not touch the walls of the vessel. Cool the water with ice cubes, and then warm it up on a hotplate. At the specified temperatures, remove the sensor and measure the resistance between its contacts.
If the temperature sensor is normal, connect the voltmeter to the connector contacts and ground.
Turn on the ignition. The specified value is about 5 volts. If there is no voltage, ring the wire.
Ring the ground wire.
If the sensor and wires are normal, the control unit is defective.
Removal
Note: To prevent coolant from leaking out when removing the sensor, drain some of the coolant into a container.
Models 316i, 318i
Remove the idle air control valve.
Unscrew the intake pipe support and the "arrow" cable channel. The temperature sensor is located in the engine block behind these parts.
Remove the temperature sensor connector.
Unscrew the temperature sensor "1" DME. At the BMW service station, a special tool BMW-00 9160 is used for unscrewing. 2 - coolant temperature sensor for the gauge on the instrument panel. The figure shows a six-cylinder engine, the installation position on a four-cylinder engine is similar.
Installation
Screw in the temperature sensor with a new gasket and tighten to a torque of 12-14 Nm.
Caution: Do not overtighten the temperature sensor.
Connect the connector. Snap the wire retainer into place.
Fill with coolant and bleed air from the cooling system.
Make a test drive and check the tightness of the temperature sensor installation location; tighten it a little if necessary.
This article is available at russian, bulgarian, belarusian, ukrainian, serbian, croatian, romanian, polish, slovak, hungarian
Article verified: Chebotarev Vladislav
Share information:
Previous articles
БМВ E36: Supply system
Next articles
Similar articles on other types of BMW cars:
Removal and installation, checking of temperature sensor BMW 5 Series E34 (1988-1996)
Removal and installation the heater temperature sensor BMW 5 Series E39 (1995-2003)
Temperature sensor — checking, removal and installation BMW 7 Series E32 (1986-1994)
Removal and installation the fuel rail pressure sensor BMW 7 Series E38 (1994-2001)
Pistons — removal and installation BMW X3 E83 (2003-2010)
Coolant temperature sensor BMW X5 E53 (1999-2006)
Link in different formats to this page
Visitor comments
No comments yet
- General information
- Manual
- Maintenance
- Power unit
- Engine repair
- Cooling system
- Power system (gasoline)
- Injection system (gasoline)
- Fuel system (diesel)
- Exhaust system
- Ignition system
- Charge and launch systems
- Transmission
- Car gearbox
- Clutch and drive shafts
- Chassis
- Brake system
- Suspension front and rear
- Steering
- Body
- Body care and repair
- Exterior
- Interior
- Electrical equipment
- Troubleshooting
- Lighting and signaling
- Equipment and devices
- Heater and air conditioner
- Electrical circuits
- General information
- Manual
- Repair on the road
- Weekly checks
- Maintenance
- Troubleshooting
- Power unit
- 4 cylinder engines
- 6 cylinder engines
- Engine overhaul
- Cooling and heating
- Fuel and exhaust system
- Starting and charging system
- Ignition system
- Transmission
- Clutch
- Mechanical gearbox
- Automatic gearbox
- Cardan and drive shafts
- Chassis
- Brake system
- Wheel suspension
- Steering
- Body
- Exterior
- Interior
- Electrical equipment
- Equipment and devices
- Electrical circuits
- General information
- Maintenance
- Power unit
- Engine repair
- Cooling system
- Ignition system
- Supply system
- Fuel injection system
- Exhaust system
- Transmission
- Clutch
- Car gearbox
- Front and rear axle
- Chassis
- Steering
- Brake system
- Body
- Exterior
- Interior
- Electrical equipment
- Heating system
- Equipment and devices
- Power devices
- Electrical circuits
- Power unit
- M10/M20 engine
- M40 engine
- Ignition system
- Lubrication system
- Cooling system
- Supply system
- Fuel injection
- Exhaust system
- Transmission
- Clutch
- Manual gearbox
- Front axle
- Rear axle
- Chassis
- Steering
- Brake system
- Body
- Exterior
- Interior
- Electrical equipment
- Heating system
- Equipment and devices
- Electrical circuits
- General information
- Specifications
- Operation and maintenance
- 4-cylinder engine
- Engine repair
- Cooling and lubrication system
- Supply system
- Ignition system
- 6-cylinder engine
- Engine repair
- Cooling and lubrication system
- Supply system
- Fuel injection system
- Ignition system
- Transmission
- Clutch
- 4-speed manual gearbox
- 5-speed manual gearbox
- Automatic gearbox
- Cardan and rear axle
- Chassis
- Steering
- Front suspension
- Rear suspension
- Brake system
- Electrical equipment
- Equipment and devices
- Electrical circuits