
Table of contents: Removal ↓ Installation and adjustment ↓
- Home
- BMW 3 Series
- E46
- Body
- Exterior
- Hood — removal, installation and adjustment
Hood — removal, installation and adjustment (BMW 3 Series E46)
Removal
1. Open the hood and have an assistant support it. Use a pencil or marker to mark the position of the hinges relative to the hood (to facilitate subsequent installation).
2. Disconnect the hoses from the windshield washer nozzles. On models with heated nozzles, disconnect the electrical connectors from the nozzles. Tie string to the hoses/wires, then pull the hoses/wires out of the hood. Secure the string to the hood.
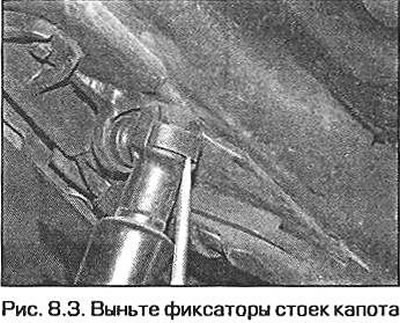
3. With the help of an assistant, support the hood in the open position, then remove the clamps and disconnect the struts (Fig. 8.3).
4. Remove the rear bolts securing the hinges to the hood, then loosen the front bolts. Slide the hood forward, disconnect it from the hinges, and remove it from the vehicle. Remove the spacers located between the hinges and the hood.
5. Inspect the hood hinges for wear and play. Replace the hinges if necessary. Each hinge is secured to the body with two bolts. Mark the position of the hinges relative to the body, then unscrew the mounting bolts and remove them from the vehicle. When installing, align the hinges with the marks made before removal and tighten the mounting bolts securely.
Installation and adjustment
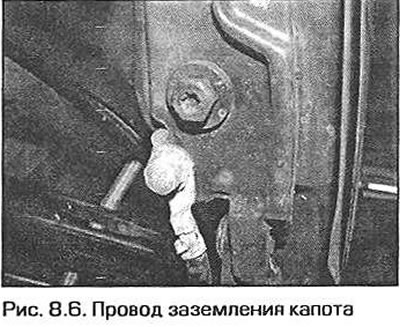
6. Install the gaskets on the hinges (if they exist), then, with the help of an assistant, align the hood with the hinges. Insert the rear mounting bolts and screw them in by hand. Align the marks on the hood and hinges made before removal, then tighten the mounting bolts securely. Keep in mind that the ground wire is attached to the left hinge (Fig. 8.6).
7. Close the hood and check its position relative to the surrounding panels. If necessary, loosen the hood hinges and adjust the hood position. After completing the adjustment, tighten the mounting bolts securely and make sure the hood opens and closes easily. Tie the hoses/wires to the strings and pull them through the hood openings. Connect the hoses/wires to the washer nozzles.
This article is available at russian, bulgarian, belarusian, ukrainian, serbian, croatian, romanian, polish, slovak, hungarian
Article verified: Ilyinsky Matvey
Share information:
Previous articles
БМВ E46: Exterior
Next articles
Similar articles on other types of BMW cars:
Removal, installation and adjustment of the hood BMW 5 Series E28 (1981-1988)
Removal and installation the engine compartment hood cable BMW 5 Series E34 (1988-1996)
Removal, installation and adjustment of the hood, replacement of its… BMW 7 Series E38 (1994-2001)
Door — removal, installation and adjustment BMW 7 Series E32 (1986-1994)
Removal and installation the hood BMW X3 E83 (2003-2010)
Hood — removal, installation and adjustment BMW X5 E53 (1999-2006)
Link in different formats to this page
Visitor comments
No comments yet
- General information
- Manual
- Maintenance
- Power unit
- Engine repair
- Cooling system
- Power system (gasoline)
- Injection system (gasoline)
- Fuel system (diesel)
- Exhaust system
- Ignition system
- Charge and launch systems
- Transmission
- Car gearbox
- Clutch and drive shafts
- Chassis
- Brake system
- Suspension front and rear
- Steering
- Body
- Body care and repair
- Exterior
- Interior
- Electrical equipment
- Troubleshooting
- Lighting and signaling
- Equipment and devices
- Heater and air conditioner
- Electrical circuits
- General information
- Manual
- Repair on the road
- Weekly checks
- Maintenance
- Troubleshooting
- Power unit
- 4 cylinder engines
- 6 cylinder engines
- Engine overhaul
- Cooling and heating
- Fuel and exhaust system
- Starting and charging system
- Ignition system
- Transmission
- Clutch
- Mechanical gearbox
- Automatic gearbox
- Cardan and drive shafts
- Chassis
- Brake system
- Wheel suspension
- Steering
- Body
- Exterior
- Interior
- Electrical equipment
- Equipment and devices
- Electrical circuits
- General information
- Maintenance
- Power unit
- Engine repair
- Cooling system
- Ignition system
- Supply system
- Fuel injection system
- Exhaust system
- Transmission
- Clutch
- Car gearbox
- Front and rear axle
- Chassis
- Steering
- Brake system
- Body
- Exterior
- Interior
- Electrical equipment
- Heating system
- Equipment and devices
- Power devices
- Electrical circuits
- Power unit
- M10/M20 engine
- M40 engine
- Ignition system
- Lubrication system
- Cooling system
- Supply system
- Fuel injection
- Exhaust system
- Transmission
- Clutch
- Manual gearbox
- Front axle
- Rear axle
- Chassis
- Steering
- Brake system
- Body
- Exterior
- Interior
- Electrical equipment
- Heating system
- Equipment and devices
- Electrical circuits
- General information
- Specifications
- Operation and maintenance
- 4-cylinder engine
- Engine repair
- Cooling and lubrication system
- Supply system
- Ignition system
- 6-cylinder engine
- Engine repair
- Cooling and lubrication system
- Supply system
- Fuel injection system
- Ignition system
- Transmission
- Clutch
- 4-speed manual gearbox
- 5-speed manual gearbox
- Automatic gearbox
- Cardan and rear axle
- Chassis
- Steering
- Front suspension
- Rear suspension
- Brake system
- Electrical equipment
- Equipment and devices
- Electrical circuits