
Table of contents: Removal ↓ Installation ↓
- Home
- BMW 3 Series
- E46
- Body
- Exterior
- Hood Lock Cable — Removal and Installation
Hood Lock Cable — Removal and Installation (BMW 3 Series E46)
Removal
1. The hood lock cable consists of three sections. The first section goes from the opening handle to the connector located on the right mudguard of the engine compartment (next to the windshield washer reservoir), the second section goes to the right lock, and the third section connects the left and right locks.
Cable between the opening handle and the connection
2. Open the driver's door and carefully remove the threshold trim.
3. Remove the portion of the door frame seal located opposite the side trim panel in the footwell area.
4. Remove the clips and remove the trim panel located above the pedals. After removing the panel, disconnect all electrical wiring connectors.
5. Remove the screw and remove the hood release handle.
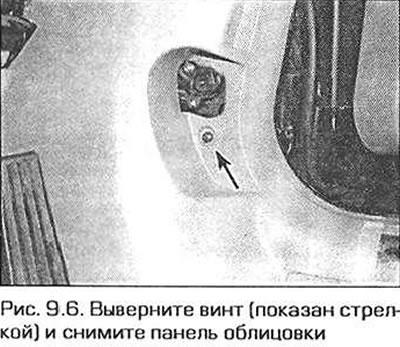
6. Remove the screw and remove the side trim panel (Fig. 9.6).
7. Disconnect the cable from the handle.
8. Pull out (or push out) cable sheath through the bulkhead and remove the cable from the engine compartment.
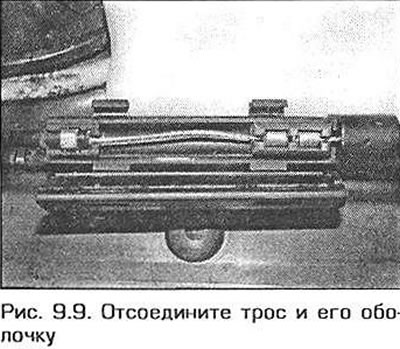
9. Remove the cable connector housing from the mudguard. Open the housing and disconnect the cable and its sheath (Fig. 9.9).
Cable between connector and lock
10. Remove the connector from the mudguard. Open the connector and disconnect the cable and its sheath (see fig. 9.9).
11. Remove the hood lock located on the driver's side (see paragraph 10).
Cable connecting the hood locks
12. The procedure for removing this cable is part of the procedure for removing the hood locks (see paragraph 10).
Installation
13. Installation is performed in the reverse order of removal. In this case, it is necessary to correctly route the cable and secure it with all the clamps provided for this purpose. Before closing the hood, move the lock handle and make sure that the lock opens.
This article is available at russian, bulgarian, belarusian, ukrainian, serbian, croatian, romanian, polish, slovak, hungarian
Article verified: Ilyinsky Matvey
Share information:
Previous articles
БМВ E46: Exterior
Next articles
Similar articles on other types of BMW cars:
Removal and installation the engine compartment hood cable BMW 5 Series E34 (1988-1996)
Removal and installation the door lock cylinder BMW 5 Series E39 (1995-2003)
Engine hood — removal and installation BMW 7 Series E32 (1986-1994)
Removal and installation the ignition switch and steering wheel lock BMW 7 Series E38 (1994-2001)
Removal and installation the hood BMW X3 E83 (2003-2010)
Removal and installation the upper luggage door lock BMW X5 E53 (1999-2006)
Link in different formats to this page
Visitor comments
No comments yet
- General information
- Manual
- Maintenance
- Power unit
- Engine repair
- Cooling system
- Power system (gasoline)
- Injection system (gasoline)
- Fuel system (diesel)
- Exhaust system
- Ignition system
- Charge and launch systems
- Transmission
- Car gearbox
- Clutch and drive shafts
- Chassis
- Brake system
- Suspension front and rear
- Steering
- Body
- Body care and repair
- Exterior
- Interior
- Electrical equipment
- Troubleshooting
- Lighting and signaling
- Equipment and devices
- Heater and air conditioner
- Electrical circuits
- General information
- Manual
- Repair on the road
- Weekly checks
- Maintenance
- Troubleshooting
- Power unit
- 4 cylinder engines
- 6 cylinder engines
- Engine overhaul
- Cooling and heating
- Fuel and exhaust system
- Starting and charging system
- Ignition system
- Transmission
- Clutch
- Mechanical gearbox
- Automatic gearbox
- Cardan and drive shafts
- Chassis
- Brake system
- Wheel suspension
- Steering
- Body
- Exterior
- Interior
- Electrical equipment
- Equipment and devices
- Electrical circuits
- General information
- Maintenance
- Power unit
- Engine repair
- Cooling system
- Ignition system
- Supply system
- Fuel injection system
- Exhaust system
- Transmission
- Clutch
- Car gearbox
- Front and rear axle
- Chassis
- Steering
- Brake system
- Body
- Exterior
- Interior
- Electrical equipment
- Heating system
- Equipment and devices
- Power devices
- Electrical circuits
- Power unit
- M10/M20 engine
- M40 engine
- Ignition system
- Lubrication system
- Cooling system
- Supply system
- Fuel injection
- Exhaust system
- Transmission
- Clutch
- Manual gearbox
- Front axle
- Rear axle
- Chassis
- Steering
- Brake system
- Body
- Exterior
- Interior
- Electrical equipment
- Heating system
- Equipment and devices
- Electrical circuits
- General information
- Specifications
- Operation and maintenance
- 4-cylinder engine
- Engine repair
- Cooling and lubrication system
- Supply system
- Ignition system
- 6-cylinder engine
- Engine repair
- Cooling and lubrication system
- Supply system
- Fuel injection system
- Ignition system
- Transmission
- Clutch
- 4-speed manual gearbox
- 5-speed manual gearbox
- Automatic gearbox
- Cardan and rear axle
- Chassis
- Steering
- Front suspension
- Rear suspension
- Brake system
- Electrical equipment
- Equipment and devices
- Electrical circuits