
Table of contents: Basic information ↓ Bleeding the brake system ↓
- Home
- BMW 3 Series
- E46
- Chassis
- Brake system
- Hydraulic system — air removal
Hydraulic system — air removal (BMW 3 Series E46)
Warning! Brake fluid is poisonous. If it gets on your skin, wash it off immediately and thoroughly. If it gets into your eyes, seek medical attention. Certain types of fluids are flammable and can ignite when they come into contact with hot surfaces. When servicing hydraulic systems, it is recommended to assume that the working fluid can ignite and take fire safety measures as if you were dealing with gasoline. Working fluids damage paint and plastic. If the fluid gets on such surfaces, wash it off immediately and thoroughly with clean water. Working fluids are also hygroscopic (actively absorb moisture from the air). Therefore, fluids with a significant shelf life may contain impurities and cannot be used. When filling the hydraulic system, always use the recommended type of fluid and drink it from a sealed container immediately after opening.
Caution! On models with ABS (with or without ASC+T system), after disconnecting the high-pressure lines connecting the hydraulic unit with the master cylinder and accumulator (if it exists) bleeding of the system must be performed at a specialized service station. These stations have special equipment for safe bleeding of such systems.
Basic information
1. Reliable operation of any hydraulic system is possible only after removing air from all circuits and components. This is achieved by bleeding the system.
2. When bleeding, add only clean working fluid of the recommended type to the system. Never add fluid that has been drained from the system. Before starting work, make sure that you have a sufficient amount of working fluid.
3. If you suspect the presence of a fluid of an unspecified composition in the hydraulic system, then in this case it is necessary to flush the circuits and components of the brake system with a clean working fluid of the recommended type, and also replace all seals.
4. If hydraulic fluid is leaking from the hydraulic system or air is entering the system due to a leak, correct the malfunction before proceeding with the following procedures.
5. Place the car on a level surface. Turn off the engine. Engage first or reverse gear. Then place chocks under the wheels and release the parking brake.
6. Make sure all pipes and hoses are in good condition, connections and air bleed screws are tight. Clean dirt around the bleed screws.
7. Unscrew the cap of the reserve reservoir of the master cylinder. Pour brake fluid into the reservoir up to the "MAX" mark. Install the reservoir cap (without wrapping it). Remember that to prevent air from entering the system during bleeding, it is necessary to maintain the fluid level in the tank at least above the "MIN" mark.
8. You can purchase one of the kits designed for self-bleeding of brakes. It is recommended to always use such a kit, as it significantly simplifies the bleeding process and reduces the risk of displaced air and drained fluid returning to the system. If you do not have such a kit, use the basic bleeding method, which requires the participation of two people, described in detail below.
9. If you are using a bleeding kit, prepare the vehicle for bleeding (see above) and follow the manufacturer's instructions. Bleeding procedures may vary depending on the type of kit. Below is only a basic outline of how to perform it.
10. To remove air from the system by any means, it is necessary to follow the sequence specified in paragraphs 11 and 12.
Bleeding the brake system
Pumping sequence
11. When disconnecting individual components in any part of the system, taking precautions to reduce leaks, only that part of the system must be bled.
12. If it is necessary to bleed the entire system, perform the procedures in the following sequence:
- a) Rear right brake
- 6) Rear left brake
- c) Front right brake
- d) Front left brake
Attention! In models with ABS system (with or without ASC+T system) after bleeding the brake system, you should contact a specialized service station as soon as possible to check the operation of the brake system.
The main method of pumping with the participation of two people
13. Prepare a clean glass container, a rubber or plastic tube of suitable length to be pulled over the bleed screw, and a spanner to turn the screw. You will also need an assistant.
14. Remove the dust cap from the first (according to the above sequence) bleed screw. Put a key and a tube on the screw. Lower the free end of the tube into the container and pour in enough liquid so that its level is above the end of the tube.
15. When performing this procedure, it is necessary to maintain the fluid level in the master cylinder reservoir at least not below the "MIN" mark.
16. Ask an assistant to fully depress the brake pedal several times to build up pressure in the system and hold it in the depressed position.
17. With the pedal depressed, unscrew the air bleed screw (about one turn) to release liquid and air under pressure into the container. The assistant should hold the pedal down, pressing it to the floor if necessary, and not release it without your command. When the liquid stops flowing from the tube, tighten the screw, and the assistant should slowly release the pedal. Check the liquid level in the tank.
18. Repeat the operations specified in paragraphs 16 and 17 until the fluid flowing out of the bleed screw no longer contains air bubbles. If the master cylinder has been emptied and then refilled with brake fluid, and air continues to come out of the first (in the pumping sequence) cylinder, then before continuing the bleeding procedure it is necessary to pause (about 5 seconds) to fill the channels of the master cylinder.
19. After the air bubbles in the liquid flow disappear, tighten the bleed screw securely. Then remove the tube and key. Install the dust cap. Do not apply excessive force when tightening.
20. Repeat the bleeding procedure for the remaining working cylinders (in the pumping sequence) until the air is completely removed from the system and the brake pedal becomes "hard" again.
Bleeding using a shut-off valve kit
21. As the name suggests, this kit contains a tube with a shut-off valve, which is designed to prevent the air and liquid displaced from the system from returning back into the system. This kit may include a transparent container that can be conveniently positioned to allow air bubbles to be observed escaping from the tube (Fig. 2.21).
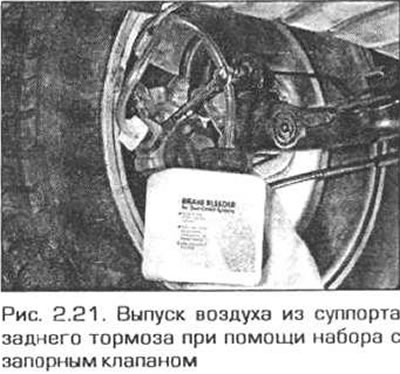
22. This kit should be connected to the air bleed screw, and then unscrew the screw. After this, you should return to the driver's seat and smoothly and evenly press the brake pedal, and then slowly release it. Repeat the procedure until the air bubbles in the flowing liquid disappear.
23. When using such a convenient tool, do not forget to control the liquid level in the tank, which should always be no lower than (at least) "MIN" marks.
Bleeding using a pressure bleeding kit
24. A kit like this usually runs on a canister of compressed air, such as a spare tire. Keep in mind that the pressure will probably need to be lower than normal (see the instructions for use included with the equipment).
Note: BMW does not allow operation at pressures exceeding 2 bar.
25. Attach a sealed container with pressurized fluid to the brake system reservoir. After this, you can begin bleeding by simply unscrewing the working cylinder screws one by one (in the above sequence). Release the liquid until there are no more air bubbles in the outgoing stream.
26. This method has the advantage that a large container of liquid provides additional protection against air penetration into the system during pumping.
27. Pressure bleeding is especially effective when used for "complex" systems or when bleeding the entire system during a scheduled fluid change.
All methods
28. After removing air from the system and restoring the "pedal stiffness", wash away any fluid leaks. Securely tighten the bleed screws and put the dust caps on them.
29. Check the fluid level in the reservoir and top up if necessary (see "Weekly check").
30. Discard the fluid drained from the system. It cannot be reused.
31. Check the sensations of pressing the brake pedal. A "soft" feeling throughout the pedal's travel means that there is air in the system and therefore it requires further bleeding. If you have repeated the bleeding procedure several times but have not achieved a satisfactory result, this may indicate wear of the master cylinder seals.
This article is available at russian, bulgarian, belarusian, ukrainian, serbian, croatian, romanian, polish, slovak, hungarian
Article verified: Ilyinsky Matvey
Share information:
Previous articles
БМВ E46: Brake system
Next articles
Similar articles on other types of BMW cars:
Description, removal and installation of the brake system vacuum… BMW 5 Series E28 (1981-1988)
Hydraulic power steering system BMW 5 Series E12 (1972-1981)
Removal and installation of the exhaust system BMW 7 Series E38 (1994-2001)
Removal air from the fuel system BMW 7 Series E32 (1986-1994)
Removal and installation the airbag system module in the left or… BMW X3 E83 (2003-2010)
Hydraulic clutch system BMW X5 E53 (1999-2006)
Description, removal and installation of the brake system vacuum… BMW 5 Series E28 (1981-1988)
Hydraulic power steering system BMW 5 Series E12 (1972-1981)
Removal and installation of the exhaust system BMW 7 Series E38 (1994-2001)
Removal air from the fuel system BMW 7 Series E32 (1986-1994)
Removal and installation the airbag system module in the left or… BMW X3 E83 (2003-2010)
Hydraulic clutch system BMW X5 E53 (1999-2006)
Link in different formats to this page
Visitor comments
No comments yet
- General information
- Manual
- Maintenance
- Power unit
- Engine repair
- Cooling system
- Power system (gasoline)
- Injection system (gasoline)
- Fuel system (diesel)
- Exhaust system
- Ignition system
- Charge and launch systems
- Transmission
- Car gearbox
- Clutch and drive shafts
- Chassis
- Brake system
- Suspension front and rear
- Steering
- Body
- Body care and repair
- Exterior
- Interior
- Electrical equipment
- Troubleshooting
- Lighting and signaling
- Equipment and devices
- Heater and air conditioner
- Electrical circuits
- General information
- Manual
- Repair on the road
- Weekly checks
- Maintenance
- Troubleshooting
- Power unit
- 4 cylinder engines
- 6 cylinder engines
- Engine overhaul
- Cooling and heating
- Fuel and exhaust system
- Starting and charging system
- Ignition system
- Transmission
- Clutch
- Mechanical gearbox
- Automatic gearbox
- Cardan and drive shafts
- Chassis
- Brake system
- Wheel suspension
- Steering
- Body
- Exterior
- Interior
- Electrical equipment
- Equipment and devices
- Electrical circuits
- General information
- Maintenance
- Power unit
- Engine repair
- Cooling system
- Ignition system
- Supply system
- Fuel injection system
- Exhaust system
- Transmission
- Clutch
- Car gearbox
- Front and rear axle
- Chassis
- Steering
- Brake system
- Body
- Exterior
- Interior
- Electrical equipment
- Heating system
- Equipment and devices
- Power devices
- Electrical circuits
- Power unit
- M10/M20 engine
- M40 engine
- Ignition system
- Lubrication system
- Cooling system
- Supply system
- Fuel injection
- Exhaust system
- Transmission
- Clutch
- Manual gearbox
- Front axle
- Rear axle
- Chassis
- Steering
- Brake system
- Body
- Exterior
- Interior
- Electrical equipment
- Heating system
- Equipment and devices
- Electrical circuits
- General information
- Specifications
- Operation and maintenance
- 4-cylinder engine
- Engine repair
- Cooling and lubrication system
- Supply system
- Ignition system
- 6-cylinder engine
- Engine repair
- Cooling and lubrication system
- Supply system
- Fuel injection system
- Ignition system
- Transmission
- Clutch
- 4-speed manual gearbox
- 5-speed manual gearbox
- Automatic gearbox
- Cardan and rear axle
- Chassis
- Steering
- Front suspension
- Rear suspension
- Brake system
- Electrical equipment
- Equipment and devices
- Electrical circuits