



Table of contents: Checking the lambda probe heating ↓ Replacement ↓
- Home
- BMW 5 Series
- E34
- General information
- Maintenance
- Checking and replacing the lambda probe
Checking and replacing the lambda probe (BMW 5 Series E34)
Every 80,000 km, the lambda probe must be checked for proper operation with the measuring device in the installed position; experience has shown that the lambda probe must be replaced after 100,000 km. A full check can be carried out at a BMW service station via the diagnostic connector. However, the lambda probe's functionality can already be confirmed by checking the CO content, which also includes checking the lambda control.
Since the lambda probe only works properly when hot, it is additionally heated when the engine warms up. Thanks to this, the lambda control starts to function normally within 1-2 minutes after starting the engine. If, in addition to checking the CO content, the lambda probe heating is checked, it can be assumed that the lambda control is functioning.
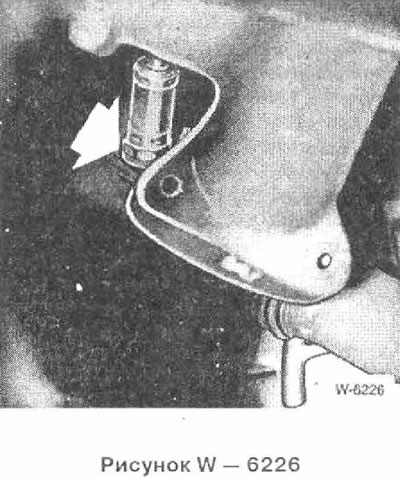
Check the reliability of the lambda probe fastening in the front exhaust pipe.
Screw the detachable connection of the lambda probe onto the bulkhead (Figure 2210).
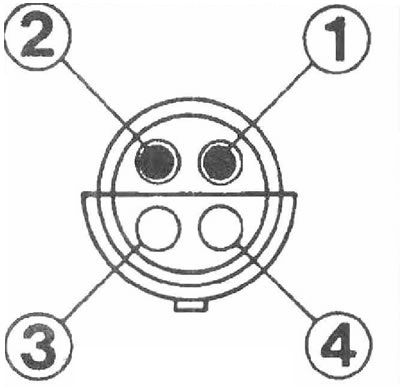
1 Lambda probe power connector (-)
2 Lambda probe power connector (+)
3 and 4 Lambda probe heating sockets
Checking the lambda probe heating: Connect the ohmmeter to sockets 3 and 4 (from the side of the lambda probe connector) and measure the resistance. Specified value: maximum 5 Ohm, otherwise replace the lambda probe.
To replace the lambda probe, you need to purchase a special BMW paste for threads. In addition, pay attention to the fact that the lambda probe does not touch the body of the probe from the front.
The website served as the basis for the text BMWman
Checking the lambda probe heating
Since the lambda probe only works properly when hot, it is additionally heated when the engine warms up. Thanks to this, the lambda control starts to function normally within 1-2 minutes after starting the engine. If, in addition to checking the CO content, the lambda probe heating is checked, it can be assumed that the lambda control is functioning.
Check the reliability of the lambda probe fastening in the front exhaust pipe.
Screw the detachable connection of the lambda probe onto the bulkhead (Figure 2210).
1 Lambda probe power connector (-)
2 Lambda probe power connector (+)
3 and 4 Lambda probe heating sockets
Checking the lambda probe heating: Connect the ohmmeter to sockets 3 and 4 (from the side of the lambda probe connector) and measure the resistance. Specified value: maximum 5 Ohm, otherwise replace the lambda probe.
Replacement
To replace the lambda probe, you need to purchase a special BMW paste for threads. In addition, pay attention to the fact that the lambda probe does not touch the body of the probe from the front.
The website served as the basis for the text BMWman
This article is available at russian, bulgarian, belarusian, ukrainian, serbian, croatian, romanian, polish, slovak, hungarian
Article verified: Polikarpov Saveliy
Share information:
Previous articles
БМВ E34: Maintenance
Next articles
Similar articles on other types of BMW cars:
Checking the level and replacing the oil in the automatic transmission BMW 3 Series E21 (1975-1983)
Valve guides — checking and replacing BMW 7 Series E32 (1986-1994)
Checking the engine oil level and replacing it BMW X5 E53 (1999-2006)
Replacing the intake camshaft BMW X3 E83 (2003-2010)
Checking the level and replacing the oil in the automatic transmission BMW 3 Series E21 (1975-1983)
Valve guides — checking and replacing BMW 7 Series E32 (1986-1994)
Checking the engine oil level and replacing it BMW X5 E53 (1999-2006)
Replacing the intake camshaft BMW X3 E83 (2003-2010)
Link in different formats to this page
Visitor comments
No comments yet
- General information
- Governing bodies
- Manual
- Maintenance
- Power unit
- Engine repair
- Lubrication system
- Cooling system
- Ignition system
- Supply system
- Injection system (gasoline)
- Injection system (diesel)
- Exhaust system
- Transmission
- Clutch
- Car gearbox
- Front axle
- Rear axle
- Chassis
- Steering
- Brake system
- Wheels and tires
- Body
- Interior
- Exterior
- Heating system
- Electrical equipment
- Equipment and devices
- Power devices
- Windscreen wipers
- Electrical circuits
- General information
- Manual
- Maintenance
- Power unit
- Engine repair
- Ignition system
- Engine lubrication system
- Cooling system
- Fuel system (gasoline)
- Fuel system (diesel)
- Exhaust system
- Transmission
- Clutch
- Car gearbox
- Chassis
- Front and rear suspension
- Steering
- Brake system
- Body
- Exterior
- Interior
- Electrical equipment
- Heating system
- Equipment and devices
- Power devices
- Electrical circuits
- General information
- Manual
- Maintenance
- Power unit
- Engine in a car
- Engine overhaul
- Cooling system
- Supply system
- Ignition system
- Control system
- Transmission
- Clutch
- Manual gearbox
- Automatic gearbox
- Transmission line
- Chassis
- Steering
- Front suspension
- Rear suspension
- Brake system
- Body
- Body elements
- Car care and painting
- Electrical equipment
- Heater and air conditioner
- Equipment and devices
- Starter and generator
- Electrical circuits
- General information
- Operation and maintenance
- Specifications
- Power unit
- Engine repair
- Cooling and lubrication system
- Supply system
- Ecotronic power supply system
- Fuel injection system
- Ignition system
- Transmission
- Clutch
- Gearbox BMW 242/4
- Gearbox Getrag 262/8
- Gearbox Getrag 265/6
- Automatic gearbox
- Cardan gear
- Rear axle
- Chassis
- Steering
- Front suspension
- Rear suspension
- Brake system
- Electrical equipment
- Equipment and devices
- Electrical circuits