
- Home
- BMW 7 Series
- E38
- Electrical equipment
- Heating and air conditioning
- Removal and installation of deflectors for heating, ventilation and air conditioning systems
Removal and installation of deflectors for heating, ventilation and air conditioning systems (BMW 7 Series E38)
Side deflectors
1. Before removal left deflector, follow these steps:
- 2. Remove the wooden strip and disconnect the connector of the instrument panel illumination and headlight leveling switches;
Wooden plank
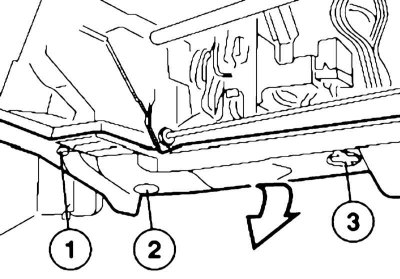
- Turn the top ones inside out (without spacer washer) and lower (with spacer washer) mounting bolts and remove the left glove box. Unhook the parking brake release cable.
Left glove box fastener
2. Before removal right deflector, follow these steps:
- Open and tilt down the glove box. Remove the screws and bend the top of the glove box trim;
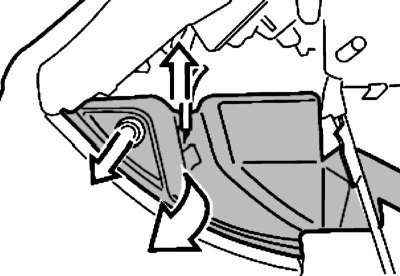
Left side deflector retainers
- Disconnect the connectors from the switch and the glove compartment light and remove the trim.
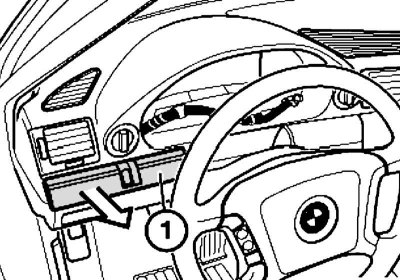
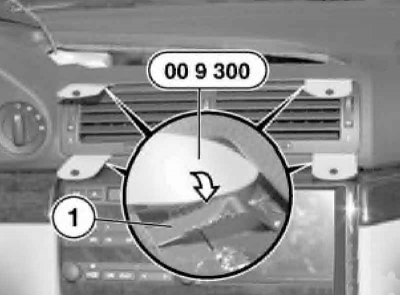
3. Close the deflector. Move the sound insulation (1) slightly downwards to provide access to both deflector fasteners.
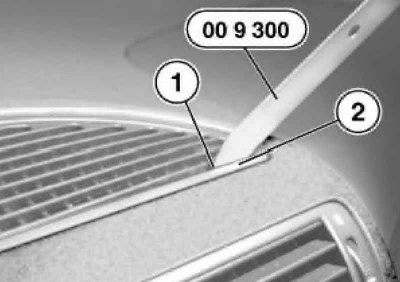
4. Press first one, then the second deflector retainer. To prevent the pressed retainer from locking, install a thin wide plate (tool No.00 9 300) between the lower edge of the deflector and its socket.
5. Separate the air supply hose from the deflector.
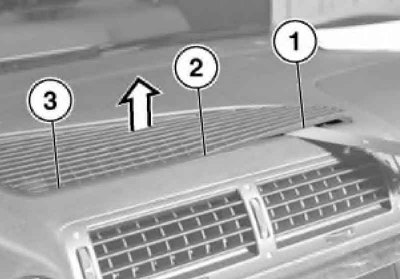
Upper and central deflectors
When removing the deflectors of models with an integrated heating and air conditioning system, go to paragraph 6. In paragraphs with 1 to 5 describes the preparatory operations for removing the deflectors of models with adjustable air conditioning system.

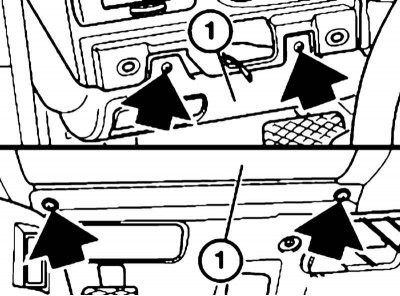
1. Loosen the screw (1), slightly lift the trim panel (2) of the front passenger footwell and remove it by moving it towards you (3).
2. Unscrew the bolts (1) and remove the rivets (2 and 3) securing the lower panel of the right glove compartment. Pull the trim forward, remove and disconnect the buzzer connector.
3. Open and tilt down the glove box. Remove the screws and bend back the top of the glove box trim (see illustration). Disconnect the connectors of the switch and the glove compartment light and remove the trim.
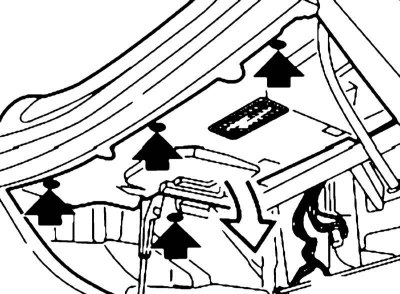
4. Remove the rivets, pull the connector upwards and remove the side trim panels. Remove the air duct in the footwell from its fasteners.
5. Disconnect the air temperature control flap drive cable.
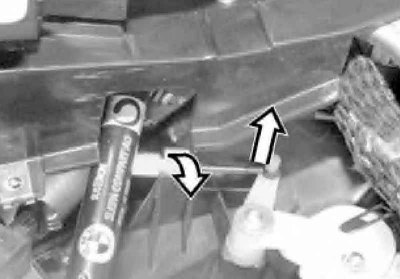
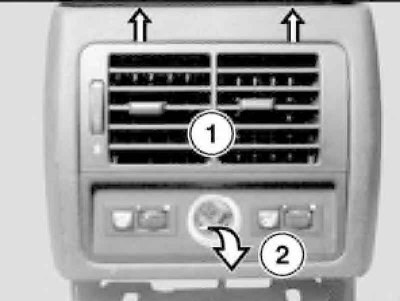
6. Insert tool No.00 9 300 between the upper deflector (1) and the frame (2).
7. Sequentially release the upper grille fasteners at points (1-3), hook and remove the grille.
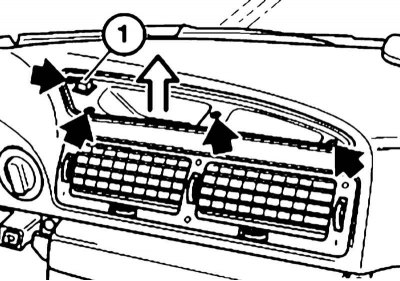
8. Remove the screws. Hook and remove the ventilation nozzle frame, disconnect the K/L connector (1).
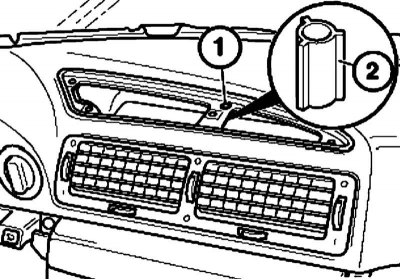
9. Unscrew the screw (1) and remove the spacer (2).
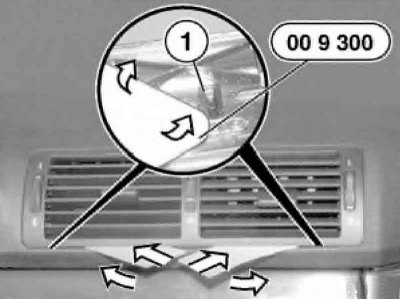
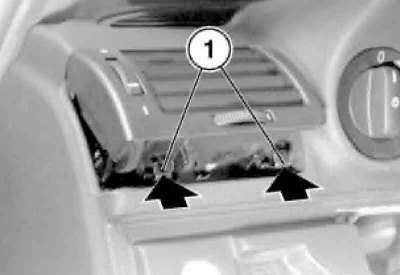
10. Close the deflector, press it slightly upwards and insert both tools No.00 9 300 from below into the gap between the deflector and the instrument panel so as to press the clips (1).
11. Press the upper fasteners in the same way.
12. Place both hands into the opening of the upper deflector and push out the central deflectors from the inside.
13. Installation is carried out in reverse order.
Rear air vent
Depending on the configuration, a heater control panel or a decorative strip may be installed under the deflector. In any case, deflector removal is performed in the same way.
1. Slightly press the deflector (1) and the heater control panel (2) apart. Press the latches and remove the heater control panel first from the upper guide groove, then pull the deflector upwards and remove the control panel.
2. Move the deflector down by about 35 mm and remove it from the recesses in the guide grooves.
3. To install, insert the deflector (1) into the recesses in the middle of the guide grooves and insert it all the way up. Then install the decorative strip or the heater control panel.
This article is available at russian, bulgarian, belarusian, ukrainian, serbian, croatian, romanian, polish, slovak, hungarian
Article verified: Polikarpov Saveliy
Share information:
Previous articles
БМВ E38: Heating and air conditioning
Next articles
Similar articles on other types of BMW cars:
Heating and ventilation system elements — removal and installation BMW 3 Series E46 (1998-2006, petrol)
Removal and installation switches: seat heating / sunblind / Hi-Fi /… BMW 3 Series E46 (1998-2006)
Removal and installation the heating/air conditioning control unit BMW 5 Series E39 (1995-2003)
Heating, ventilation and air conditioning BMW 5 Series E34 (1988-1996)
Pistons — removal and installation BMW X3 E83 (2003-2010)
Removal and installation of the module of the systems in the airbag… BMW X5 E53 (1999-2006)
Link in different formats to this page
Visitor comments
No comments yet
- General information
- Introduction to guide
- Manual
- Maintenance
- Power unit
- Engine M60/1, M60/2 (petrol)
- M62 engine (petrol)
- M57 engine (diesel)
- M67 engine (diesel)
- Cooling system
- Fuel system (petrol)
- Fuel system (diesel)
- Exhaust system
- Ignition and control systems
- Charge and launch systems
- Transmission
- Clutch
- Mechanical gearbox
- Automatic gearbox
- Cardan and drive shafts
- Chassis
- Brake system
- Front suspension
- Rear suspension
- Steering
- Body
- Exterior
- Interior
- Electrical equipment
- Equipment and devices
- Lighting
- Heating and air conditioning
- Electrical circuits
- General information
- Care and maintenance
- Power unit
- Minor engine repair
- Engine overhaul
- Lubrication system
- Cooling system
- Ignition system
- Supply system
- Injection system (petrol)
- Injection system (diesel)
- Exhaust system
- Transmission
- Clutch
- Manual gearbox
- Automatic gearbox
- Cardan gear
- Rear axle and shafts
- Chassis
- Front suspension
- Rear suspension
- Steering
- Wheels and tires
- Brake system
- Body
- Body elements
- Electrical equipment
- Equipment and devices
- Electrical circuits