
Table of contents: Additional water pump (on the fan…↓ Heater water valve ↓
- Home
- BMW 7 Series
- E38
- Electrical equipment
- Heating and air conditioning
- Removal and installation an additional water pump and water valve
Removal and installation an additional water pump and water valve (BMW 7 Series E38)
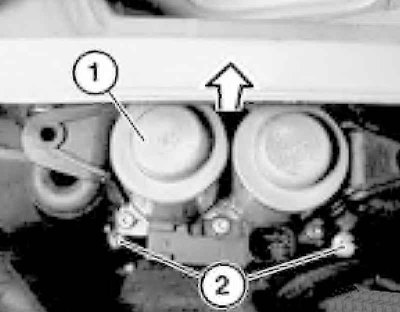
Additional water pump (on the fan casing)
1. Remove the front engine accessory protection panel.
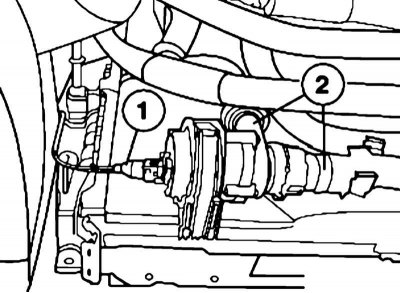
2. Disconnect the connector (1) and remove the water hoses (2).
3. Remove the brackets and auxiliary water pump.
4. Installation is carried out in reverse order. Finally, bleed the cooling system.
Heater water valve
Below is a description for the model with the M67 engine, on other models this procedure is performed similarly.
The procedure for removing and installing the water valve of the heating system and the A/C of the rear compartment is described in the description of the removal and installation of the radiator of the heater of the rear compartment (see section Removal and installation the heater radiator).
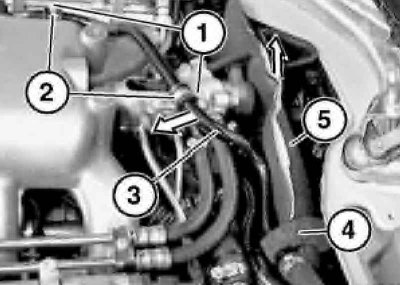
1. Remove the air outlet duct and soundproof casing. Loosen the bolts (1) of the clamps (2), move the vacuum pipe (3) to the side in the direction of the arrow, and secure with clamps if necessary. Separate the contact tape (4) and remove the insulation (5) in the direction of the arrow.
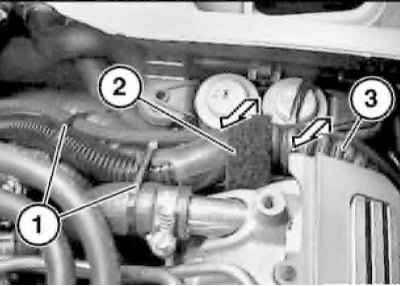
2. Remove the clamps (1) and separate the contact tape (2) in the direction indicated by the arrow. Pull out the pipes (3) in the direction indicated by the arrow and secure with clamps if necessary.
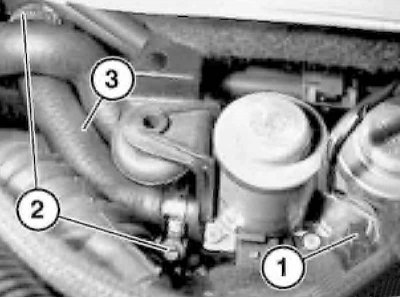
3. Disconnect the connector (1), loosen the clamps (2) and remove the water hose (3) assembly.
4. Disconnect the water valve (1) from the rubber cushions in the direction indicated by the arrow. Loosen the clamps (2) and disconnect the water hoses.
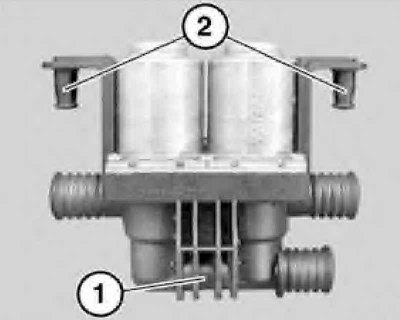
5. Installation is carried out in the reverse order. Pay attention to the correct position of the guides (1 and 2). If necessary, replace the rubber cushions.
(The original article is located on: «BMWMAN.RU»)
This article is available at russian, bulgarian, belarusian, ukrainian, serbian, croatian, romanian, polish, slovak, hungarian
Article verified: Polikarpov Saveliy
Share information:
Previous articles
БМВ E38: Heating and air conditioning
Next articles
Similar articles on other types of BMW cars:
Removal and installation the water pump BMW 3 Series E21 (1975-1983)
Removal and installation the water pump BMW 3 Series E30 (1982-1994)
Removal and installation the water pump BMW 5 Series E34 (1988-1996)
Removal and installation the water pump BMW 5 Series E28 (1981-1988)
Water pump (N47) BMW X3 E83 (2003-2010)
Removal and installation the engine BMW X5 E53 (1999-2006)
Link in different formats to this page
Visitor comments
No comments yet
- General information
- Introduction to guide
- Manual
- Maintenance
- Power unit
- Engine M60/1, M60/2 (petrol)
- M62 engine (petrol)
- M57 engine (diesel)
- M67 engine (diesel)
- Cooling system
- Fuel system (petrol)
- Fuel system (diesel)
- Exhaust system
- Ignition and control systems
- Charge and launch systems
- Transmission
- Clutch
- Mechanical gearbox
- Automatic gearbox
- Cardan and drive shafts
- Chassis
- Brake system
- Front suspension
- Rear suspension
- Steering
- Body
- Exterior
- Interior
- Electrical equipment
- Equipment and devices
- Lighting
- Heating and air conditioning
- Electrical circuits
- General information
- Care and maintenance
- Power unit
- Minor engine repair
- Engine overhaul
- Lubrication system
- Cooling system
- Ignition system
- Supply system
- Injection system (petrol)
- Injection system (diesel)
- Exhaust system
- Transmission
- Clutch
- Manual gearbox
- Automatic gearbox
- Cardan gear
- Rear axle and shafts
- Chassis
- Front suspension
- Rear suspension
- Steering
- Wheels and tires
- Brake system
- Body
- Body elements
- Electrical equipment
- Equipment and devices
- Electrical circuits