
Table of contents: Removal ↓ Installation ↓
- Home
- BMW 3 Series
- E36
- Electrical equipment
- Equipment and devices
- Removal and installation headlights
Removal and installation headlights (BMW 3 Series E36)
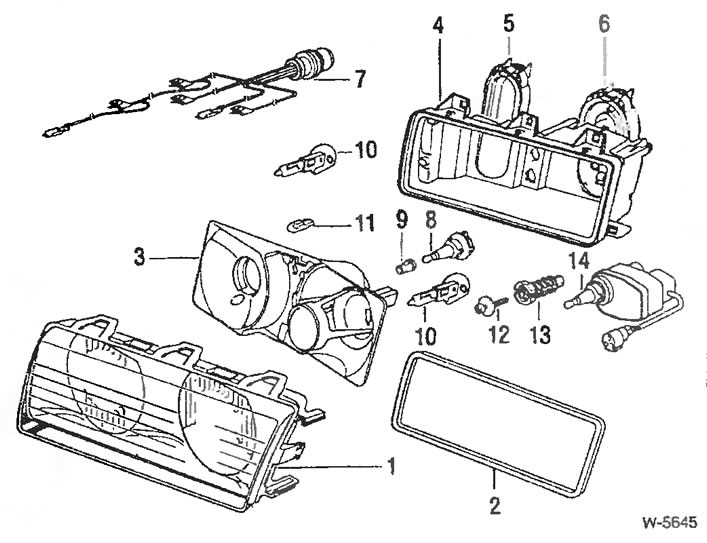
The so-called ellipsoid headlights are installed as low beam headlights and fog lights. In an ellipsoid headlight, a collecting lens is installed in front of the incandescent lamp, focusing the light of the lamp. The advantages of ellipsoid headlights are: small diameter of the headlight with a strong network of headlights at the same time; uniform illumination of the road, especially at a distance of up to 50 meters; reduction of diffuse light, thereby reducing one's own blindness in bad weather conditions and less blinding of oncoming traffic.
Open the engine compartment hood.
Disconnect the ground wire from the battery.
If necessary, remove the generator ventilation air intake or the air filter housing with the air flow meter.
Remove the direction indicator.
1. Headlight adjustment screw in horizontal plane
2. Headlight height adjustment screw
3. Diffuser mounting brackets
4. Connector
5. Headlamp leveling control motor
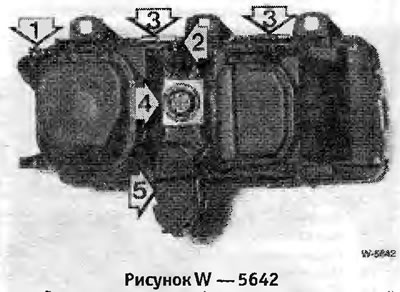
Disconnect connector "4", having first screwed on the plastic union nut.
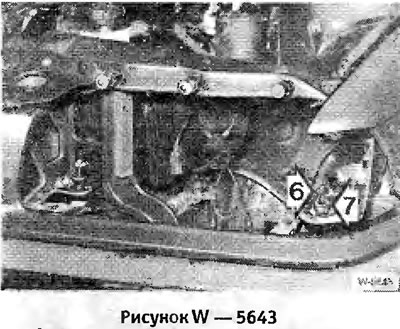
Unscrew 5 screws "6". The screws are shown in the picture on the removed headlight.
Remove the headlight.
If a headlight leveling motor is installed, turn it 90° to the left and pull it out.
If removed, insert the headlight leveling motor and turn it 90° to the right.
Insert the headlight.
First, tighten both bottom screws to the edge of the thread, while holding the expansion nuts with a wrench so that they do not turn.
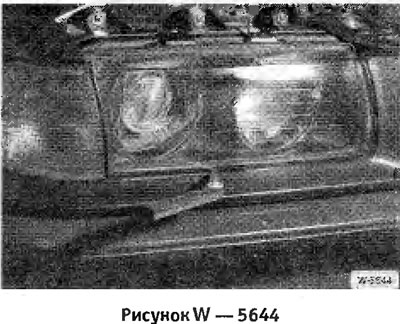
Check the clearance as shown in the figure. Specified value: 2.5 mm. If necessary, turn both lower spacer nuts accordingly.
Screw the headlight on completely, holding the spacer nuts in place.
Install the direction indicator.
Connect the connector and secure it with a plastic union nut.
If removed, install a generator ventilation air intake or an air filter with an air flow meter.
Connect the ground wire to the battery.
Adjust the headlights.
Set the time on the clock.
Set the security code for the radio receiver, see section "Setting the radio receiver code".
Removal
Open the engine compartment hood.
Disconnect the ground wire from the battery.
Caution: When the battery is disconnected, the information in the electronic memory devices, such as the engine fault memory or the radio security code memory, is erased. Disconnect the battery only when the ignition is off, so as not to damage the fuel injection system control unit. When disconnecting the battery, follow the instructions in the sections "Radio" and "Removing and installing the battery".
Note: On vehicles with a six-cylinder engine, the battery is located in the luggage compartment on the right side next to the spare wheel.
If necessary, remove the generator ventilation air intake or the air filter housing with the air flow meter.
Remove the direction indicator.
1. Headlight adjustment screw in horizontal plane
2. Headlight height adjustment screw
3. Diffuser mounting brackets
4. Connector
5. Headlamp leveling control motor
Disconnect connector "4", having first screwed on the plastic union nut.
Unscrew 5 screws "6". The screws are shown in the picture on the removed headlight.
Note: Hold the 5 spacer nuts "7" with a wrench so that they do not turn. The spacer nuts are used to adjust the headlight to the body.
Remove the headlight.
If a headlight leveling motor is installed, turn it 90° to the left and pull it out.
Installation
If removed, insert the headlight leveling motor and turn it 90° to the right.
Insert the headlight.
First, tighten both bottom screws to the edge of the thread, while holding the expansion nuts with a wrench so that they do not turn.
Check the clearance as shown in the figure. Specified value: 2.5 mm. If necessary, turn both lower spacer nuts accordingly.
Screw the headlight on completely, holding the spacer nuts in place.
Install the direction indicator.
Connect the connector and secure it with a plastic union nut.
If removed, install a generator ventilation air intake or an air filter with an air flow meter.
Connect the ground wire to the battery.
Attention: Connect the battery with the ignition off, otherwise the electronic control unit of the injection device may be damaged.
Adjust the headlights.
Set the time on the clock.
Set the security code for the radio receiver, see section "Setting the radio receiver code".
This article is available at russian, bulgarian, belarusian, ukrainian, serbian, croatian, romanian, polish, slovak, hungarian
Article verified: Chebotarev Vladislav
Share information:
Previous articles
БМВ E36: Equipment and devices
Next articles
Similar articles on other types of BMW cars:
Removal and installation headlights BMW 5 Series E34 (1988-1996)
Removal and installation headlights BMW 5 Series E39 (1995-2003)
Removal and installation of headlights and their components BMW 7 Series E38 (1994-2001)
Cylinder Head Cover — Removal and Installation BMW 7 Series E32 (1986-1994)
Pistons — removal and installation BMW X3 E83 (2003-2010)
Removal and installation headlights BMW X5 E53 (1999-2006)
Removal and installation headlights BMW 5 Series E34 (1988-1996)
Removal and installation headlights BMW 5 Series E39 (1995-2003)
Removal and installation of headlights and their components BMW 7 Series E38 (1994-2001)
Cylinder Head Cover — Removal and Installation BMW 7 Series E32 (1986-1994)
Pistons — removal and installation BMW X3 E83 (2003-2010)
Removal and installation headlights BMW X5 E53 (1999-2006)
Link in different formats to this page
Visitor comments
No comments yet
- General information
- Manual
- Maintenance
- Power unit
- Engine repair
- Cooling system
- Power system (gasoline)
- Injection system (gasoline)
- Fuel system (diesel)
- Exhaust system
- Ignition system
- Charge and launch systems
- Transmission
- Car gearbox
- Clutch and drive shafts
- Chassis
- Brake system
- Suspension front and rear
- Steering
- Body
- Body care and repair
- Exterior
- Interior
- Electrical equipment
- Troubleshooting
- Lighting and signaling
- Equipment and devices
- Heater and air conditioner
- Electrical circuits
- General information
- Manual
- Repair on the road
- Weekly checks
- Maintenance
- Troubleshooting
- Power unit
- 4 cylinder engines
- 6 cylinder engines
- Engine overhaul
- Cooling and heating
- Fuel and exhaust system
- Starting and charging system
- Ignition system
- Transmission
- Clutch
- Mechanical gearbox
- Automatic gearbox
- Cardan and drive shafts
- Chassis
- Brake system
- Wheel suspension
- Steering
- Body
- Exterior
- Interior
- Electrical equipment
- Equipment and devices
- Electrical circuits
- General information
- Maintenance
- Power unit
- Engine repair
- Cooling system
- Ignition system
- Supply system
- Fuel injection system
- Exhaust system
- Transmission
- Clutch
- Car gearbox
- Front and rear axle
- Chassis
- Steering
- Brake system
- Body
- Exterior
- Interior
- Electrical equipment
- Heating system
- Equipment and devices
- Power devices
- Electrical circuits
- Power unit
- M10/M20 engine
- M40 engine
- Ignition system
- Lubrication system
- Cooling system
- Supply system
- Fuel injection
- Exhaust system
- Transmission
- Clutch
- Manual gearbox
- Front axle
- Rear axle
- Chassis
- Steering
- Brake system
- Body
- Exterior
- Interior
- Electrical equipment
- Heating system
- Equipment and devices
- Electrical circuits
- General information
- Specifications
- Operation and maintenance
- 4-cylinder engine
- Engine repair
- Cooling and lubrication system
- Supply system
- Ignition system
- 6-cylinder engine
- Engine repair
- Cooling and lubrication system
- Supply system
- Fuel injection system
- Ignition system
- Transmission
- Clutch
- 4-speed manual gearbox
- 5-speed manual gearbox
- Automatic gearbox
- Cardan and rear axle
- Chassis
- Steering
- Front suspension
- Rear suspension
- Brake system
- Electrical equipment
- Equipment and devices
- Electrical circuits