
- Home
- BMW 3 Series
- E36
- Electrical equipment
- Equipment and devices
- Removal and installation the radio
Removal and installation the radio (BMW 3 Series E36)
Factory-installed radios come with different mounting options.
If the receiver has a sliding mount, it allows for quick removal and installation of the radio. However, this can only be done with a special tool that is included with the radio or is available in the store.
Disconnect the ground wire from the battery.
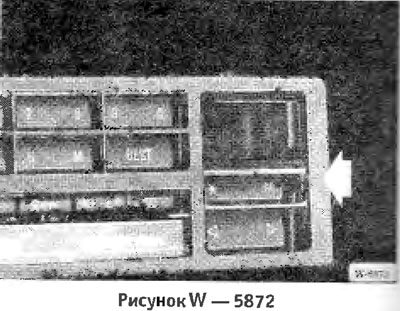
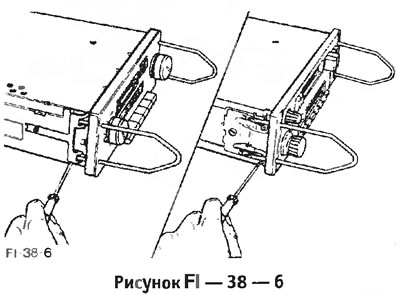
Remove the radio cover with a small screwdriver. To avoid damaging the dashboard, place a paper gasket or rag underneath.

Loosen the 2 screws "1" with a 2.5 mm open-end wrench "2" until the side mounting brackets are released so that the radio can be pulled out.
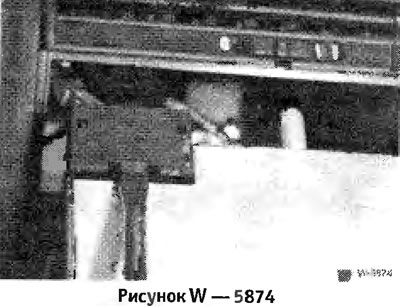
Disconnect the connector. First lift the mounting bracket.
Disconnect the antenna cable.
Connect the antenna cable.
Connect the connector. Press the mounting bracket.
Push the radio receiver into the hole until it stops.
Tighten the two screws on the left and right alternately with a spanner.
Put on the overlay.
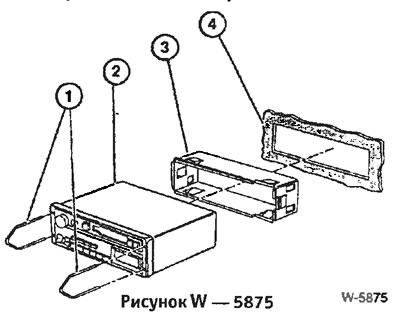
Insert the pullers "1" into the holes on the front board from the left and right.
Unclamp the pullers outwards, thus the fastening strips move apart. At the same time pull out the radio receiver. Do not allow the radio receiver to become skewed.
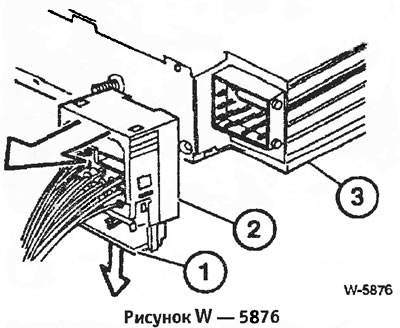
Disconnect connector "2" from the radio receiver after first removing the retaining clip "1".
Disconnect the antenna cable.
Remove the pullers. To do this, squeeze the mounting clamps with a screwdriver.
Connect the connector and antenna cable to the back of the radio.
Insert the radio into the dashboard until the latches click into place.
Connect the ground wire to the battery.
Set the time on the clock.
Set the security code for the radio receiver, see section "Setting the radio receiver code".
Door Speaker: Remove the inner door trim.
Unscrew the loudspeaker "1".
Check the operation of the radio receiver. Instructions for self-installation of the radio receiver
The serially installed connector of the cable harness is only suitable for radios from the BMW program. Pin assignment of the power connector:
It is mandatory to install certified radio interference suppression systems, otherwise the General Operating Permit will be invalidated. Radio interference suppression kits specifically for BMW vehicles with operating instructions are available for sale.
If the receiver has a sliding mount, it allows for quick removal and installation of the radio. However, this can only be done with a special tool that is included with the radio or is available in the store.
Removal
Disconnect the ground wire from the battery.
Caution: When the battery is disconnected, the information in the electronic memory devices, such as the engine fault memory or the radio security code memory, is erased. Disconnect the battery only when the ignition is off, so as not to damage the fuel injection system control unit. When disconnecting the battery, follow the instructions in the sections "Radio" and "Removing and installing the battery".
Note: On vehicles with a six-cylinder engine, the battery is located in the luggage compartment on the right side next to the spare wheel.
Radio receiver "Business"
Remove the radio cover with a small screwdriver. To avoid damaging the dashboard, place a paper gasket or rag underneath.
Loosen the 2 screws "1" with a 2.5 mm open-end wrench "2" until the side mounting brackets are released so that the radio can be pulled out.
Disconnect the connector. First lift the mounting bracket.
Disconnect the antenna cable.
Installation
Connect the antenna cable.
Connect the connector. Press the mounting bracket.
Push the radio receiver into the hole until it stops.
Tighten the two screws on the left and right alternately with a spanner.
Put on the overlay.
Radio receiver 8avaria CII/C Revers II
Insert the pullers "1" into the holes on the front board from the left and right.
Unclamp the pullers outwards, thus the fastening strips move apart. At the same time pull out the radio receiver. Do not allow the radio receiver to become skewed.
Disconnect connector "2" from the radio receiver after first removing the retaining clip "1".
Disconnect the antenna cable.
Remove the pullers. To do this, squeeze the mounting clamps with a screwdriver.
Installation
Connect the connector and antenna cable to the back of the radio.
Insert the radio into the dashboard until the latches click into place.
Connect the ground wire to the battery.
Attention: Connect the battery with the ignition off, otherwise the electronic control unit of the injection device may fail.
Set the time on the clock.
Set the security code for the radio receiver, see section "Setting the radio receiver code".
Door Speaker: Remove the inner door trim.
Unscrew the loudspeaker "1".
Check the operation of the radio receiver. Instructions for self-installation of the radio receiver
The serially installed connector of the cable harness is only suitable for radios from the BMW program. Pin assignment of the power connector:
- Contact 5 = terminal 75 - switched positive
- Contact 9 = terminal 30 - constant positive (+) power supply
- Pin 10 = GAL - Speed signal for automatic volume control (special equipment)
- Contact 13 = terminal 58g - backlight
- Contact 15 = terminal 31 - ground (-)
Caution: If a special transition cable is not installed, do not allow the presence of uninsulated wires. Otherwise, a short circuit may cause the cable to catch fire.
It is mandatory to install certified radio interference suppression systems, otherwise the General Operating Permit will be invalidated. Radio interference suppression kits specifically for BMW vehicles with operating instructions are available for sale.
This article is available at russian, bulgarian, belarusian, ukrainian, serbian, croatian, romanian, polish, slovak, hungarian
Article verified: Chebotarev Vladislav
Share information:
Previous articles
БМВ E36: Equipment and devices
Next articles
Similar articles on other types of BMW cars:
Removal and installation the radio BMW 5 Series E34 (1988-1996)
Removal and installation radio BMW 5 Series E39 (1995-2003)
Cylinder Head Cover — Removal and Installation BMW 7 Series E32 (1986-1994)
Pistons — removal and installation BMW X3 E83 (2003-2010)
Removal and installation the engine BMW X5 E53 (1999-2006)
Link in different formats to this page
Visitor comments
No comments yet
- General information
- Manual
- Maintenance
- Power unit
- Engine repair
- Cooling system
- Power system (gasoline)
- Injection system (gasoline)
- Fuel system (diesel)
- Exhaust system
- Ignition system
- Charge and launch systems
- Transmission
- Car gearbox
- Clutch and drive shafts
- Chassis
- Brake system
- Suspension front and rear
- Steering
- Body
- Body care and repair
- Exterior
- Interior
- Electrical equipment
- Troubleshooting
- Lighting and signaling
- Equipment and devices
- Heater and air conditioner
- Electrical circuits
- General information
- Manual
- Repair on the road
- Weekly checks
- Maintenance
- Troubleshooting
- Power unit
- 4 cylinder engines
- 6 cylinder engines
- Engine overhaul
- Cooling and heating
- Fuel and exhaust system
- Starting and charging system
- Ignition system
- Transmission
- Clutch
- Mechanical gearbox
- Automatic gearbox
- Cardan and drive shafts
- Chassis
- Brake system
- Wheel suspension
- Steering
- Body
- Exterior
- Interior
- Electrical equipment
- Equipment and devices
- Electrical circuits
- General information
- Maintenance
- Power unit
- Engine repair
- Cooling system
- Ignition system
- Supply system
- Fuel injection system
- Exhaust system
- Transmission
- Clutch
- Car gearbox
- Front and rear axle
- Chassis
- Steering
- Brake system
- Body
- Exterior
- Interior
- Electrical equipment
- Heating system
- Equipment and devices
- Power devices
- Electrical circuits
- Power unit
- M10/M20 engine
- M40 engine
- Ignition system
- Lubrication system
- Cooling system
- Supply system
- Fuel injection
- Exhaust system
- Transmission
- Clutch
- Manual gearbox
- Front axle
- Rear axle
- Chassis
- Steering
- Brake system
- Body
- Exterior
- Interior
- Electrical equipment
- Heating system
- Equipment and devices
- Electrical circuits
- General information
- Specifications
- Operation and maintenance
- 4-cylinder engine
- Engine repair
- Cooling and lubrication system
- Supply system
- Ignition system
- 6-cylinder engine
- Engine repair
- Cooling and lubrication system
- Supply system
- Fuel injection system
- Ignition system
- Transmission
- Clutch
- 4-speed manual gearbox
- 5-speed manual gearbox
- Automatic gearbox
- Cardan and rear axle
- Chassis
- Steering
- Front suspension
- Rear suspension
- Brake system
- Electrical equipment
- Equipment and devices
- Electrical circuits