



- Home
- BMW 3 Series
- E46
- General information
- Manual
- Seats — adjustment
Seats — adjustment (BMW 3 Series E46)
The most modern methods were used in the development of the seats.
The reinforced supporting structure of the seats, together with the seat belts, belt limiters and tensioners and, of course, the airbags, ensures the highest level of safety. Thanks to the multi-layer structure of the filler of the ergonomic seats, the high percentage of natural fibres and the sophisticated internal ventilation system of the seat, the person feels relaxed and does not get tired while driving - and even on long journeys. The lumbar support ensures an optimal position of the spine.
For your personal safety, please follow these seat adjustment guidelines.
Do not adjust the driver's seat while driving. Unexpected movement may cause loss of control of the vehicle and lead to an accident.
The seat belt should fit as tightly as possible to the body. Otherwise, in a frontal collision, the lap belt may jump up the hips and injure the lower abdomen. In addition, if the belt does not fit tightly, its restraining effect is realized with a delay.
It is not permissible for the back of the front seat to be reclined too far back while the vehicle is moving (this applies primarily to the passenger seat), since in the event of an accident there is a risk of a person "slipping" under the seat belt, which will not be able to perform its protective function.
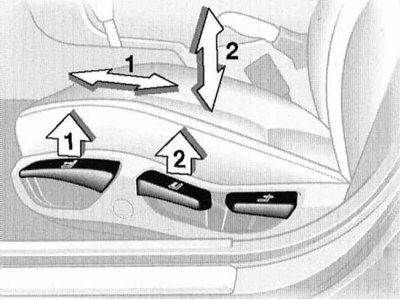
1. Longitudinal adjustment.
Pull the handle to move the seat to a comfortable position.
After releasing the handle, gently rock the seat back and forth until it locks securely.
2. Height adjustment.
Pull the handle to adjust the seat height by loading the cushion with your own weight or by standing up from it.
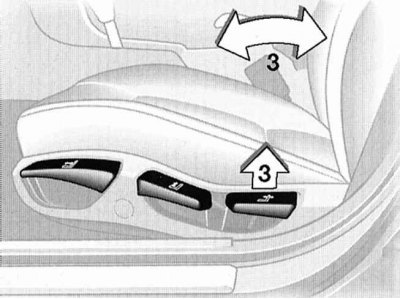
3. Backrest adjustment.
Pull the handle to adjust the backrest angle, leaning back or forward.
To relieve the spinal discs, sit with the maximum shift back, leaning your entire back on the seat back. The ideal position is considered to be one in which the head is in a straight line with the spine.
To reduce muscle tension during long journeys, you can slightly increase the tilt of the backrest. However, it should still be possible to control the car with your arms slightly bent at the elbows, resting on the highest point of the steering wheel.
After adjusting the seat, adjust the seat belt height, refer to Section Security systems.
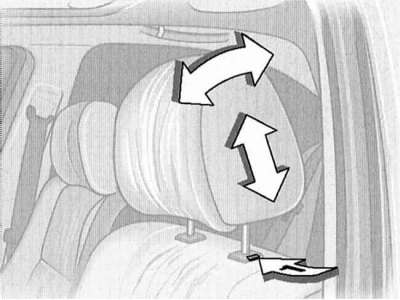
The headrests can be adjusted in height by pulling them out of their sockets or pushing them back in.
To move the headrests to the lowest position, press button 1.
The angle of the front seat headrests can be adjusted by turning them around a horizontal axis.
Head restraints reduce the traumatic effects of accidents on the cervical vertebrae.
The center of the headrests should be approximately at ear level.
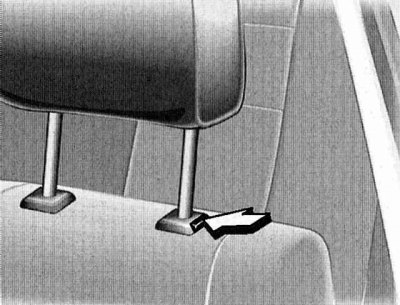
Pull the headrest up as far as it will go.
Click the button (shown by arrow) and remove the headrest.
Click the button (shown by arrow) and insert the headrest into the guides.
Adjust the position of the headrest.
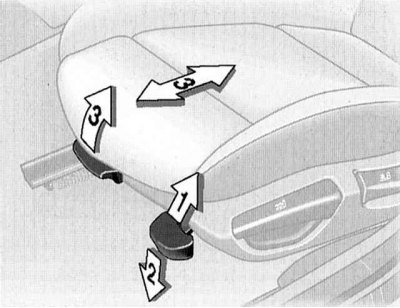
This seat has the additional ability to adjust the angle of the cushion and thigh support.
1. Tilt up: Pull the handle up several times until the seat cushion reaches a comfortable position for you.
2. Tilt down: Press the handle several times until the seat cushion reaches a comfortable position for you.
3. Knee support: Pull the handle to bring the knee support to a comfortable position for you.
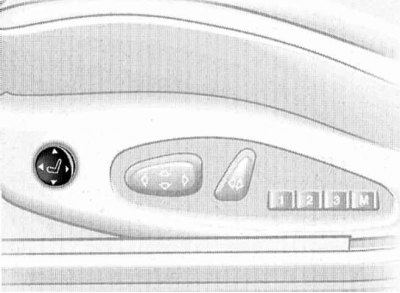
The contour of the back can be modified so that its protruding part fits into the hollow of the lumbar spine, creating support for it.
This provides support for the upper pelvis and spine, facilitating a correct and free posture.
By pressing the switch at the front or back, the convexity of the backrest contour is increased or decreased, respectively.
Pressing the top or bottom of the switch increases the convexity of the top or bottom of the lumbar support.
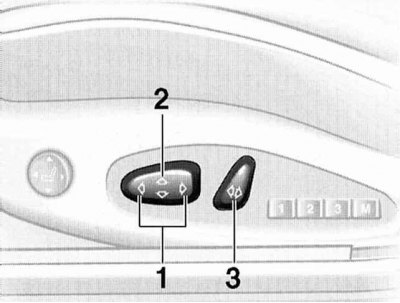
1. Longitudinal adjustment of the seat.
2. Seat height adjustment.
3. Backrest tilt adjustment.
The headrest is adjusted manually.
For your personal safety, please follow the adjustment instructions provided earlier in this Section.
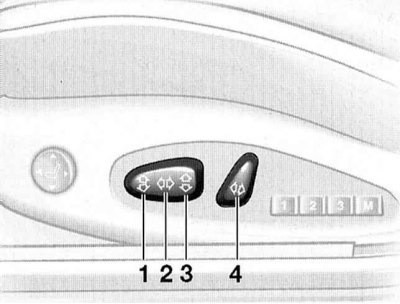
1. Adjusting the angle of the pillow.
2. Longitudinal adjustment of the seat.
3. Seat height adjustment.
4. Backrest tilt adjustment.
The headrest and knee support are adjusted manually.
For your safety, please follow the adjustment instructions provided earlier in this Section.
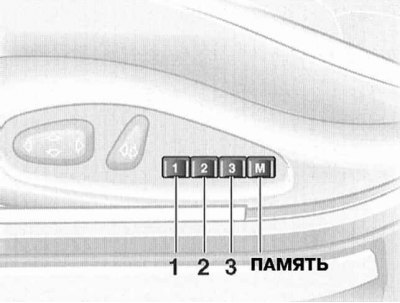
It is possible to memorize and recall up to three seat adjustment options.
The device does not remember the position of the lumbar support.
1. Insert the key into the ignition switch and turn it to position 1 or 2.
2. Adjust the seat to a comfortable position.
3. Press the Memory button. The indicator lamp built into it will light.
4. Press key 1, 2 or 3 at your discretion. The indicator lamp will go out.
Ignition key in position 1:
Press and hold the desired key (1, 2 or 3).
If you operate any of the seat adjustment switches or press one of the memory keys, the setup process will be interrupted immediately.
The driver's door is closed and the key in the ignition is turned to position 0 or 2 or removed from the ignition:
The desired key (1, 2 or 3) must be kept pressed until the installation process is complete.
If you accidentally press the MEMORY button, press it again to turn off the indicator lamp.
Do not turn on the playback function while driving, as unexpected movement of the seat may cause an accident.
# You can set up your car so that when you unlock it using your personal key remote control, the seat will automatically move to a position that is comfortable for you.
If you are using the memory unit in the key, make sure that the space behind the driver's seat is clear before unlocking the car. Otherwise, objects on the floor may be damaged when the seat is moved back.
The reinforced supporting structure of the seats, together with the seat belts, belt limiters and tensioners and, of course, the airbags, ensures the highest level of safety. Thanks to the multi-layer structure of the filler of the ergonomic seats, the high percentage of natural fibres and the sophisticated internal ventilation system of the seat, the person feels relaxed and does not get tired while driving - and even on long journeys. The lumbar support ensures an optimal position of the spine.
Seat adjustment
For your personal safety, please follow these seat adjustment guidelines.
Do not adjust the driver's seat while driving. Unexpected movement may cause loss of control of the vehicle and lead to an accident.
The seat belt should fit as tightly as possible to the body. Otherwise, in a frontal collision, the lap belt may jump up the hips and injure the lower abdomen. In addition, if the belt does not fit tightly, its restraining effect is realized with a delay.
It is not permissible for the back of the front seat to be reclined too far back while the vehicle is moving (this applies primarily to the passenger seat), since in the event of an accident there is a risk of a person "slipping" under the seat belt, which will not be able to perform its protective function.
Manually adjustable seat
1. Longitudinal adjustment.
Pull the handle to move the seat to a comfortable position.
After releasing the handle, gently rock the seat back and forth until it locks securely.
2. Height adjustment.
Pull the handle to adjust the seat height by loading the cushion with your own weight or by standing up from it.
3. Backrest adjustment.
Pull the handle to adjust the backrest angle, leaning back or forward.
Correct fit
To relieve the spinal discs, sit with the maximum shift back, leaning your entire back on the seat back. The ideal position is considered to be one in which the head is in a straight line with the spine.
To reduce muscle tension during long journeys, you can slightly increase the tilt of the backrest. However, it should still be possible to control the car with your arms slightly bent at the elbows, resting on the highest point of the steering wheel.
After adjusting the seat, adjust the seat belt height, refer to Section Security systems.
Headrests
Adjustment
The headrests can be adjusted in height by pulling them out of their sockets or pushing them back in.
To move the headrests to the lowest position, press button 1.
The angle of the front seat headrests can be adjusted by turning them around a horizontal axis.
Head restraints reduce the traumatic effects of accidents on the cervical vertebrae.
The center of the headrests should be approximately at ear level.
Removal
Pull the headrest up as far as it will go.
Click the button (shown by arrow) and remove the headrest.
Installation
Click the button (shown by arrow) and insert the headrest into the guides.
Adjust the position of the headrest.
Signature sports seat*
This seat has the additional ability to adjust the angle of the cushion and thigh support.
1. Tilt up: Pull the handle up several times until the seat cushion reaches a comfortable position for you.
2. Tilt down: Press the handle several times until the seat cushion reaches a comfortable position for you.
3. Knee support: Pull the handle to bring the knee support to a comfortable position for you.
Lumbar support*
The contour of the back can be modified so that its protruding part fits into the hollow of the lumbar spine, creating support for it.
This provides support for the upper pelvis and spine, facilitating a correct and free posture.
By pressing the switch at the front or back, the convexity of the backrest contour is increased or decreased, respectively.
Pressing the top or bottom of the switch increases the convexity of the top or bottom of the lumbar support.
Seat with electric adjustment*
1. Longitudinal adjustment of the seat.
2. Seat height adjustment.
3. Backrest tilt adjustment.
The headrest is adjusted manually.
For your personal safety, please follow the adjustment instructions provided earlier in this Section.
Signature sports seat
1. Adjusting the angle of the pillow.
2. Longitudinal adjustment of the seat.
3. Seat height adjustment.
4. Backrest tilt adjustment.
The headrest and knee support are adjusted manually.
For your safety, please follow the adjustment instructions provided earlier in this Section.
Seat adjustment memory*
It is possible to memorize and recall up to three seat adjustment options.
The device does not remember the position of the lumbar support.
Memorization
1. Insert the key into the ignition switch and turn it to position 1 or 2.
2. Adjust the seat to a comfortable position.
3. Press the Memory button. The indicator lamp built into it will light.
4. Press key 1, 2 or 3 at your discretion. The indicator lamp will go out.
Playback
Ignition key in position 1:
Press and hold the desired key (1, 2 or 3).
If you operate any of the seat adjustment switches or press one of the memory keys, the setup process will be interrupted immediately.
The driver's door is closed and the key in the ignition is turned to position 0 or 2 or removed from the ignition:
The desired key (1, 2 or 3) must be kept pressed until the installation process is complete.
If you accidentally press the MEMORY button, press it again to turn off the indicator lamp.
Do not turn on the playback function while driving, as unexpected movement of the seat may cause an accident.
# You can set up your car so that when you unlock it using your personal key remote control, the seat will automatically move to a position that is comfortable for you.
If you are using the memory unit in the key, make sure that the space behind the driver's seat is clear before unlocking the car. Otherwise, objects on the floor may be damaged when the seat is moved back.
This article is available at russian, bulgarian, belarusian, ukrainian, serbian, croatian, romanian, polish, slovak, hungarian
Article verified: Sevastyanov Nikolay
Share information:
Previous articles
БМВ E46: Manual
Next articles
Similar articles on other types of BMW cars:
Seats — description and adjustment BMW 5 Series E39 (1995-2003)
Control dimensions and adjustment data. Cars produced since 1986 BMW 7 Series E32 (1986-1994)
Adjustment probe (M47 T2) BMW X3 E83 (2003-2010)
Headlight re-adjustment BMW X5 E53 (1999-2006)
Seats — description and adjustment BMW 5 Series E39 (1995-2003)
Control dimensions and adjustment data. Cars produced since 1986 BMW 7 Series E32 (1986-1994)
Adjustment probe (M47 T2) BMW X3 E83 (2003-2010)
Headlight re-adjustment BMW X5 E53 (1999-2006)
Link in different formats to this page
Visitor comments
No comments yet
- General information
- Manual
- Maintenance
- Power unit
- Engine repair
- Cooling system
- Power system (gasoline)
- Injection system (gasoline)
- Fuel system (diesel)
- Exhaust system
- Ignition system
- Charge and launch systems
- Transmission
- Car gearbox
- Clutch and drive shafts
- Chassis
- Brake system
- Suspension front and rear
- Steering
- Body
- Body care and repair
- Exterior
- Interior
- Electrical equipment
- Troubleshooting
- Lighting and signaling
- Equipment and devices
- Heater and air conditioner
- Electrical circuits
- General information
- Manual
- Repair on the road
- Weekly checks
- Maintenance
- Troubleshooting
- Power unit
- 4 cylinder engines
- 6 cylinder engines
- Engine overhaul
- Cooling and heating
- Fuel and exhaust system
- Starting and charging system
- Ignition system
- Transmission
- Clutch
- Mechanical gearbox
- Automatic gearbox
- Cardan and drive shafts
- Chassis
- Brake system
- Wheel suspension
- Steering
- Body
- Exterior
- Interior
- Electrical equipment
- Equipment and devices
- Electrical circuits
- General information
- Maintenance
- Power unit
- Engine repair
- Cooling system
- Ignition system
- Supply system
- Fuel injection system
- Exhaust system
- Transmission
- Clutch
- Car gearbox
- Front and rear axle
- Chassis
- Steering
- Brake system
- Body
- Exterior
- Interior
- Electrical equipment
- Heating system
- Equipment and devices
- Power devices
- Electrical circuits
- Power unit
- M10/M20 engine
- M40 engine
- Ignition system
- Lubrication system
- Cooling system
- Supply system
- Fuel injection
- Exhaust system
- Transmission
- Clutch
- Manual gearbox
- Front axle
- Rear axle
- Chassis
- Steering
- Brake system
- Body
- Exterior
- Interior
- Electrical equipment
- Heating system
- Equipment and devices
- Electrical circuits
- General information
- Specifications
- Operation and maintenance
- 4-cylinder engine
- Engine repair
- Cooling and lubrication system
- Supply system
- Ignition system
- 6-cylinder engine
- Engine repair
- Cooling and lubrication system
- Supply system
- Fuel injection system
- Ignition system
- Transmission
- Clutch
- 4-speed manual gearbox
- 5-speed manual gearbox
- Automatic gearbox
- Cardan and rear axle
- Chassis
- Steering
- Front suspension
- Rear suspension
- Brake system
- Electrical equipment
- Equipment and devices
- Electrical circuits