
Table of contents: Checking the condition of the…↓ Checking and adjusting the wiper arm…↓
- Home
- BMW 3 Series
- E46
- General information
- Maintenance
- Checking the condition, replacing the brushes and adjusting the angle of the windshield wipers
Checking the condition, replacing the brushes and adjusting the angle of the windshield wipers (BMW 3 Series E46)
1. Over time, road film accumulates on windshield wipers, reducing their effectiveness, so wipers should be washed regularly in a mild cleaning solution.
2. Windscreen wiper assemblies and blades should be inspected regularly. If inspection reveals hardening or cracks in the blade rubber, replace the blades. If inspection reveals nothing unusual, wet the windscreen, turn on the wipers, let them run for a while, and turn them off. Uneven marks from the blades on the glass or streaks on clean glass indicate that the blades should be replaced.
3. If the brushes do not clean the windshield well enough, the following reasons may be possible:
When your car goes through an automatic car wash, wax particles get on your windshield. These particles can be removed by adding a wax-dissolving detergent to your windshield washer fluid.
Filling the fluid reservoir with a glass cleaner with wax-dissolving properties can significantly improve the performance of the wipers. Grease-dissolving cleaners are not able to completely clean the glass.
If the brushes are damaged, they should be replaced.
The angle of installation of the windshield wiper arms does not correspond to the required one.
During operation of the windscreen wiper mechanism, the mounting nuts may become loose, so they should be checked and, if necessary, tightened each time the wipers are checked.
4. Turn the windshield wipers on and off, they will return to their original position.
5. Check the distance between the wiper blade rubber and the base of the glass, which should be 20 mm on the windshield.
6. Set the windshield wiper arms to their original position. To do this, wet the windshield with water. Turn on the windshield wiper briefly and stop it with the switch.
7. Remove the brush.

8. Move the lever "2". Install the special HAZET tool and secure it with the screw "3".
9. Carefully pull back the lever. The HAZET tool should be in contact with the glass at three points.
10. Check the installation angle on the instrument scale and compare with the required value.
Required value: -3°±2°.
11. Move the lever slightly away from the glass and turn it slightly with a 24 mm wrench "1".
12. Check the installation angle again and adjust it if necessary so that the scale shows the required value.
13. After this, remove the tool, install it again and fix it. Check the installation angle again, adjust if necessary.
Checking the condition of the brushes and the initial position of the wiper arm
2. Windscreen wiper assemblies and blades should be inspected regularly. If inspection reveals hardening or cracks in the blade rubber, replace the blades. If inspection reveals nothing unusual, wet the windscreen, turn on the wipers, let them run for a while, and turn them off. Uneven marks from the blades on the glass or streaks on clean glass indicate that the blades should be replaced.
3. If the brushes do not clean the windshield well enough, the following reasons may be possible:
When your car goes through an automatic car wash, wax particles get on your windshield. These particles can be removed by adding a wax-dissolving detergent to your windshield washer fluid.
Filling the fluid reservoir with a glass cleaner with wax-dissolving properties can significantly improve the performance of the wipers. Grease-dissolving cleaners are not able to completely clean the glass.
If the brushes are damaged, they should be replaced.
The angle of installation of the windshield wiper arms does not correspond to the required one.
During operation of the windscreen wiper mechanism, the mounting nuts may become loose, so they should be checked and, if necessary, tightened each time the wipers are checked.
Examination
4. Turn the windshield wipers on and off, they will return to their original position.
5. Check the distance between the wiper blade rubber and the base of the glass, which should be 20 mm on the windshield.
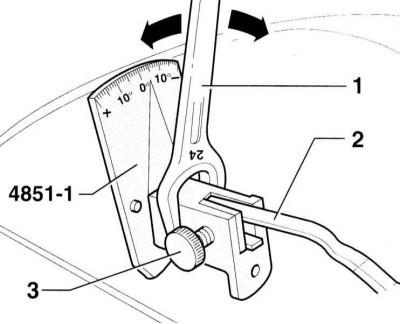
Checking and adjusting the wiper arm angle
The windscreen wiper arm angle must be checked if the glass cleaning efficiency is low or if the wipers move unevenly or vibrate during operation. The special HAZET 4851-1 tool is required for adjustment.
Examination
6. Set the windshield wiper arms to their original position. To do this, wet the windshield with water. Turn on the windshield wiper briefly and stop it with the switch.
7. Remove the brush.
8. Move the lever "2". Install the special HAZET tool and secure it with the screw "3".
9. Carefully pull back the lever. The HAZET tool should be in contact with the glass at three points.
10. Check the installation angle on the instrument scale and compare with the required value.
Required value: -3°±2°.
Adjustment
11. Move the lever slightly away from the glass and turn it slightly with a 24 mm wrench "1".
12. Check the installation angle again and adjust it if necessary so that the scale shows the required value.
13. After this, remove the tool, install it again and fix it. Check the installation angle again, adjust if necessary.
This article is available at russian, bulgarian, belarusian, ukrainian, serbian, croatian, romanian, polish, slovak, hungarian
Article verified: Sevastyanov Nikolay
Share information:
Previous articles
БМВ E46: Maintenance
Next articles
Similar articles on other types of BMW cars:
Checking the condition and replacing the windshield wipers BMW 5 Series E28 (1981-1988)
Checking/replacing the windshield washer pump BMW 5 Series E39 (1995-2003)
Checking the condition of the windshield wipers and adjusting the… BMW 7 Series E38 (1994-2001)
Valve guides — checking and replacing BMW 7 Series E32 (1986-1994)
Identifying engine faults by the condition of spark plugs BMW X3 E83 (2003-2010)
Checking the windshield wipers BMW X5 E53 (1999-2006)
Link in different formats to this page
Visitor comments
No comments yet
- General information
- Manual
- Maintenance
- Power unit
- Engine repair
- Cooling system
- Power system (gasoline)
- Injection system (gasoline)
- Fuel system (diesel)
- Exhaust system
- Ignition system
- Charge and launch systems
- Transmission
- Car gearbox
- Clutch and drive shafts
- Chassis
- Brake system
- Suspension front and rear
- Steering
- Body
- Body care and repair
- Exterior
- Interior
- Electrical equipment
- Troubleshooting
- Lighting and signaling
- Equipment and devices
- Heater and air conditioner
- Electrical circuits
- General information
- Manual
- Repair on the road
- Weekly checks
- Maintenance
- Troubleshooting
- Power unit
- 4 cylinder engines
- 6 cylinder engines
- Engine overhaul
- Cooling and heating
- Fuel and exhaust system
- Starting and charging system
- Ignition system
- Transmission
- Clutch
- Mechanical gearbox
- Automatic gearbox
- Cardan and drive shafts
- Chassis
- Brake system
- Wheel suspension
- Steering
- Body
- Exterior
- Interior
- Electrical equipment
- Equipment and devices
- Electrical circuits
- General information
- Maintenance
- Power unit
- Engine repair
- Cooling system
- Ignition system
- Supply system
- Fuel injection system
- Exhaust system
- Transmission
- Clutch
- Car gearbox
- Front and rear axle
- Chassis
- Steering
- Brake system
- Body
- Exterior
- Interior
- Electrical equipment
- Heating system
- Equipment and devices
- Power devices
- Electrical circuits
- Power unit
- M10/M20 engine
- M40 engine
- Ignition system
- Lubrication system
- Cooling system
- Supply system
- Fuel injection
- Exhaust system
- Transmission
- Clutch
- Manual gearbox
- Front axle
- Rear axle
- Chassis
- Steering
- Brake system
- Body
- Exterior
- Interior
- Electrical equipment
- Heating system
- Equipment and devices
- Electrical circuits
- General information
- Specifications
- Operation and maintenance
- 4-cylinder engine
- Engine repair
- Cooling and lubrication system
- Supply system
- Ignition system
- 6-cylinder engine
- Engine repair
- Cooling and lubrication system
- Supply system
- Fuel injection system
- Ignition system
- Transmission
- Clutch
- 4-speed manual gearbox
- 5-speed manual gearbox
- Automatic gearbox
- Cardan and rear axle
- Chassis
- Steering
- Front suspension
- Rear suspension
- Brake system
- Electrical equipment
- Equipment and devices
- Electrical circuits